前言
2016年4月21日,阿里巴巴在Qcon大会上宣布跨平台移动开发工具Weex开放内测邀请。Weex能够完美兼顾性能与动态性,让移动开发者通过简捷的前端语法写出Native级别的性能体验,并支持iOS、安卓、YunOS及Web等多端部署。
近一年来,ReactNative 和 Weex 这些跨平台技术对Native开发者来说,冲击是巨大的。Native在开发App的时候存在一些弊端,比如客户端需要频繁更新,iOS更新时间还要受到审核的牵制;iOS、Android和前端同时开发同一个需求,在人员成本上消耗大;Hybrid的性能和Native相比又差了一点。
ReactNative 和 Weex的出现,就是为了解决这些痛点的。
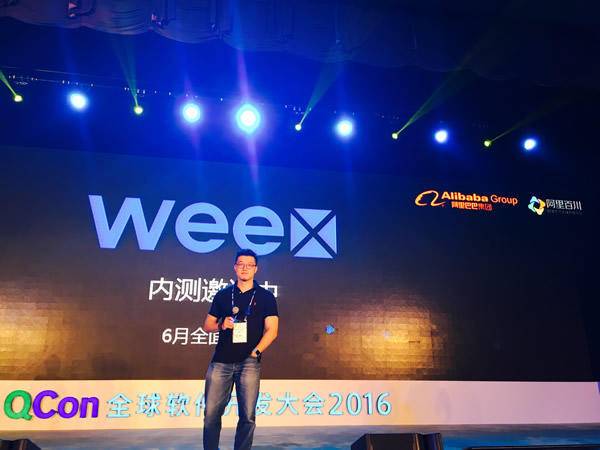
从4月21号宣布内测以后,短短两周就有超过5000名开发者申请。
2016年6月30日阿里巴巴正式宣布Weex开源。号称可以用Web方式,开发Native级性能体验的亿级应用匠心打造跨平台移动开发工具Weex在开源首日就登上Github趋势榜首位,截止目前为止,Weex在GitHub上的Star数已经到达了13393了。成为中国2016年在Github上最热门的开源项目之一。
目录
- 1.Weex概述
- 2.Weex工作原理
- 3.Weex在iOS上是如何跑起来的
- 4.关于Weex,ReactNative,JSPatch
一. Weex概述
Weex从出生那天起,仿佛就是和ReactNative是“一对”。
ReactNative宣称“Learn once, write anywhere”,而Weex宣称“Write Once, Run Everywhere”。Weex从出生那天起,就被给予了一统三端的厚望。ReactNative可以支持iOS、Android,而Weex可以支持iOS、Android、HTML5。一统三端就解决了前言里面说的第二个痛点,同时开发浪费人员成本的问题。
Native移动开发者只需要在本地导入Weex的SDK,就可以通过HTML/CSS/JavaScript网页的这套编程语言来开发Native级别的Weex界面。这意味着可以直接用现有Web开发的编辑器和IDE的代码补全、提示、检查等功能。从而也给前端人员开发Native端,较低的开发成本和学习成本。
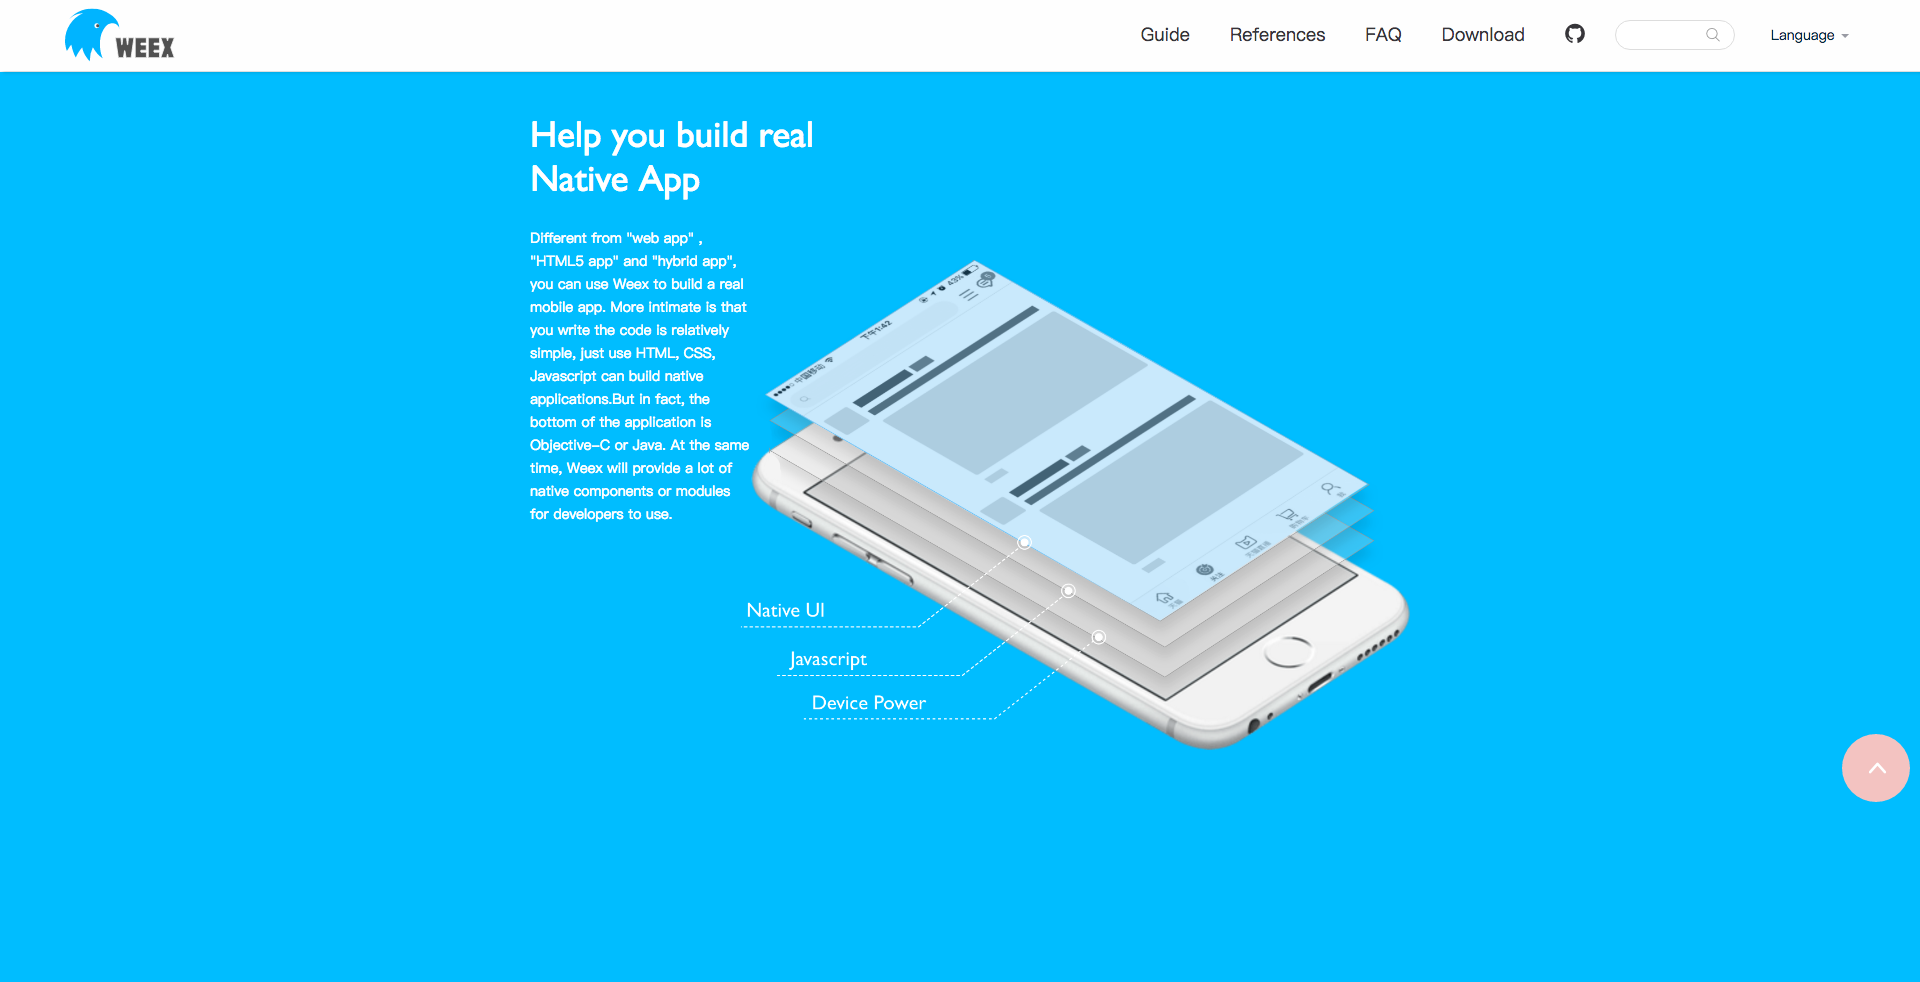
Weex是一种轻量级、可扩展、高性能框架。集成也很方便,可以直接在HTML5页面嵌入,也可嵌在原生UI中。由于和ReactNative一样,都会调用Native端的原生控件,所以在性能上比Hybrid高出一个层次。这就解决了前言里面所说的第三个痛点,性能问题。

Weex非常轻量,体积小巧,语法简单,方便接入和上手。ReactNative官方只允许将ReactNative基础JS库和业务JS一起打成一个JS bundle,没有提供分包的功能,所以如果想节约流量就必须制作分包打包工具。而Weex默认打的JS bundle只包含业务JS代码,体积小很多,基础JS库包含在Weex SDK中,这一点Weex与Facebook的React Native和微软的Cordova相比,Weex更加轻量,体积小巧。把Weex生成的JS bundle轻松部署到服务器端,然后Push到客户端,或者客户端请求新的资源即可完成发布。如此快速的迭代就解决了前言里面说的第一个痛点,发布无法控制时间,
Weex中Native组件和API都可以横向扩展,业务方可去中心化横向灵活化定制组件和功能模块。并且还可以直接复用Web前端的工程化管理和监控性能等工具。
知乎上有一个关于Weex 和 ReactNative很好的对比文章weex&ReactNative对比,推荐大家阅读。
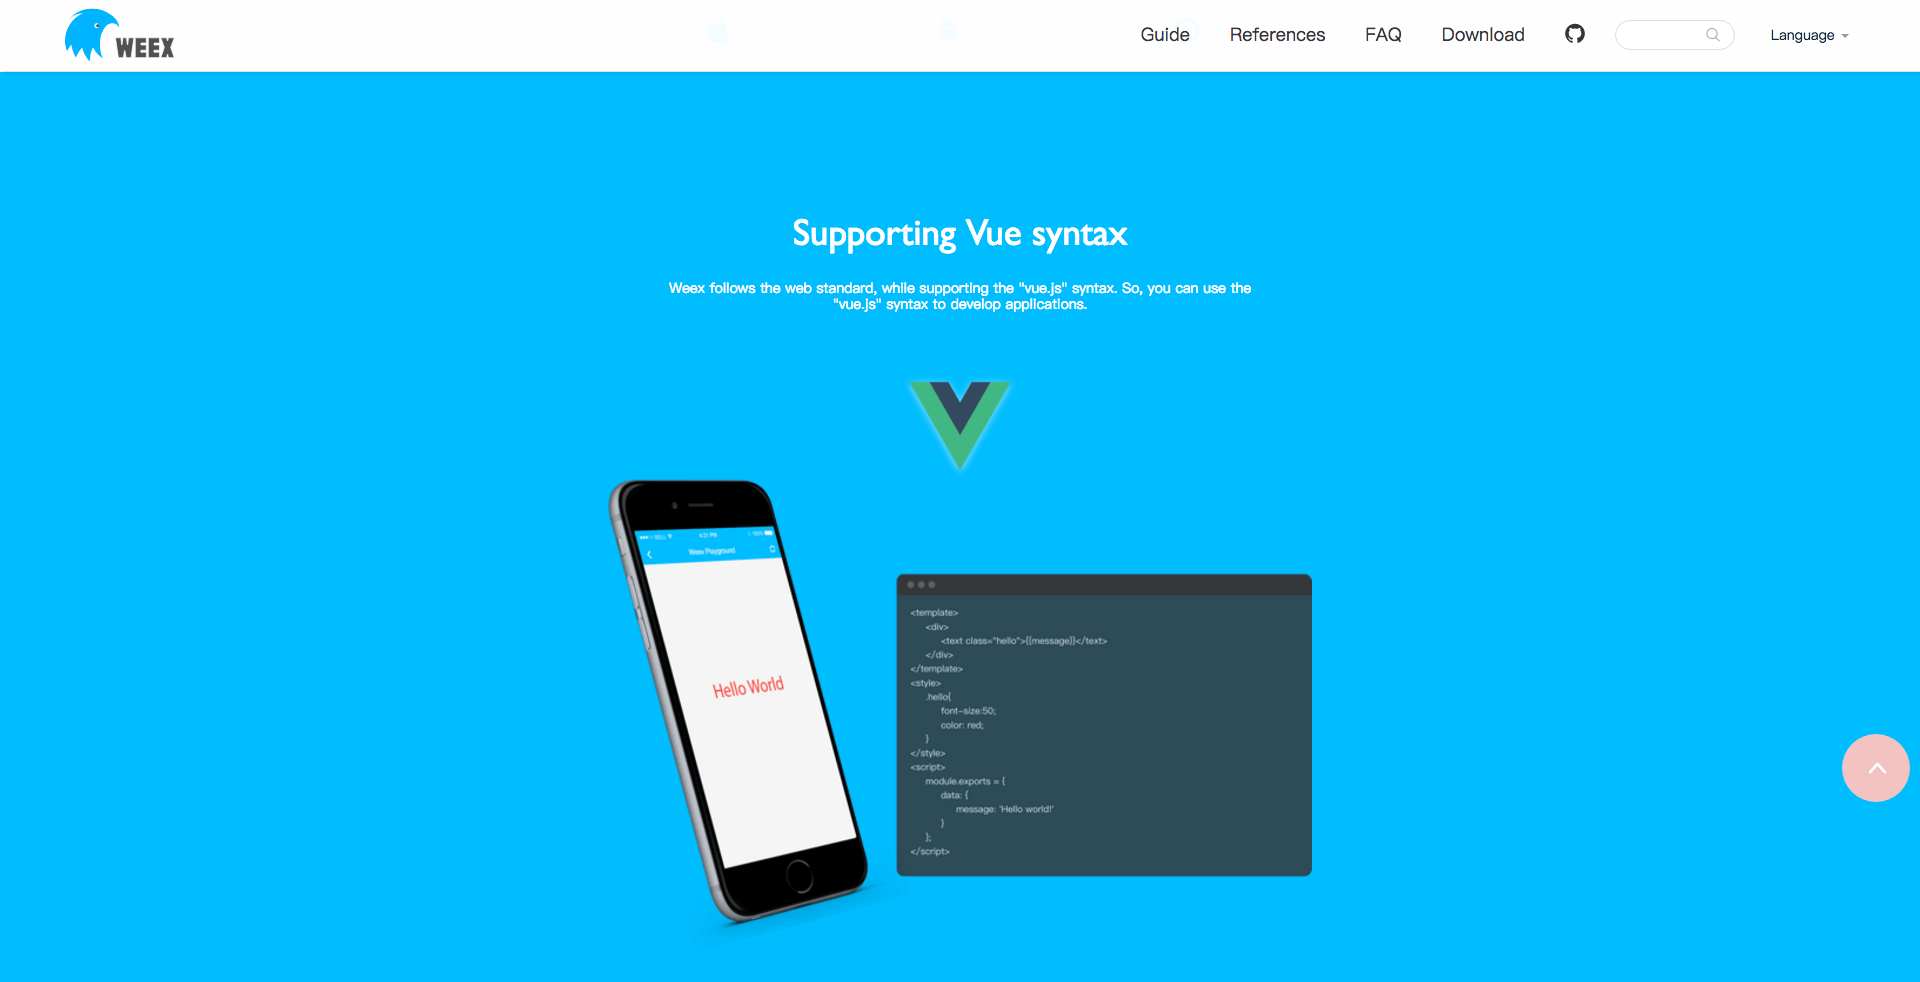
Weex在2017年2月17日正式发布v0.10.0,这个里程碑的版本开始完美的兼容Vue.js开发Weex界面。
Weex又于2017年2月24 迁移至 Apache 基金会,阿里巴巴会基于 Apache 的基础设施继续迭代。并启用了全新的 GitHub 仓库:https://github.com/apache/incubator-weex
故以下源码分析都基于v0.10.0这个版本。
二. Weex工作原理
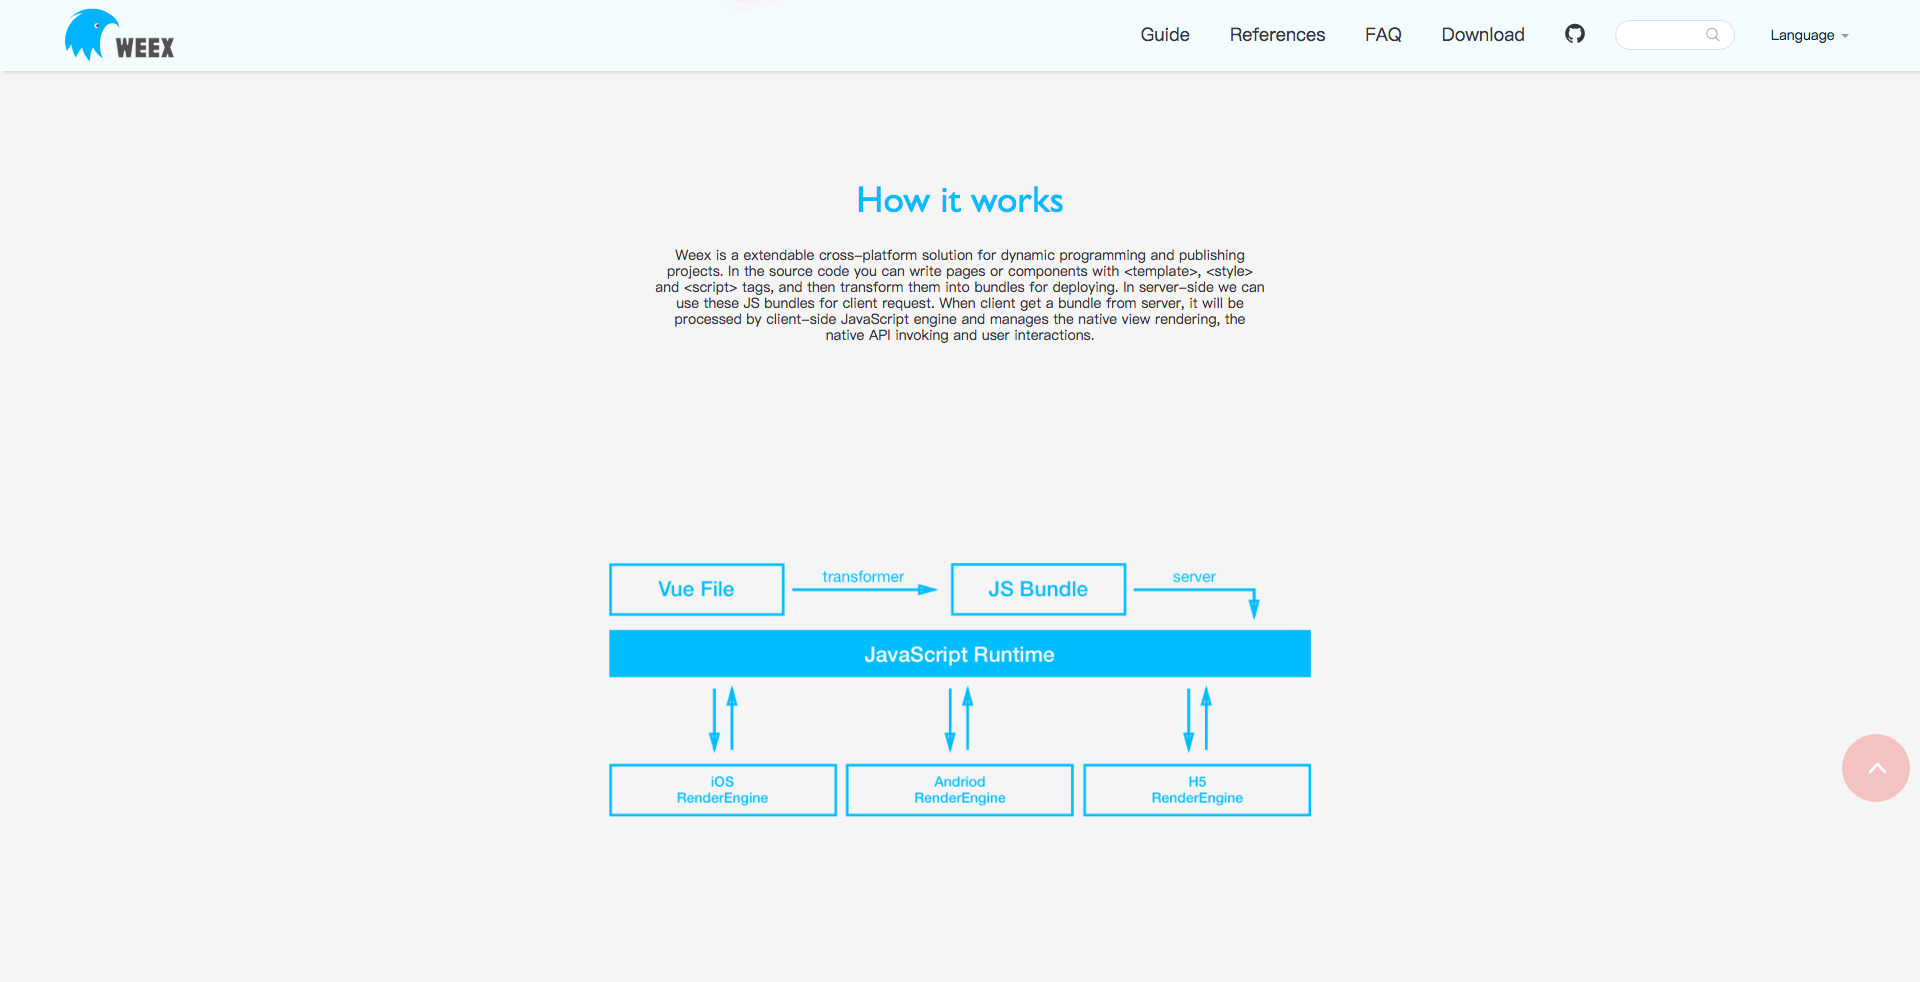
上图是官方给的一张原理图,Weex是如何把JS打包成JS Bundle的原理本篇文章暂时不涉及。本篇文章会详细分析Weex是如何在Native端工作的。笔者把Native端的原理再次细分,如下图:

Weex可以通过自己设计的DSL,书写.we文件或者.vue文件来开发界面,整个页面书写分成了3段,template、style、script,借鉴了成熟的MVVM的思想。
Weex在性能方面,为了尽可能的提升客户端的性能,DSL的Transformer全部都放在了服务器端实现,Weex会在服务器端将XML + CSS + JavaScript 代码全部都转换成JS Bundle。服务器将JS Bundle部署到Server上和CDN上。
Weex和React Native不同的是,Weex把JS Framework内置在SDK里面,用来解析从服务器上下载的JS Bundle,这样也减少了每个JS Bundle的体积,不再有React Native需要分包的问题。客户端请求完JS Bundle以后,传给JS Framework,JS Framework解析完成以后会输出Json格式的Virtual DOM,客户端Native只需要专心负责 Virtual DOM 的解析和布局、UI 渲染。然而这一套解析,布局,渲染的逻辑SDK基本实现了。
最后Weex支持三端一致,服务器上的一份JS Bundle,通过解析,实现iOS/Android/HTML5 三端的一致性。
三. Weex在iOS上是如何跑起来的
经过上一章的分析,我们知道了Weex的整体流程,由于笔者前端知识匮乏,所以从.we或者.vue文件到JS bundle前端这部分的源码分析本文暂时不涉及,等笔者熟悉前端以后,这块还会再补上来。
分析之前先说明一点,Weex的所有源码其实已经开源了,至于SDK的Demo里面还依赖了一个ATSDK.framework,这个是没有开源的。ATSDK.framework这个其实是Weex性能监控的插件。
就是上图中的那个灰色的框框的插件。这个插件有些大厂有自己的APM,阿里暂时没有开源这块,但是对Weex所有功能是不影响的。
那么接下来就详细分析一下在iOS Native端,Weex是如何跑起来的。直接上源码分析。
(一). Weex SDK初始化
这是Native端想把Weex跑起来的第一步。
- (BOOL)application:(UIApplication *)application didFinishLaunchingWithOptions:(NSDictionary *)launchOptions
{
    self.window = [[UIWindow alloc] initWithFrame:[UIScreen mainScreen].bounds];
    self.window.backgroundColor = [UIColor whiteColor];

    // 在这里进行初始化SDK
    [self initWeexSDK];

    self.window.rootViewController = [[WXRootViewController alloc] initWithRootViewController:[self demoController]];
    [self.window makeKeyAndVisible];

    return YES;
}
在application: didFinishLaunchingWithOptions:函数里面初始化SDK。这里会初始化很多东西。可能有人会问了,初始化写在这里,还初始化这么多东西,不会卡App的启动时间么?带着这个问题继续往下看吧。
#pragma mark weex
- (void)initWeexSDK
{
    [WXAppConfiguration setAppGroup:@"AliApp"];
    [WXAppConfiguration setAppName:@"WeexDemo"];
    [WXAppConfiguration setExternalUserAgent:@"ExternalUA"];

    [WXSDKEngine initSDKEnvironment];

    [WXSDKEngine registerHandler:[WXImgLoaderDefaultImpl new] withProtocol:@protocol(WXImgLoaderProtocol)];
    [WXSDKEngine registerHandler:[WXEventModule new] withProtocol:@protocol(WXEventModuleProtocol)];

    [WXSDKEngine registerComponent:@"select" withClass:NSClassFromString(@"WXSelectComponent")];
    [WXSDKEngine registerModule:@"event" withClass:[WXEventModule class]];
    [WXSDKEngine registerModule:@"syncTest" withClass:[WXSyncTestModule class]];

#if !(TARGET_IPHONE_SIMULATOR)
    [self checkUpdate];
#endif

#ifdef DEBUG
    [self atAddPlugin];
    [WXDebugTool setDebug:YES];
    [WXLog setLogLevel:WXLogLevelLog];

    #ifndef UITEST
        [[ATManager shareInstance] show];
    #endif
#else
    [WXDebugTool setDebug:NO];
    [WXLog setLogLevel:WXLogLevelError];
#endif
}
上述就是要在application: didFinishLaunchingWithOptions:里面初始化的全部内容。我们一行一行的来解读。
WXAppConfiguration是一个用来记录App配置信息的单例对象。
@interface WXAppConfiguration : NSObject

@property (nonatomic, strong) NSString * appGroup;
@property (nonatomic, strong) NSString * appName;
@property (nonatomic, strong) NSString * appVersion;
@property (nonatomic, strong) NSString * externalUA;
@property (nonatomic, strong) NSString * JSFrameworkVersion;
@property (nonatomic, strong) NSArray  * customizeProtocolClasses;


/**
 * AppGroup的名字或者公司组织名,默认值为nil
 */
+ (NSString *)appGroup;
+ (void)setAppGroup:(NSString *) appGroup;

/**
 * app的名字, 默认值是main bundle里面的CFBundleDisplayName
 */
+ (NSString *)appName;
+ (void)setAppName:(NSString *)appName;

/**
 * app版本信息, 默认值是main bundle里面的CFBundleShortVersionString
 */
+ (NSString *)appVersion;
+ (void)setAppVersion:(NSString *)appVersion;

/**
 * app外面用户代理的名字, 所有Weex的请求头都会设置用户代理user agent字段,默认值为nil
 */
+ (NSString *)externalUserAgent;
+ (void)setExternalUserAgent:(NSString *)userAgent;

/**
 * JSFrameworkVersion的版本
 */
+ (NSString *)JSFrameworkVersion;
+ (void)setJSFrameworkVersion:(NSString *)JSFrameworkVersion;


/*
 *  自定义customizeProtocolClasses
 */
+ (NSArray*)customizeProtocolClasses;
+ (void)setCustomizeProtocolClasses:(NSArray*)customizeProtocolClasses;

@end
注意WXAppConfiguration的所有方法都是加号的类方法,内部实现是用WXAppConfiguration的单例实现的,这里用类方法是为了我们方便调用。
接下来是初始化SDK的实质代码了。
[WXSDKEngine initSDKEnvironment];
关于初始化的具体实现,见下面,里面标注了注释:
+ (void)initSDKEnvironment
{
    // 打点记录状态
    WX_MONITOR_PERF_START(WXPTInitalize)
    WX_MONITOR_PERF_START(WXPTInitalizeSync)

    // 加载本地的main.js
    NSString *filePath = [[NSBundle bundleForClass:self] pathForResource:@"main" ofType:@"js"];
    NSString *script = [NSString stringWithContentsOfFile:filePath encoding:NSUTF8StringEncoding error:nil];

    // 初始化SDK环境
    [WXSDKEngine initSDKEnvironment:script];

    // 打点记录状态
    WX_MONITOR_PERF_END(WXPTInitalizeSync)

    // 模拟器版本特殊代码
#if TARGET_OS_SIMULATOR
    static dispatch_once_t onceToken;
    dispatch_once(&onceToken, ^{
        [WXSimulatorShortcutManager registerSimulatorShortcutWithKey:@"i" modifierFlags:UIKeyModifierCommand | UIKeyModifierAlternate action:^{
            NSURL *URL = [NSURL URLWithString:@"http://localhost:8687/launchDebugger"];
            NSURLRequest *request = [NSURLRequest requestWithURL:URL];

            NSURLSession *session = [NSURLSession sharedSession];
            NSURLSessionDataTask *task = [session dataTaskWithRequest:request
                                                    completionHandler:
                                          ^(NSData *data, NSURLResponse *response, NSError *error) {
                                              // ...
                                          }];

            [task resume];
            WXLogInfo(@"Launching browser...");

            dispatch_after(dispatch_time(DISPATCH_TIME_NOW, (int64_t)(1 * NSEC_PER_SEC)), dispatch_get_main_queue(), ^{
                [self connectDebugServer:@"ws://localhost:8687/debugger/0/renderer"];
            });

        }];
    });
#endif
}
这里整个SDKEnvironment的初始化分成了四个步骤,WXMonitor监视器记录状态,加载本地的main.js,WXSDKEngine的初始化,模拟器WXSimulatorShortcutManager连接本地server。接下来一步步的分析。
1. WXMonitor监视器记录状态

WXMonitor是一个普通的对象,它里面只存储了一个线程安全的字典WXThreadSafeMutableDictionary。
@interface WXThreadSafeMutableDictionary<KeyType, ObjectType> : NSMutableDictionary
@property (nonatomic, strong) dispatch_queue_t queue;
@property (nonatomic, strong) NSMutableDictionary* dict;
@end
在这个字典初始化的时候会初始化一个queue。
- (instancetype)init
{
    self = [self initCommon];
    if (self) {
        _dict = [NSMutableDictionary dictionary];
    }
    return self;
}

- (instancetype)initCommon
{
    self = [super init];
    if (self) {
        NSString* uuid = [NSString stringWithFormat:@"com.taobao.weex.dictionary_%p", self];
        _queue = dispatch_queue_create([uuid UTF8String], DISPATCH_QUEUE_CONCURRENT);
    }
    return self;
}
每次生成一次WXThreadSafeMutableDictionary,就会有一个与之内存地址向对应的Concurrent的queue相对应。
这个queue就保证了线程安全。
- (NSUInteger)count
{
    __block NSUInteger count;
    dispatch_sync(_queue, ^{
        count = _dict.count;
    });
    return count;
}

- (id)objectForKey:(id)aKey
{
    __block id obj;
    dispatch_sync(_queue, ^{
        obj = _dict[aKey];
    });
    return obj;
}

- (NSEnumerator *)keyEnumerator
{
    __block NSEnumerator *enu;
    dispatch_sync(_queue, ^{
        enu = [_dict keyEnumerator];
    });
    return enu;
}

- (id)copy{
    __block id copyInstance;
    dispatch_sync(_queue, ^{
        copyInstance = [_dict copy];
    });
    return copyInstance;
}
count、objectForKey:、keyEnumerator、copy这四个操作都是同步操作,用dispatch_sync保护线程安全。
- (void)setObject:(id)anObject forKey:(id<NSCopying>)aKey
{
    aKey = [aKey copyWithZone:NULL];
    dispatch_barrier_async(_queue, ^{
        _dict[aKey] = anObject;
    });
}

- (void)removeObjectForKey:(id)aKey
{
    dispatch_barrier_async(_queue, ^{
        [_dict removeObjectForKey:aKey];
    });
}

- (void)removeAllObjects{
    dispatch_barrier_async(_queue, ^{
        [_dict removeAllObjects];
    });
}
setObject:forKey:、removeObjectForKey:、removeAllObjects这三个操作加上了dispatch_barrier_async。
WXMonitor在整个Weex里面担任的职责是记录下各个操作的tag值和记录成功和失败的原因。WXMonitor封装了各种宏来方便方法的调用。
#define WX_MONITOR_PERF_START(tag) [WXMonitor performancePoint:tag willStartWithInstance:nil];
#define WX_MONITOR_PERF_END(tag) [WXMonitor performancePoint:tag didEndWithInstance:nil];
#define WX_MONITOR_INSTANCE_PERF_START(tag, instance) [WXMonitor performancePoint:tag willStartWithInstance:instance];
#define WX_MONITOR_INSTANCE_PERF_END(tag, instance) [WXMonitor performancePoint:tag didEndWithInstance:instance];
#define WX_MONITOR_PERF_SET(tag, value, instance) [WXMonitor performancePoint:tag didSetValue:value withInstance:instance];
#define WX_MONITOR_INSTANCE_PERF_IS_RECORDED(tag, instance) [WXMonitor performancePoint:tag isRecordedWithInstance:instance]

// 上面这些宏都会分别对应下面这些具体的方法实现。
+ (void)performancePoint:(WXPerformanceTag)tag willStartWithInstance:(WXSDKInstance *)instance;
+ (void)performancePoint:(WXPerformanceTag)tag didEndWithInstance:(WXSDKInstance *)instance;
+ (void)performancePoint:(WXPerformanceTag)tag didSetValue:(double)value withInstance:(WXSDKInstance *)instance;
+ (BOOL)performancePoint:(WXPerformanceTag)tag isRecordedWithInstance:(WXSDKInstance *)instance;
整个操作被定义成2类,一个是全局的操作,一个是具体的操作。
typedef enum : NSUInteger {
    // global
    WXPTInitalize = 0,
    WXPTInitalizeSync,
    WXPTFrameworkExecute,
    // instance
    WXPTJSDownload,
    WXPTJSCreateInstance,
    WXPTFirstScreenRender,
    WXPTAllRender,
    WXPTBundleSize,
    WXPTEnd
} WXPerformanceTag;
在WXSDKInstance初始化之前,所有的全局的global操作都会放在WXMonitor的WXThreadSafeMutableDictionary中。当WXSDKInstance初始化之后,即WXPerformanceTag中instance以下的所有操作都会放在WXSDKInstance的performanceDict中,注意performanceDict并不是线程安全的。
举个例子:
+ (void)performancePoint:(WXPerformanceTag)tag willStartWithInstance:(WXSDKInstance *)instance
{
    NSMutableDictionary *performanceDict = [self performanceDictForInstance:instance];
    NSMutableDictionary *dict = [[NSMutableDictionary alloc] initWithCapacity:2];
    dict[kStartKey] = @(CACurrentMediaTime() * 1000);
    performanceDict[@(tag)] = dict;
}
所有的操作都会按照时间被记录下来:
    WX_MONITOR_PERF_START(WXPTInitalize)
    WX_MONITOR_PERF_START(WXPTInitalizeSync)
WXThreadSafeMutableDictionary字典里面会存类似这些数据:
{
    0 =     {
        start = "146297522.903652";
    };
    1 =     {
        start = "146578019.356428";
    };
}
字典里面会根据操作的tag作为key值。一般WX_MONITOR_PERF_START和WX_MONITOR_PERF_END是成对出现的,初始化结束以后就会调用WX_MONITOR_PERF_END。最终字典里面会保存成下面的样子:
{
    0 =     {
        end = "148750673.312226";
        start = "148484241.723654";
    };
    1 =     {
        end = "148950673.312226";
        start = "148485865.699819";
    };
}
WXMonitor里面还会记录一些成功和失败的信息:
#define WX_MONITOR_SUCCESS_ON_PAGE(tag, pageName) [WXMonitor monitoringPointDidSuccess:tag onPage:pageName];
#define WX_MONITOR_FAIL_ON_PAGE(tag, errorCode, errorMessage, pageName) \
NSError *error = [NSError errorWithDomain:WX_ERROR_DOMAIN \
                                     code:errorCode \
                                 userInfo:@{NSLocalizedDescriptionKey:(errorMessage?:@"No message")}]; \
[WXMonitor monitoringPoint:tag didFailWithError:error onPage:pageName];

#define WX_MONITOR_SUCCESS(tag) WX_MONITOR_SUCCESS_ON_PAGE(tag, nil)
#define WX_MONITOR_FAIL(tag, errorCode, errorMessage) WX_MONITOR_FAIL_ON_PAGE(tag, errorCode, errorMessage, nil)

// 上面这些宏都会分别对应下面这些具体的方法实现。
+ (void)monitoringPointDidSuccess:(WXMonitorTag)tag onPage:(NSString *)pageName;
+ (void)monitoringPoint:(WXMonitorTag)tag didFailWithError:(NSError *)error onPage:(NSString *)pageName;
这些函数暂时这里没有用到,暂时先不解析了。
2. 加载本地的main.js

SDK里面会带一个main.js,直接打开这个文件会看到一堆经过webpack压缩之后的文件。这个文件的源文件在https://github.com/apache/incubator-weex/tree/master/html5目录下。对应的入口文件是 html5/render/native/index.js
import { subversion } from '../../../package.json'
import runtime from '../../runtime'
import frameworks from '../../frameworks/index'
import services from '../../services/index'

const { init, config } = runtime
config.frameworks = frameworks
const { native, transformer } = subversion

for (const serviceName in services) {
  runtime.service.register(serviceName, services[serviceName])
}

runtime.freezePrototype()
runtime.setNativeConsole()

// register framework meta info
global.frameworkVersion = native
global.transformerVersion = transformer

// init frameworks
const globalMethods = init(config)

// set global methods
for (const methodName in globalMethods) {
  global[methodName] = (...args) => {
    const ret = globalMethods[methodName](...args)
    if (ret instanceof Error) {
      console.error(ret.toString())
    }
    return ret
  }
}
这一段JS是会被当做入参传递给WXSDKManager。它也就是Native这边的JSFramework。
3. WXSDKEngine的初始化
WXSDKEngine的初始化就是整个SDK初始化的关键。
+ (void)initSDKEnvironment:(NSString *)script
{
    if (!script || script.length <= 0) {
        WX_MONITOR_FAIL(WXMTJSFramework, WX_ERR_JSFRAMEWORK_LOAD, @"framework loading is failure!");
        return;
    }

    // 注册Components,Modules,Handlers
    [self registerDefaults];

    // 执行JsFramework
    [[WXSDKManager bridgeMgr] executeJsFramework:script];
}
总共干了两件事情,注册Components,Modules,Handlers 和 执行JSFramework。
先来看看是怎么注册的。
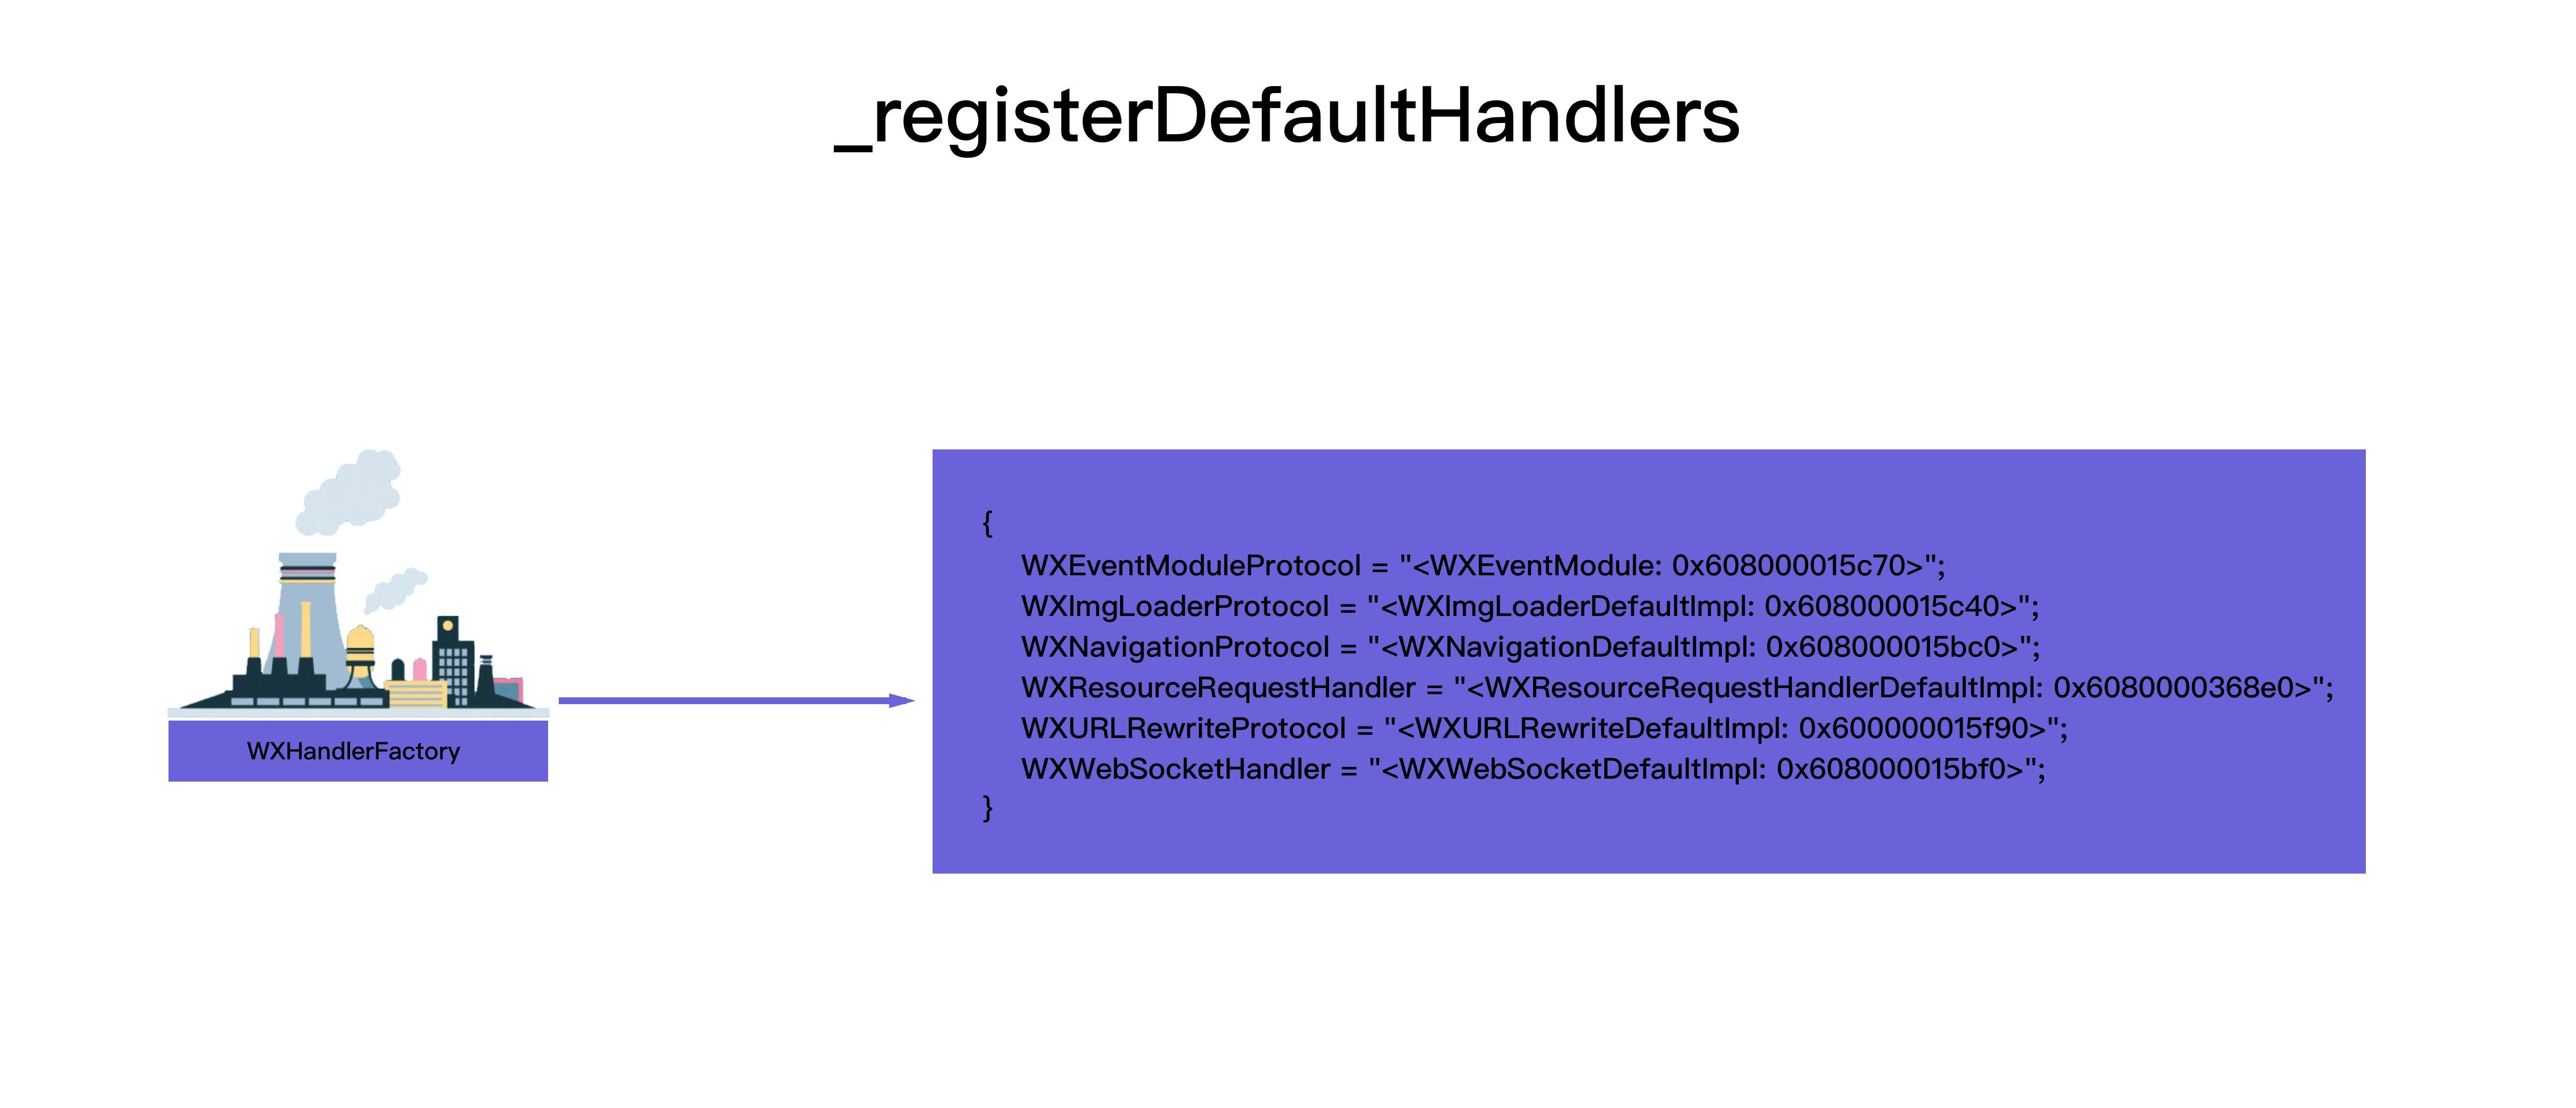
+ (void)registerDefaults
{
    static dispatch_once_t onceToken;
    dispatch_once(&onceToken, ^{
        [self _registerDefaultComponents];
        [self _registerDefaultModules];
        [self _registerDefaultHandlers];
    });
}
在WXSDKEngine初始化的时候就分别注册了这三样东西,Components,Modules,Handlers。

先看Components:
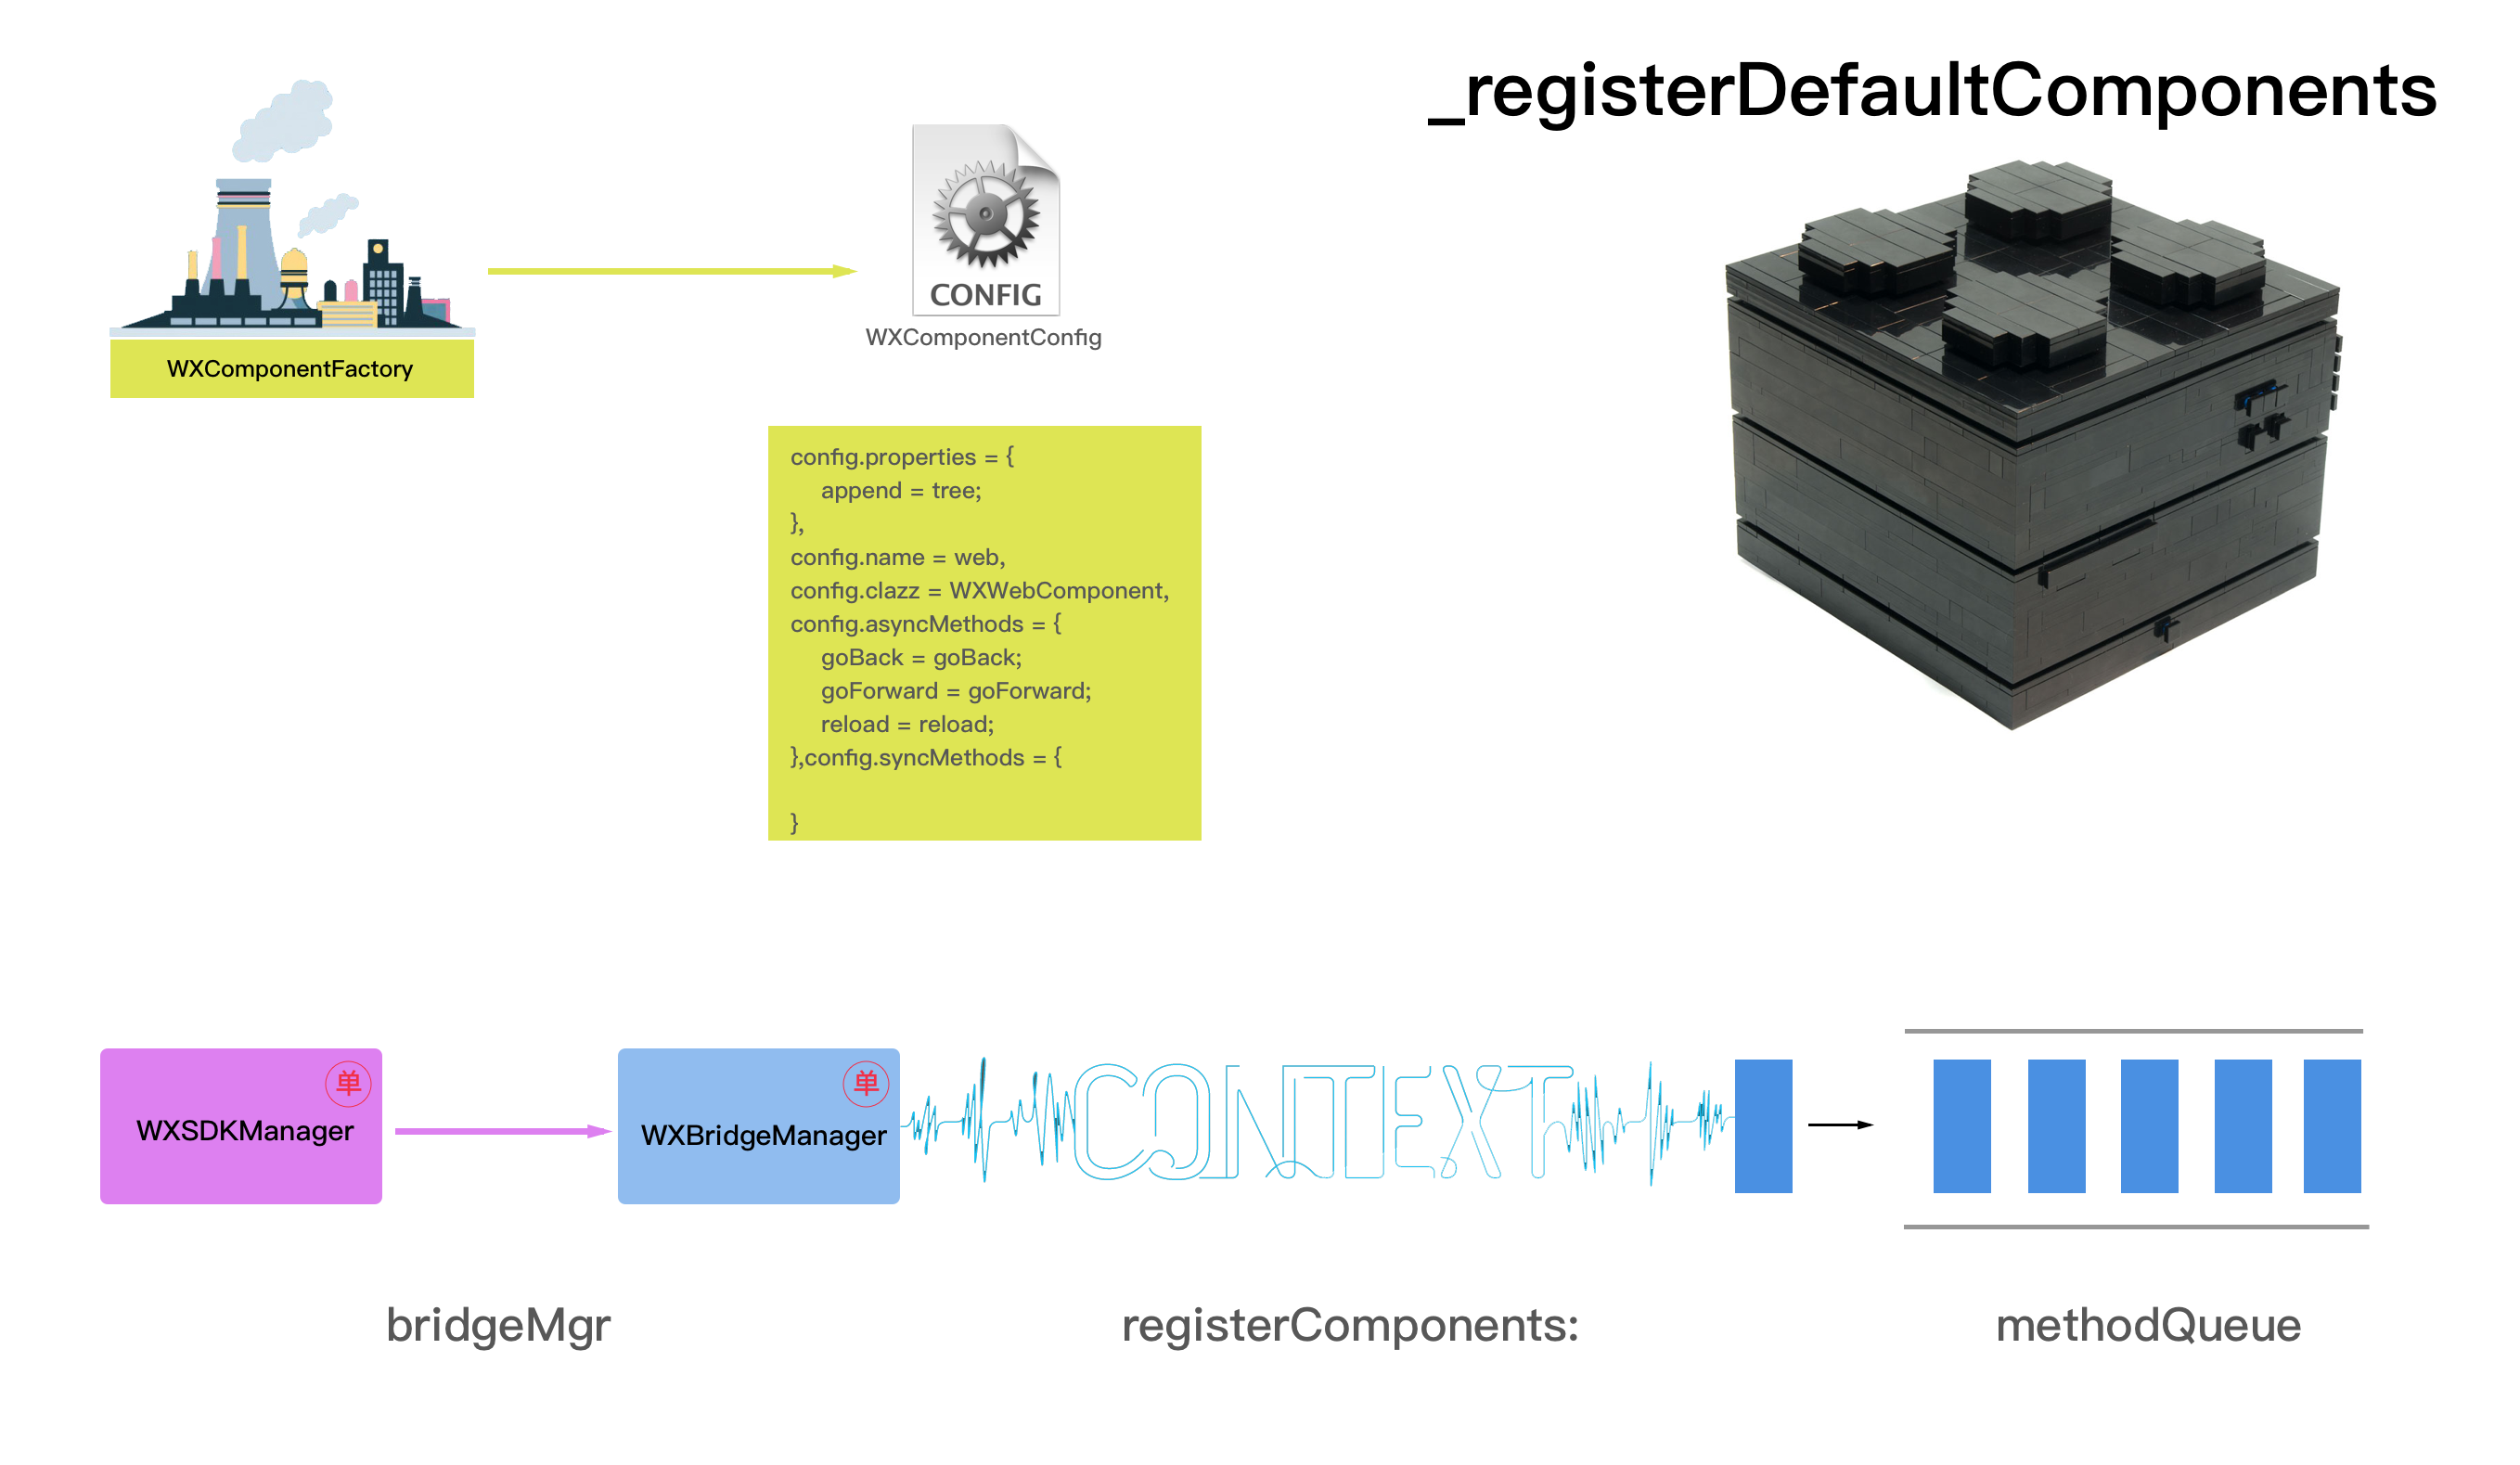
+ (void)_registerDefaultComponents
{
    [self registerComponent:@"container" withClass:NSClassFromString(@"WXDivComponent") withProperties:nil];
    [self registerComponent:@"div" withClass:NSClassFromString(@"WXComponent") withProperties:nil];
    [self registerComponent:@"text" withClass:NSClassFromString(@"WXTextComponent") withProperties:nil];
    [self registerComponent:@"image" withClass:NSClassFromString(@"WXImageComponent") withProperties:nil];
    [self registerComponent:@"scroller" withClass:NSClassFromString(@"WXScrollerComponent") withProperties:nil];
    [self registerComponent:@"list" withClass:NSClassFromString(@"WXListComponent") withProperties:nil];

    [self registerComponent:@"header" withClass:NSClassFromString(@"WXHeaderComponent")];
    [self registerComponent:@"cell" withClass:NSClassFromString(@"WXCellComponent")];
    [self registerComponent:@"embed" withClass:NSClassFromString(@"WXEmbedComponent")];
    [self registerComponent:@"a" withClass:NSClassFromString(@"WXAComponent")];

    [self registerComponent:@"select" withClass:NSClassFromString(@"WXSelectComponent")];
    [self registerComponent:@"switch" withClass:NSClassFromString(@"WXSwitchComponent")];
    [self registerComponent:@"input" withClass:NSClassFromString(@"WXTextInputComponent")];
    [self registerComponent:@"video" withClass:NSClassFromString(@"WXVideoComponent")];
    [self registerComponent:@"indicator" withClass:NSClassFromString(@"WXIndicatorComponent")];
    [self registerComponent:@"slider" withClass:NSClassFromString(@"WXSliderComponent")];
    [self registerComponent:@"web" withClass:NSClassFromString(@"WXWebComponent")];
    [self registerComponent:@"loading" withClass:NSClassFromString(@"WXLoadingComponent")];
    [self registerComponent:@"loading-indicator" withClass:NSClassFromString(@"WXLoadingIndicator")];
    [self registerComponent:@"refresh" withClass:NSClassFromString(@"WXRefreshComponent")];
    [self registerComponent:@"textarea" withClass:NSClassFromString(@"WXTextAreaComponent")];
	[self registerComponent:@"canvas" withClass:NSClassFromString(@"WXCanvasComponent")];
    [self registerComponent:@"slider-neighbor" withClass:NSClassFromString(@"WXSliderNeighborComponent")];
}
在WXSDKEngine初始化的时候会默认注册这23种基础组件。这里就举一个最复杂的组件WXWebComponent,来看看它是如何被注册的。
首先需要说明的一点,
+ (void)registerComponent:(NSString *)name withClass:(Class)clazz
{
    [self registerComponent:name withClass:clazz withProperties: @{@"append":@"tree"}];
}
registerComponent:withClass:方法和registerComponent:withClass:withProperties:方法的区别在于最后一个入参是否传@{@"append":@"tree"},如果被标记成了@"tree",那么在syncQueue堆积了很多任务的时候,会被强制执行一次layout。
所以上面23种基本组件里面,只有前5种,container,div,text,image,scroller,list是没有被标记成@"tree",剩下的18种都是有可能强制执行一次layout。
+ (void)registerComponent:(NSString *)name withClass:(Class)clazz withProperties:(NSDictionary *)properties
{
    if (!name || !clazz) {
        return;
    }
    WXAssert(name && clazz, @"Fail to register the component, please check if the parameters are correct !");

    // 1.WXComponentFactory注册组件的方法
    [WXComponentFactory registerComponent:name withClass:clazz withPros:properties];
    // 2.遍历出所有异步的方法
    NSMutableDictionary *dict = [WXComponentFactory componentMethodMapsWithName:name];
    dict[@"type"] = name;

    // 3.把组件注册到WXBridgeManager中
    if (properties) {
        NSMutableDictionary *props = [properties mutableCopy];
        if ([dict[@"methods"] count]) {
            [props addEntriesFromDictionary:dict];
        }
        [[WXSDKManager bridgeMgr] registerComponents:@[props]];
    } else {
        [[WXSDKManager bridgeMgr] registerComponents:@[dict]];
    }
}
注册组件全部都是通过WXComponentFactory完成注册的。WXComponentFactory是一个单例。
@interface WXComponentFactory : NSObject
{
    NSMutableDictionary *_componentConfigs;
    NSLock *_configLock;
}
@property (nonatomic, strong) NSDictionary *properties;
@end
在WXComponentFactory中,_componentConfigs会存储所有的组件配置,注册的过程也是生成_componentConfigs的过程。
- (void)registerComponent:(NSString *)name withClass:(Class)clazz withPros:(NSDictionary *)pros
{
    WXAssert(name && clazz, @"name or clazz must not be nil for registering component.");

    WXComponentConfig *config = nil;
    [_configLock lock];
    config = [_componentConfigs objectForKey:name];

    // 如果组件已经注册过,会提示重复注册,并且覆盖原先的注册行为
    if(config){
        WXLogInfo(@"Overrider component name:%@ class:%@, to name:%@ class:%@",
                  config.name, config.class, name, clazz);
    }

    config = [[WXComponentConfig alloc] initWithName:name class:NSStringFromClass(clazz) pros:pros];
    [_componentConfigs setValue:config forKey:name];

    // 注册类方法
    [config registerMethods];
    [_configLock unlock];
}
在WXComponentFactory的_componentConfigs字典中会按照组件的名字作为key,WXComponentConfig作为value存储各个组件的配置。
@interface WXComponentConfig : WXInvocationConfig
@property (nonatomic, strong) NSDictionary *properties;
@end


@interface WXInvocationConfig : NSObject
@property (nonatomic, strong) NSString *name;
@property (nonatomic, strong) NSString *clazz;
@property (nonatomic, strong) NSMutableDictionary *asyncMethods;
@property (nonatomic, strong) NSMutableDictionary *syncMethods;
@end
WXComponentConfig继承自WXInvocationConfig,在WXInvocationConfig中存储了组件名name,类名clazz,类里面的同步方法字典syncMethods和异步方法字典asyncMethods。
组件注册这里比较关键的一点是注册类方法。
- (void)registerMethods
{
    Class currentClass = NSClassFromString(_clazz);

    if (!currentClass) {
        WXLogWarning(@"The module class [%@] doesn't exit!", _clazz);
        return;
    }

    while (currentClass != [NSObject class]) {
        unsigned int methodCount = 0;
        // 获取类的方法列表
        Method *methodList = class_copyMethodList(object_getClass(currentClass), &methodCount);
        for (unsigned int i = 0; i < methodCount; i++) {
            // 获取SEL的字符串名称
            NSString *selStr = [NSString stringWithCString:sel_getName(method_getName(methodList[i])) encoding:NSUTF8StringEncoding];

            BOOL isSyncMethod = NO;
            // 如果是SEL名字带sync,就是同步方法
            if ([selStr hasPrefix:@"wx_export_method_sync_"]) {
                isSyncMethod = YES;
            // 如果是SEL名字不带sync,就是异步方法
            } else if ([selStr hasPrefix:@"wx_export_method_"]) {
                isSyncMethod = NO;
            } else {
                // 如果名字里面不带wx_export_method_前缀的方法,那么都不算是暴露出来的方法,直接continue,进行下一轮的筛选
                continue;
            }

            NSString *name = nil, *method = nil;
            SEL selector = NSSelectorFromString(selStr);
            if ([currentClass respondsToSelector:selector]) {
                method = ((NSString* (*)(id, SEL))[currentClass methodForSelector:selector])(currentClass, selector);
            }

            if (method.length <= 0) {
                WXLogWarning(@"The module class [%@] doesn't has any method!", _clazz);
                continue;
            }

            // 去掉方法名里面带的:号
            NSRange range = [method rangeOfString:@":"];
            if (range.location != NSNotFound) {
                name = [method substringToIndex:range.location];
            } else {
                name = method;
            }

            // 最终字典里面会按照异步方法和同步方法保存到最终的方法字典里
            NSMutableDictionary *methods = isSyncMethod ? _syncMethods : _asyncMethods;
            [methods setObject:method forKey:name];
        }

        free(methodList);
        currentClass = class_getSuperclass(currentClass);
    }

}
这里的做法也比较常规,找到对应的类方法,判断名字里面是否带有“sync”来判断方法是同步还是异步方法。这里重点需要解析的是组件的方法是如何转换成类方法的暴露出去的。
Weex是通过里面通过WX_EXPORT_METHOD宏做到对外暴露类方法的。
#define WX_EXPORT_METHOD(method) WX_EXPORT_METHOD_INTERNAL(method,wx_export_method_)


#define WX_EXPORT_METHOD_INTERNAL(method, token) \
+ (NSString *)WX_CONCAT_WRAPPER(token, __LINE__) { \
    return NSStringFromSelector(method); \
}

#define WX_CONCAT_WRAPPER(a, b)    WX_CONCAT(a, b)

#define WX_CONCAT(a, b)   a ## b
WX_EXPORT_METHOD宏会完全展开成下面这个样子:
#define WX_EXPORT_METHOD(method)

+ (NSString *)wx_export_method_ __LINE__ { \
    return NSStringFromSelector(method); \
}
举个例子,在WXWebComponent的第52行里面写了下面这一行代码:
WX_EXPORT_METHOD(@selector(goBack))
那么这个宏在预编译的时候就会被展开成下面这个样子:
+ (NSString *)wx_export_method_52 {
    return NSStringFromSelector(@selector(goBack));
}
于是乎在WXWebComponent的类方法里面就多了一个wx_export_method_52的方法。由于在同一个文件里面,WX_EXPORT_METHOD宏是不允许写在同一行的,所以转换出来的方法名字肯定不会相同。但是不同类里面行数就没有规定,行数是可能相同的,从而不同类里面可能就有相同的方法名。
比如在WXScrollerComponent里面的第58行
WX_EXPORT_METHOD(@selector(resetLoadmore))
WXTextAreaComponent里面的第58行
WX_EXPORT_METHOD(@selector(focus))
这两个是不同的组件,但是宏展开之后的方法名是一样的,这两个不同的类的类方法,是有重名的,但是完全不会有什么影响,因为获取类方法的时候是通过class_copyMethodList,保证这个list里面都是唯一的名字即可。
还有一点需要说明的是,虽然用class_copyMethodList会获取所有的类方法(+号方法),但是可能有人疑问了,那不通过WX_EXPORT_METHOD宏对外暴露的普通的+号方法,不是也会被筛选进来么?
回答:是的,会被class_copyMethodList获取到,但是这里有一个判断条件,会避开这些不通过WX_EXPORT_METHOD宏对外暴露的普通的+号类方法。
如果不通过WX_EXPORT_METHOD宏来申明对外暴露的普通的+号类方法,那么名字里面就不会带wx_export_method_的前缀的方法,那么都不算是暴露出来的方法,上面筛选的代码里面会直接continue,进行下一轮的筛选,所以不必担心那些普通的+号类方法会进来干扰。
回到WXWebComponent注册,通过上述方法获取完类方法之后,字典里面就存储的如下信息:
methods = {
    goBack = goBack;
    goForward = goForward;
    reload = reload;
}
这就完成了组件注册的第一步,完成了注册配置WXComponentConfig。
组件注册的第二步,遍历所有的异步方法。
- (NSMutableDictionary *)_componentMethodMapsWithName:(NSString *)name
{
    NSMutableDictionary *dict = [NSMutableDictionary dictionary];
    NSMutableArray *methods = [NSMutableArray array];

    [_configLock lock];
    [dict setValue:methods forKey:@"methods"];

    WXComponentConfig *config = _componentConfigs[name];
    void (^mBlock)(id, id, BOOL *) = ^(id mKey, id mObj, BOOL * mStop) {
        [methods addObject:mKey];
    };
    [config.asyncMethods enumerateKeysAndObjectsUsingBlock:mBlock];
    [_configLock unlock];
    return dict;
}
这里依旧是调用了WXComponentFactory的方法_componentMethodMapsWithName:。这里就是遍历出异步方法,并放入字典中,返回异步方法的字典。
还是以最复杂的WXWebComponent为例,这里就会返回如下的异步方法字典:
{
    methods =     (
        goForward,
        goBack,
        reload
    );
}
注册组件的最后一步会在JSFrame中注册组件。
@interface WXSDKManager ()
@property (nonatomic, strong) WXBridgeManager *bridgeMgr;
@property (nonatomic, strong) WXThreadSafeMutableDictionary *instanceDict;
@end
在WXSDKManager里面会强持有一个WXBridgeManager。这个WXBridgeManager就是用来和JS交互的Bridge。
@interface WXBridgeManager : NSObject
@property (nonatomic, weak, readonly) WXSDKInstance *topInstance;
@property (nonatomic, strong) WXBridgeContext   *bridgeCtx;
@property (nonatomic, assign) BOOL  stopRunning;
@property (nonatomic, strong) NSMutableArray *instanceIdStack;
@end
WXBridgeManager中会弱引用WXSDKInstance实例,是为了能调用WXSDKInstance的一些属性和方法。WXBridgeManager里面最重要的一个属性就是WXBridgeContext。
@interface WXBridgeContext ()
@property (nonatomic, weak, readonly) WXSDKInstance *topInstance;
@property (nonatomic, strong) id<WXBridgeProtocol>  jsBridge;
@property (nonatomic, strong) WXDebugLoggerBridge *devToolSocketBridge;
@property (nonatomic, assign) BOOL  debugJS;
// 存储native要即将调用js的一些方法
@property (nonatomic, strong) NSMutableDictionary   *sendQueue;
// 实例的一些堆栈
@property (nonatomic, strong) WXThreadSafeMutableArray    *insStack;
// 标识JSFramework是否已经加载完成
@property (nonatomic) BOOL frameworkLoadFinished;
// 在JSFramework加载完成之前,临时存储一些方法
@property (nonatomic, strong) NSMutableArray *methodQueue;
// 存储js模板的service
@property (nonatomic, strong) NSMutableArray *jsServiceQueue;
@end
在WXBridgeContext中强持有了一个jsBridge。这个就是用来和js进行交互的Bridge。
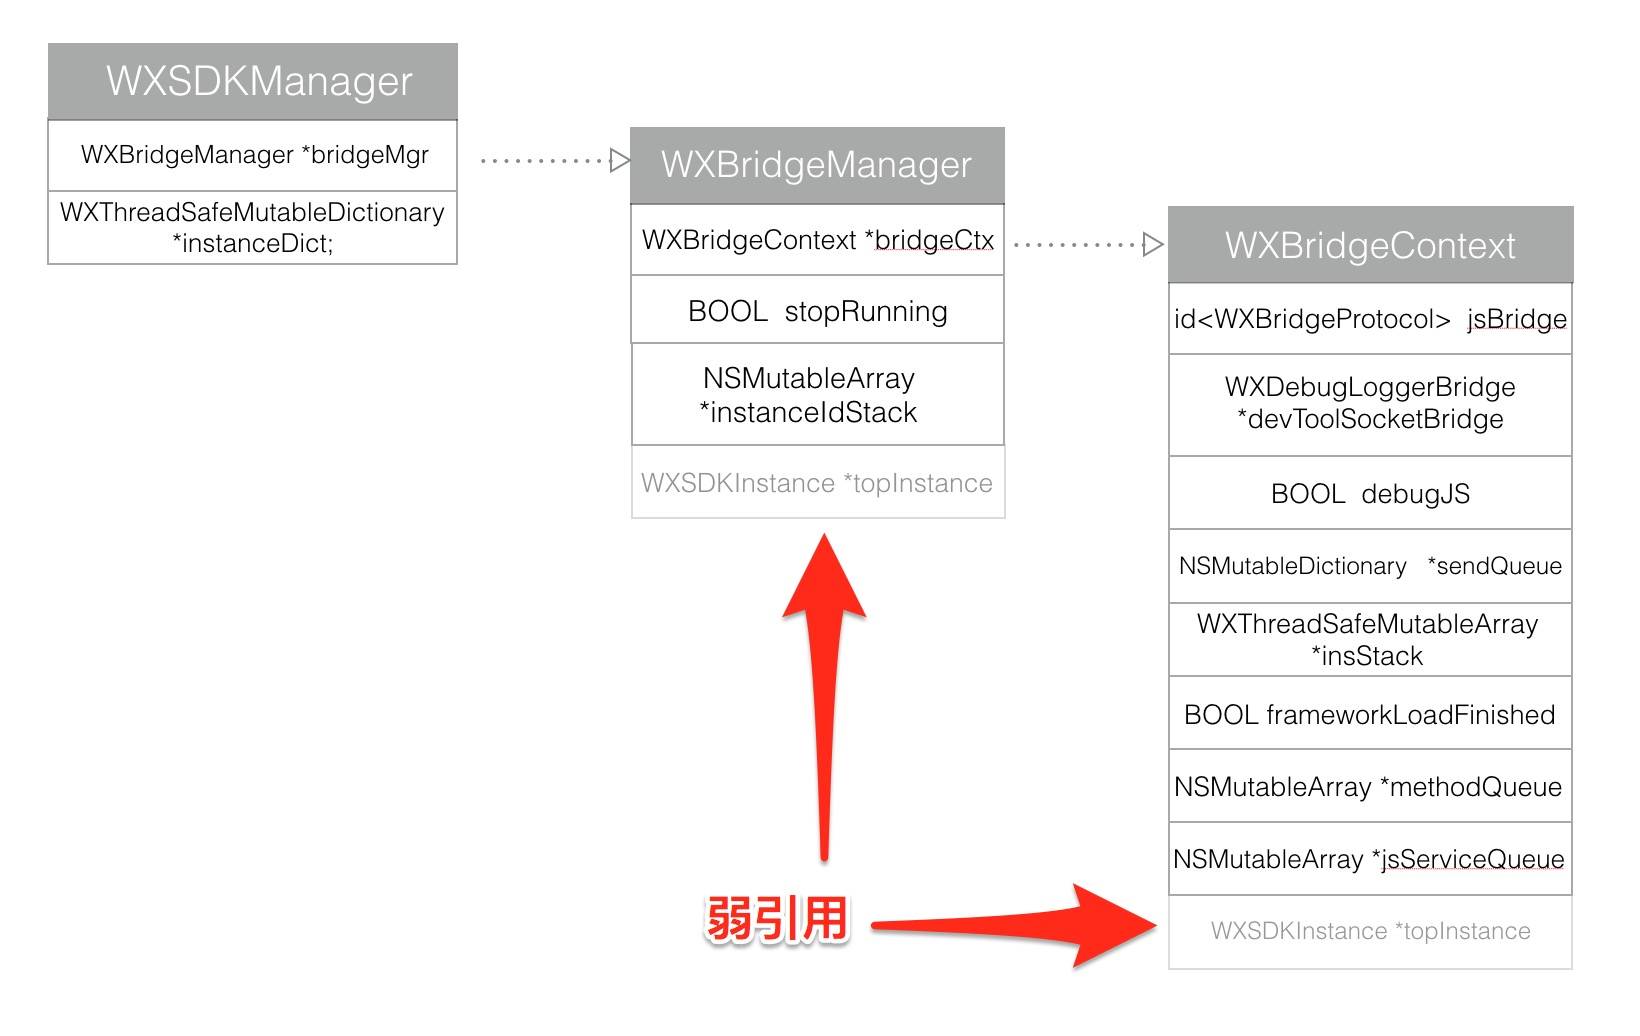
三者的关系用图表示出来如上图。由于是弱引用,所以用虚的线框表示。
回到注册的步骤中来,在WXSDKEngine中调用如下方法:
[[WXSDKManager bridgeMgr] registerComponents:@[dict]];
WXBridgeManager调用registerComponents方法。
- (void)registerComponents:(NSArray *)components
{
    if (!components) return;

    __weak typeof(self) weakSelf = self;
    WXPerformBlockOnBridgeThread(^(){
        [weakSelf.bridgeCtx registerComponents:components];
    });
}
最终是WXBridgeManager里面的WXBridgeContext 调用registerComponents,进行组件的注册。但是注册组件的这一步是在一个特殊的线程中执行的。
void WXPerformBlockOnBridgeThread(void (^block)())
{
    [WXBridgeManager _performBlockOnBridgeThread:block];
}

+ (void)_performBlockOnBridgeThread:(void (^)())block
{
    if ([NSThread currentThread] == [self jsThread]) {
        block();
    } else {
        [self performSelector:@selector(_performBlockOnBridgeThread:)
                     onThread:[self jsThread]
                   withObject:[block copy]
                waitUntilDone:NO];
    }
}
这里就可以看到,block闭包是在jsThread的线程中执行的,并非主线程。WXBridgeManager会新建一个名为@"com.taobao.weex.bridge"的jsThread线程,所有的组件注册都在这个子线程中执行的。这个jsThread也是一个单例,全局唯一。
+ (NSThread *)jsThread
{
    static dispatch_once_t onceToken;
    dispatch_once(&onceToken, ^{

        WXBridgeThread = [[NSThread alloc] initWithTarget:[[self class]sharedManager] selector:@selector(_runLoopThread) object:nil];
        [WXBridgeThread setName:WX_BRIDGE_THREAD_NAME];
        if(WX_SYS_VERSION_GREATER_THAN_OR_EQUAL_TO(@"8.0")) {
            [WXBridgeThread setQualityOfService:[[NSThread mainThread] qualityOfService]];
        } else {
            [WXBridgeThread setThreadPriority:[[NSThread mainThread] threadPriority]];
        }

        [WXBridgeThread start];
    });

    return WXBridgeThread;
}
这里就是创建jsThread的代码,jsThread会把@selector(_runLoopThread)作为selector。
- (void)_runLoopThread
{
    [[NSRunLoop currentRunLoop] addPort:[NSMachPort port] forMode:NSDefaultRunLoopMode];

    while (!_stopRunning) {
        @autoreleasepool {
            [[NSRunLoop currentRunLoop] runMode:NSDefaultRunLoopMode beforeDate:[NSDate distantFuture]];
        }
    }
}
于是这里就给jsThread开启了一个runloop。这里是用[NSMachPort port]的方式开启的runloop,之后再也无法获取到这个port了,而且这个runloop不是CFRunloop,所以用官方文档上的那3个方法已经不能停止这个runloop了,只能自己通过while的方式来停止。上述代码是一种写法,当然StackOverFlow上面推荐的是下面的写法,下面的写法也是我常用的写法。
BOOL shouldKeepRunning = YES;        // global
NSRunLoop *theRL = [NSRunLoop currentRunLoop];
while (shouldKeepRunning && [theRL runMode:NSDefaultRunLoopMode beforeDate:[NSDate distantFuture]]);
- (void)registerComponents:(NSArray *)components
{
    WXAssertBridgeThread();
    if(!components) return;
    [self callJSMethod:@"registerComponents" args:@[components]];
}
在WXBridgeContext中注册组件,其实调用的是js的方法"registerComponents"。
这里有一个需要注意的一点,由于是在子线程上注册组件,那么JSFramework如果没有加载完成,native去调用js的方法,必定调用失败。所以需要在JSFramework加载完成之前,把native调用JS的方法都缓存起来,一旦JSFramework加载完成,把缓存里面的方法都丢给JSFramework去加载。
- (void)callJSMethod:(NSString *)method args:(NSArray *)args
{
    if (self.frameworkLoadFinished) {
        [self.jsBridge callJSMethod:method args:args];
    } else {
        [_methodQueue addObject:@{@"method":method, @"args":args}];
    }
}
所以在WXBridgeContext中需要一个NSMutableArray,用来缓存在JSFramework加载完成之前,调用JS的方法。这里是保存在_methodQueue里面。如果JSFramework加载完成,那么就会调用callJSMethod:args:方法。
- (JSValue *)callJSMethod:(NSString *)method args:(NSArray *)args
{
    WXLogDebug(@"Calling JS... method:%@, args:%@", method, args);
    return [[_jsContext globalObject] invokeMethod:method withArguments:args];
}
由于这些注册的方法的定义是全局函数,那么很显然应该在JSContext的globalObject对象上调用该方法。(目前流程进行到这里还看不到定义的全局函数,往后看就会看到)
还是用WXWebComponent来举例,那么这里注册组件的method就是@“registerComponents”,args参数如下:
        (
                {
            append = tree;
            methods =             (
                goForward,
                goBack,
                reload
            );
            type = web;
        }
    )
实际上程序运行到这里,并不会去执行callJSMethod:args:,因为现在JSFramework还没有加载完成。
注册组件的全部流程如下:
再注册Modules

注册Modules的流程和上面注册Components非常类似。
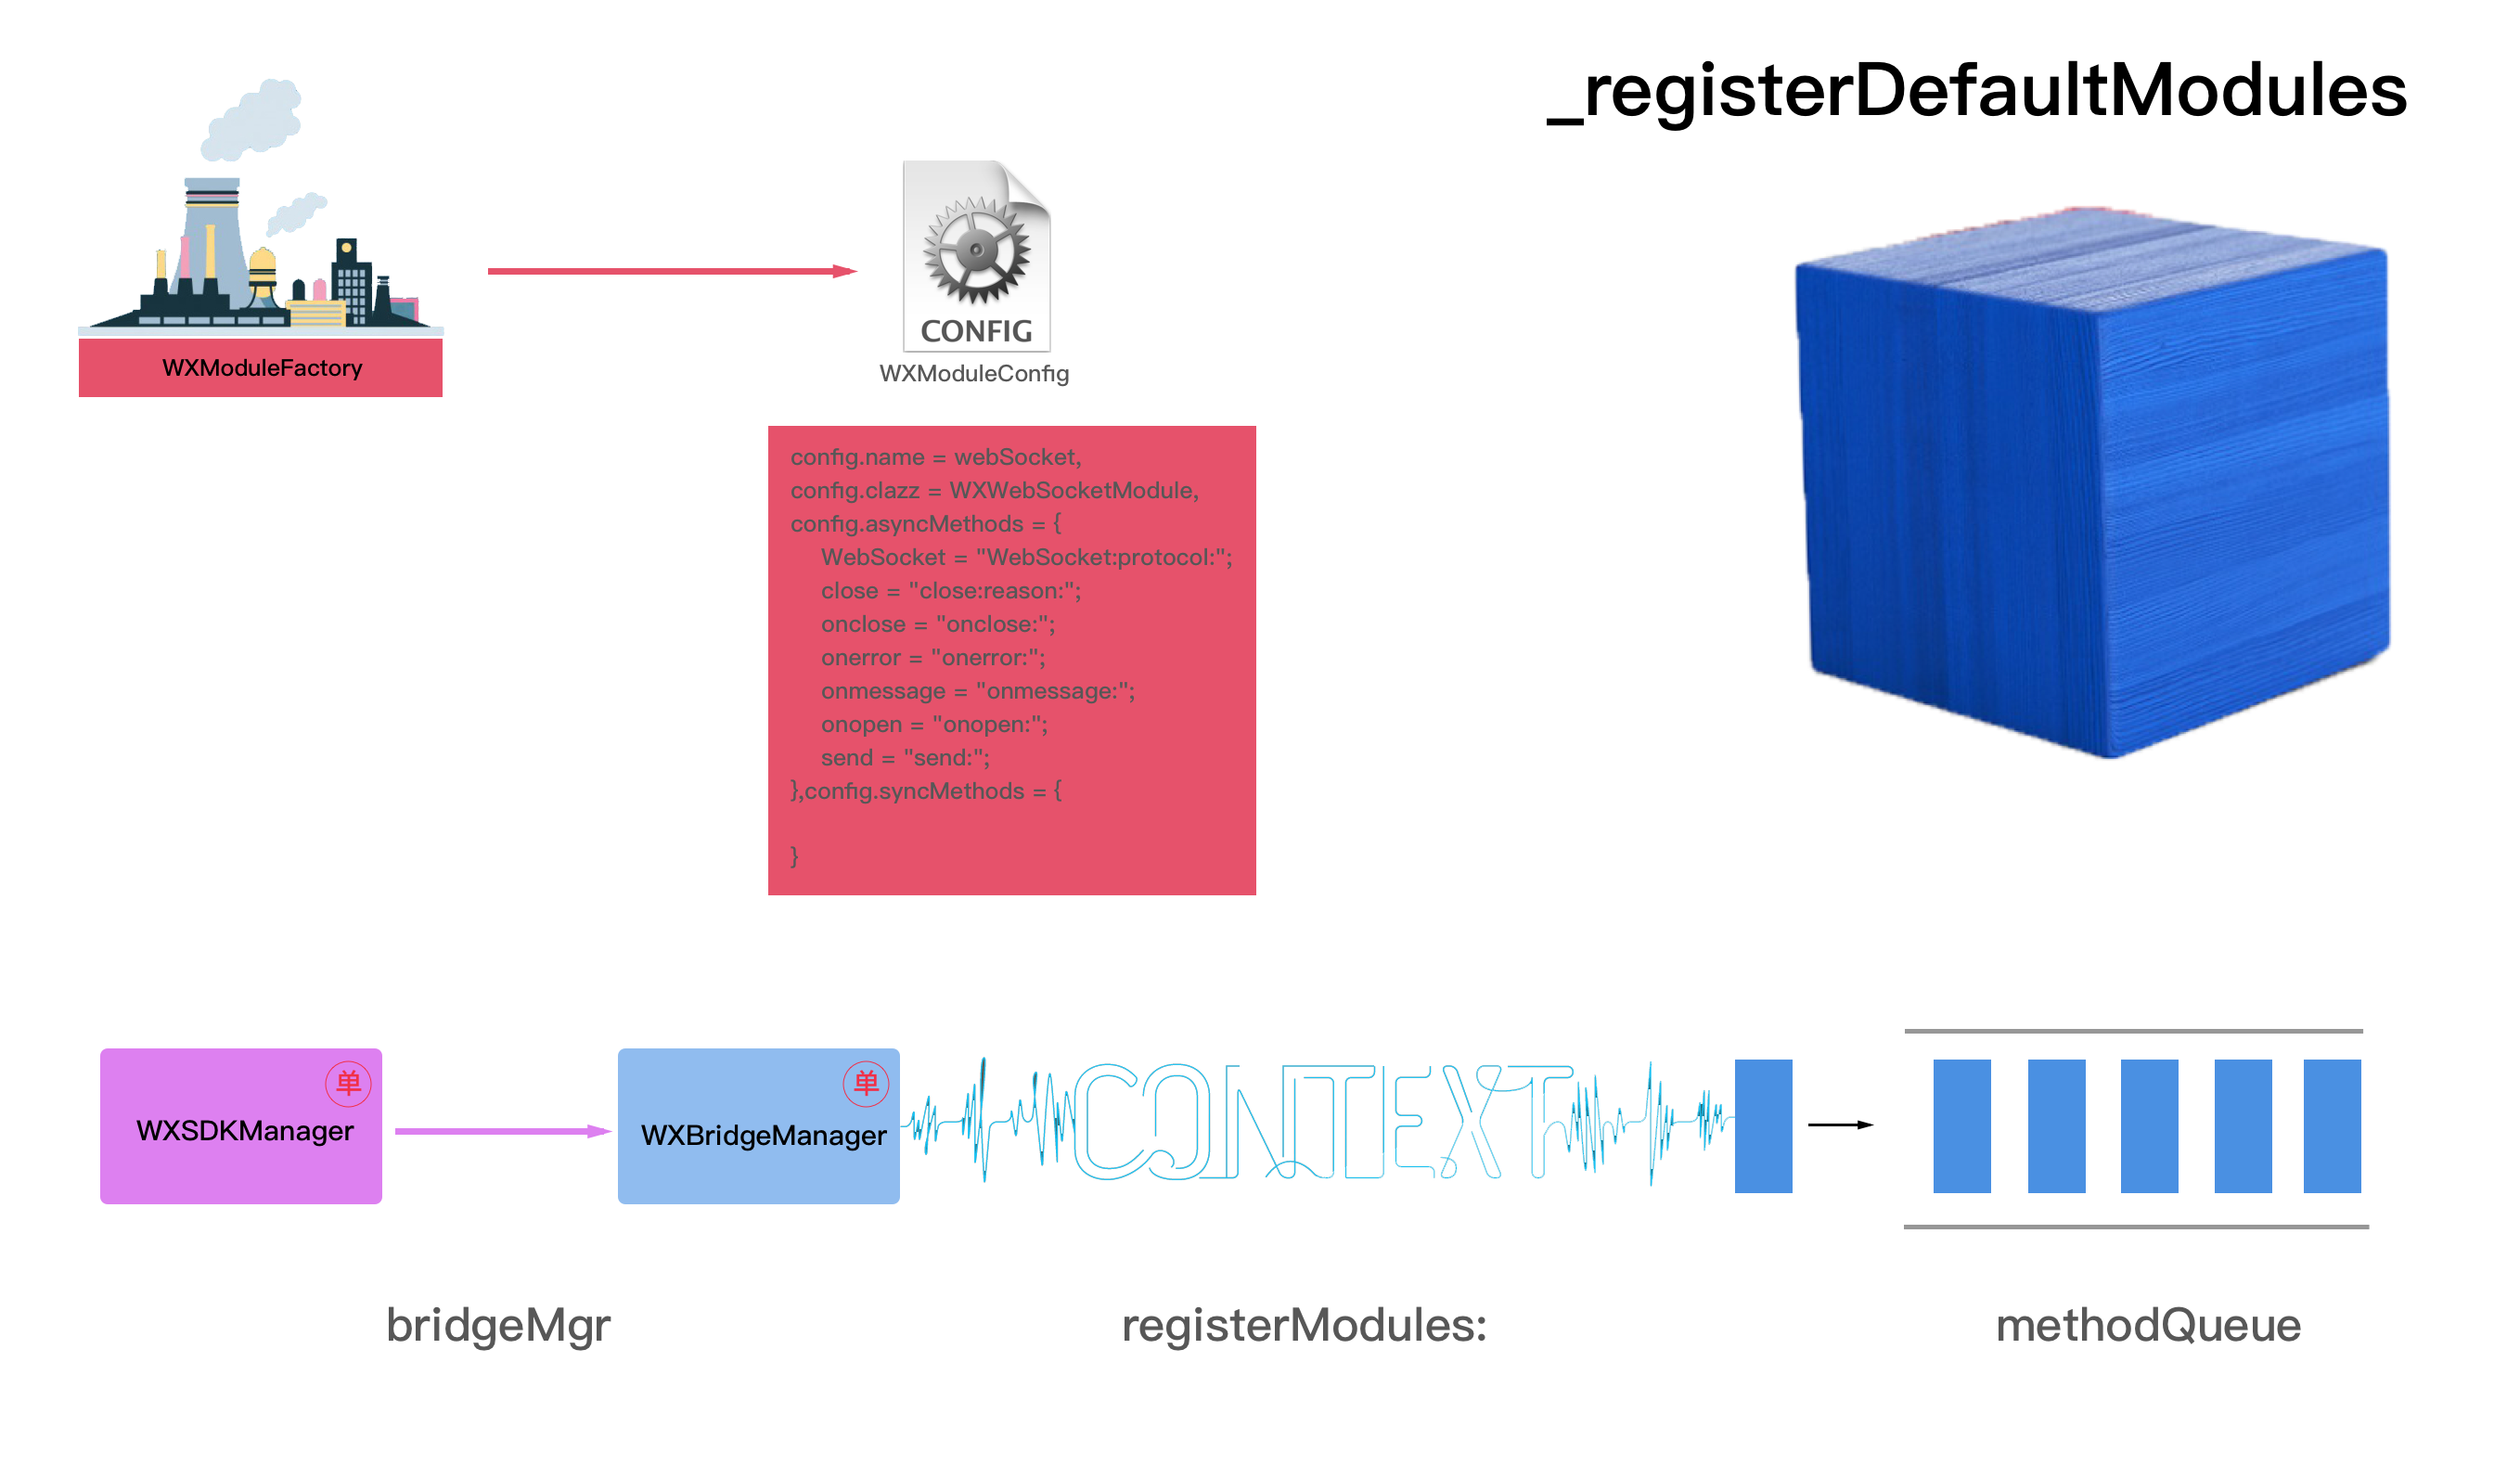
+ (void)_registerDefaultModules
{
    [self registerModule:@"dom" withClass:NSClassFromString(@"WXDomModule")];
    [self registerModule:@"navigator" withClass:NSClassFromString(@"WXNavigatorModule")];
    [self registerModule:@"stream" withClass:NSClassFromString(@"WXStreamModule")];
    [self registerModule:@"animation" withClass:NSClassFromString(@"WXAnimationModule")];
    [self registerModule:@"modal" withClass:NSClassFromString(@"WXModalUIModule")];
    [self registerModule:@"webview" withClass:NSClassFromString(@"WXWebViewModule")];
    [self registerModule:@"instanceWrap" withClass:NSClassFromString(@"WXInstanceWrap")];
    [self registerModule:@"timer" withClass:NSClassFromString(@"WXTimerModule")];
    [self registerModule:@"storage" withClass:NSClassFromString(@"WXStorageModule")];
    [self registerModule:@"clipboard" withClass:NSClassFromString(@"WXClipboardModule")];
    [self registerModule:@"globalEvent" withClass:NSClassFromString(@"WXGlobalEventModule")];
    [self registerModule:@"canvas" withClass:NSClassFromString(@"WXCanvasModule")];
    [self registerModule:@"picker" withClass:NSClassFromString(@"WXPickerModule")];
    [self registerModule:@"meta" withClass:NSClassFromString(@"WXMetaModule")];
    [self registerModule:@"webSocket" withClass:NSClassFromString(@"WXWebSocketModule")];
}
WXSDKEngine会默认注册这15种基础模块。这里就以比较复杂的模块WXWebSocketModule为例,来看看它是如何被注册的。
+ (void)registerModule:(NSString *)name withClass:(Class)clazz
{
    WXAssert(name && clazz, @"Fail to register the module, please check if the parameters are correct !");

    // 1. WXModuleFactory注册模块
    NSString *moduleName = [WXModuleFactory registerModule:name withClass:clazz];
    // 2.遍历所有同步和异步方法
    NSDictionary *dict = [WXModuleFactory moduleMethodMapsWithName:moduleName];
    // 3.把模块注册到WXBridgeManager中
    [[WXSDKManager bridgeMgr] registerModules:dict];
}
注册模块也分3步,第一步是在WXModuleFactory中注册。
@interface WXModuleFactory ()
@property (nonatomic, strong)  NSMutableDictionary  *moduleMap;
@property (nonatomic, strong)  NSLock   *moduleLock;
@end
在WXModuleFactory中,moduleMap会存储所有的模块的配置信息,注册的过程也是生成moduleMap的过程。
- (NSString *)_registerModule:(NSString *)name withClass:(Class)clazz
{
    WXAssert(name && clazz, @"Fail to register the module, please check if the parameters are correct !");

    [_moduleLock lock];
    // 这里需要注意的是:注册模块是允许同名模块的
    WXModuleConfig *config = [[WXModuleConfig alloc] init];
    config.name = name;
    config.clazz = NSStringFromClass(clazz);
    [config registerMethods];
    [_moduleMap setValue:config forKey:name];
    [_moduleLock unlock];

    return name;
}
整个注册的过程就是把WXModuleConfig为value,name为key,存入_moduleMap字典里。
@interface WXModuleConfig : WXInvocationConfig
@end
WXModuleConfig仅仅只是继承自WXInvocationConfig,所以它和WXInvocationConfig是完全一样的。[config registerMethods]这个方法和注册组件的方法是同一个方法,具体注册流程这里就不再赘述了。
在WXModuleFactory中会记录下一个个的WXModuleConfig:
_moduleMap = {
    animation = "<WXModuleConfig: 0x60000024a230>";
    canvas = "<WXModuleConfig: 0x608000259ce0>";
    clipboard = "<WXModuleConfig: 0x608000259b30>";
    dom = "<WXModuleConfig: 0x608000259440>";
    event = "<WXModuleConfig: 0x60800025a280>";
    globalEvent = "<WXModuleConfig: 0x60000024a560>";
    instanceWrap = "<WXModuleConfig: 0x608000259a70>";
    meta = "<WXModuleConfig: 0x60000024a7a0>";
    modal = "<WXModuleConfig: 0x6080002597d0>";
    navigator = "<WXModuleConfig: 0x600000249fc0>";
    picker = "<WXModuleConfig: 0x608000259e60>";
    storage = "<WXModuleConfig: 0x60000024a4a0>";
    stream = "<WXModuleConfig: 0x6080002596e0>";
    syncTest = "<WXModuleConfig: 0x60800025a520>";
    timer = "<WXModuleConfig: 0x60000024a380>";
    webSocket = "<WXModuleConfig: 0x608000259fb0>";
    webview = "<WXModuleConfig: 0x6080002598f0>";
}
每个WXModuleConfig中会记录下所有的同步和异步的方法。
config.name = dom,
config.clazz = WXDomModule,
config.asyncMethods = {
    addElement = "addElement:element:atIndex:";
    addEvent = "addEvent:event:";
    addRule = "addRule:rule:";
    createBody = "createBody:";
    createFinish = createFinish;
    getComponentRect = "getComponentRect:callback:";
    moveElement = "moveElement:parentRef:index:";
    refreshFinish = refreshFinish;
    removeElement = "removeElement:";
    removeEvent = "removeEvent:event:";
    scrollToElement = "scrollToElement:options:";
    updateAttrs = "updateAttrs:attrs:";
    updateFinish = updateFinish;
    updateStyle = "updateStyle:styles:";
},
config.syncMethods = {

}
第二步遍历所有的方法列表。
- (NSMutableDictionary *)_moduleMethodMapsWithName:(NSString *)name
{
    NSMutableDictionary *dict = [NSMutableDictionary dictionary];
    NSMutableArray *methods = [self _defaultModuleMethod];

    [_moduleLock lock];
    [dict setValue:methods forKey:name];
    WXModuleConfig *config = _moduleMap[name];
    void (^mBlock)(id, id, BOOL *) = ^(id mKey, id mObj, BOOL * mStop) {
        [methods addObject:mKey];
    };
    [config.syncMethods enumerateKeysAndObjectsUsingBlock:mBlock];
    [config.asyncMethods enumerateKeysAndObjectsUsingBlock:mBlock];
    [_moduleLock unlock];
    return dict;
}
这里遍历模块的方法列表和组件的有所不同。首先模块是有默认方法的。
- (NSMutableArray*)_defaultModuleMethod
{
    return [NSMutableArray arrayWithObjects:@"addEventListener",@"removeAllEventListeners", nil];
}
所有的模块都有addEventListener和removeAllEventListeners方法。第二个不同就是模块会遍历所有的同步和异步方法,(组件只会遍历异步方法)。最终返回生成模块的所有方法的字典。
以dom模块为例,它返回的字典如下:
{
    dom =     (
        addEventListener,
        removeAllEventListeners,
        addEvent,
        removeElement,
        updateFinish,
        getComponentRect,
        scrollToElement,
        addRule,
        updateAttrs,
        addElement,
        createFinish,
        createBody,
        updateStyle,
        removeEvent,
        refreshFinish,
        moveElement
    );
}
最后一步也是在WXBridgeManager注册模块。
- (void)registerModules:(NSDictionary *)modules
{
    if (!modules) return;

    __weak typeof(self) weakSelf = self;
    WXPerformBlockOnBridgeThread(^(){
        [weakSelf.bridgeCtx registerModules:modules];
    });
}
这里注册过程和组件是完全一样的,也是在子线程@"com.taobao.weex.bridge"的jsThread中操作的。
- (void)registerModules:(NSDictionary *)modules
{
    WXAssertBridgeThread();
    if(!modules) return;
    [self callJSMethod:@"registerModules" args:@[modules]];
}
这里调用JS的方法名变为了@"registerModules",入参args就是第二步产生的方法字典。
    args =     (
                {
            dom =             (
                addEventListener,
                removeAllEventListeners,
                addEvent,
                removeElement,
                updateFinish,
                getComponentRect,
                scrollToElement,
                addRule,
                updateAttrs,
                addElement,
                createFinish,
                createBody,
                updateStyle,
                removeEvent,
                refreshFinish,
                moveElement
            );
        }
    )
同样,此时模块并不会真正的被注册上,因为JSFramework还没有加载完成,这里也会被添加进methodQueue缓存起来。
注册模块的全部流程如下:
最后是注册Handlers。
+ (void)_registerDefaultHandlers
{
    [self registerHandler:[WXResourceRequestHandlerDefaultImpl new] withProtocol:@protocol(WXResourceRequestHandler)];
    [self registerHandler:[WXNavigationDefaultImpl new] withProtocol:@protocol(WXNavigationProtocol)];
    [self registerHandler:[WXURLRewriteDefaultImpl new] withProtocol:@protocol(WXURLRewriteProtocol)];
    [self registerHandler:[WXWebSocketDefaultImpl new] withProtocol:@protocol(WXWebSocketHandler)];

}
WXSDKEngine中默认注册4个Handler。
+ (void)registerHandler:(id)handler withProtocol:(Protocol *)protocol
{
    WXAssert(handler && protocol, @"Fail to register the handler, please check if the parameters are correct !");

    [WXHandlerFactory registerHandler:handler withProtocol:protocol];
}
WXSDKEngine会继续调用WXHandlerFactory的registerHandler:withProtocol:方法。
@interface WXHandlerFactory : NSObject
@property (nonatomic, strong) WXThreadSafeMutableDictionary *handlers;
+ (void)registerHandler:(id)handler withProtocol:(Protocol *)protocol;
+ (id)handlerForProtocol:(Protocol *)protocol;
+ (NSDictionary *)handlerConfigs;
@end
WXHandlerFactory也是一个单例,里面有一个线程安全的字典handlers,用来保存实例和Protocol名的映射表。
WXSDKEngine初始化的最后一步就是执行JSFramework。
[[WXSDKManager bridgeMgr] executeJsFramework:script];
WXSDKManager会调用WXBridgeManager去执行SDK里面的main.js文件。
- (void)executeJsFramework:(NSString *)script
{
    if (!script) return;

    __weak typeof(self) weakSelf = self;
    WXPerformBlockOnBridgeThread(^(){
        [weakSelf.bridgeCtx executeJsFramework:script];
    });
}
WXBridgeManager通过WXBridgeContext调用executeJsFramework:方法。这里方法调用也是在子线程中进行的。
- (void)executeJsFramework:(NSString *)script
{
    WXAssertBridgeThread();
    WXAssertParam(script);

    WX_MONITOR_PERF_START(WXPTFrameworkExecute);

    [self.jsBridge executeJSFramework:script];

    WX_MONITOR_PERF_END(WXPTFrameworkExecute);

    if ([self.jsBridge exception]) {
        NSString *message = [NSString stringWithFormat:@"JSFramework executes error: %@", [self.jsBridge exception]];
        WX_MONITOR_FAIL(WXMTJSFramework, WX_ERR_JSFRAMEWORK_EXECUTE, message);
    } else {
        WX_MONITOR_SUCCESS(WXMTJSFramework);
        // 至此JSFramework算完全加载完成了
        self.frameworkLoadFinished = YES;

        // 执行所有注册的JsService
        [self executeAllJsService];

         // 获取JSFramework版本号
        JSValue *frameworkVersion = [self.jsBridge callJSMethod:@"getJSFMVersion" args:nil];
        if (frameworkVersion && [frameworkVersion isString]) {
            // 把版本号存入WXAppConfiguration中
            [WXAppConfiguration setJSFrameworkVersion:[frameworkVersion toString]];
        }

        // 执行之前缓存在_methodQueue数组里面的所有方法
        for (NSDictionary *method in _methodQueue) {
            [self callJSMethod:method[@"method"] args:method[@"args"]];
        }

        [_methodQueue removeAllObjects];

        // 至此,初始化工作算完成了。
        WX_MONITOR_PERF_END(WXPTInitalize);
    };
}
WX_MONITOR_PERF_START是在操作之前标记WXPTFrameworkExecute。执行完JSFramework以后,用WX_MONITOR_PERF_END标记执行完成。
- (void)executeJSFramework:(NSString *)frameworkScript
{
    WXAssertParam(frameworkScript);
    if (WX_SYS_VERSION_GREATER_THAN_OR_EQUAL_TO(@"8.0")) {
        [_jsContext evaluateScript:frameworkScript withSourceURL:[NSURL URLWithString:@"main.js"]];
    }else{
        [_jsContext evaluateScript:frameworkScript];
    }
}
加载JSFramework的核心代码在这里,通过JSContext执行evaluateScript:来加载JSFramework。由于这里并没有返回值,所以加载的JSFramework的目的仅仅是声明了里面的所有方法,并没有调用。这也符合OC加载其他Framework的过程,加载只是加载到内存中,Framework里面的方法可以随时被调用,而不是一加载就调用其所有的方法。
加载完成JSFramework以后,就要开始加载之前缓存的JSService和JSMethod。JSService是在jsServiceQueue中缓存的。JSMethod是在methodQueue中缓存的。
- (void)executeAllJsService
{
    for(NSDictionary *service in _jsServiceQueue) {
        NSString *script = [service valueForKey:@"script"];
        NSString *name = [service valueForKey:@"name"];
        [self executeJsService:script withName:name];
    }

    [_jsServiceQueue removeAllObjects];
}
JSService由于是直接js转成NSString,所以这里直接运行executeJsService:withName即可。
   for (NSDictionary *method in _methodQueue) {
       [self callJSMethod:method[@"method"] args:method[@"args"]];
     }

    [_methodQueue removeAllObjects];

- (JSValue *)callJSMethod:(NSString *)method args:(NSArray *)args
{
    WXLogDebug(@"Calling JS... method:%@, args:%@", method, args);

    NSLog(@"WXJSCoreBridge jsContext 正要调用方法");

    return [[_jsContext globalObject] invokeMethod:method withArguments:args];
}
由于_methodQueue里面装的都是全局的js方法,所以需要调用invokeMethod: withArguments:去执行。
当这一切都加载完成,SDK的初始化工作就基本完成了,这里就会标记上WXPTInitalize结束。
这里还需要说明的是,jsBridge第一次是如何被加载进来的。
- (id<WXBridgeProtocol>)jsBridge
{
    WXAssertBridgeThread();
    _debugJS = [WXDebugTool isDevToolDebug];

    Class bridgeClass = _debugJS ? NSClassFromString(@"WXDebugger") : [WXJSCoreBridge class];

    if (_jsBridge && [_jsBridge isKindOfClass:bridgeClass]) {
        return _jsBridge;
    }

    if (_jsBridge) {
        [_methodQueue removeAllObjects];
        _frameworkLoadFinished = NO;
    }

    _jsBridge = _debugJS ? [NSClassFromString(@"WXDebugger") alloc] : [[WXJSCoreBridge alloc] init];

    [self registerGlobalFunctions];

    return _jsBridge;
}
第一次进入这个函数没有jsBridge实例的时候,会先生成WXJSCoreBridge的实例,然后紧接着注册全局的函数。等第二次再调用这个函数的时候,_jsBridge已经是WXJSCoreBridge类型了,就会直接return,下面的语句也不会再重复执行了。
typedef NSInteger(^WXJSCallNative)(NSString *instance, NSArray *tasks, NSString *callback);
typedef NSInteger(^WXJSCallAddElement)(NSString *instanceId,  NSString *parentRef, NSDictionary *elementData, NSInteger index);
typedef NSInvocation *(^WXJSCallNativeModule)(NSString *instanceId, NSString *moduleName, NSString *methodName, NSArray *args, NSDictionary *options);
typedef void (^WXJSCallNativeComponent)(NSString *instanceId, NSString *componentRef, NSString *methodName, NSArray *args, NSDictionary *options);
这4个闭包就是OC封装暴露给JS的4个全局函数。
- (void)registerCallNative:(WXJSCallNative)callNative
{
    JSValue* (^callNativeBlock)(JSValue *, JSValue *, JSValue *) = ^JSValue*(JSValue *instance, JSValue *tasks, JSValue *callback){
        NSString *instanceId = [instance toString];
        NSArray *tasksArray = [tasks toArray];
        NSString *callbackId = [callback toString];

        WXLogDebug(@"Calling native... instance:%@, tasks:%@, callback:%@", instanceId, tasksArray, callbackId);
        return [JSValue valueWithInt32:(int32_t)callNative(instanceId, tasksArray, callbackId) inContext:[JSContext currentContext]];
    };

    _jsContext[@"callNative"] = callNativeBlock;
}
- (void)registerCallAddElement:(WXJSCallAddElement)callAddElement
{
    id callAddElementBlock = ^(JSValue *instanceId, JSValue *ref, JSValue *element, JSValue *index, JSValue *ifCallback) {

        NSString *instanceIdString = [instanceId toString];
        NSDictionary *componentData = [element toDictionary];
        NSString *parentRef = [ref toString];
        NSInteger insertIndex = [[index toNumber] integerValue];

         WXLogDebug(@"callAddElement...%@, %@, %@, %ld", instanceIdString, parentRef, componentData, (long)insertIndex);

        return [JSValue valueWithInt32:(int32_t)callAddElement(instanceIdString, parentRef, componentData, insertIndex) inContext:[JSContext currentContext]];
    };

    _jsContext[@"callAddElement"] = callAddElementBlock;
}
- (void)registerCallNativeModule:(WXJSCallNativeModule)callNativeModuleBlock
{
    _jsContext[@"callNativeModule"] = ^JSValue *(JSValue *instanceId, JSValue *moduleName, JSValue *methodName, JSValue *args, JSValue *options) {
        NSString *instanceIdString = [instanceId toString];
        NSString *moduleNameString = [moduleName toString];
        NSString *methodNameString = [methodName toString];
        NSArray *argsArray = [args toArray];
        NSDictionary *optionsDic = [options toDictionary];

        WXLogDebug(@"callNativeModule...%@,%@,%@,%@", instanceIdString, moduleNameString, methodNameString, argsArray);

        NSInvocation *invocation = callNativeModuleBlock(instanceIdString, moduleNameString, methodNameString, argsArray, optionsDic);
        JSValue *returnValue = [JSValue wx_valueWithReturnValueFromInvocation:invocation inContext:[JSContext currentContext]];
        return returnValue;
    };
}
- (void)registerCallNativeComponent:(WXJSCallNativeComponent)callNativeComponentBlock
{
    _jsContext[@"callNativeComponent"] = ^void(JSValue *instanceId, JSValue *componentName, JSValue *methodName, JSValue *args, JSValue *options) {
        NSString *instanceIdString = [instanceId toString];
        NSString *componentNameString = [componentName toString];
        NSString *methodNameString = [methodName toString];
        NSArray *argsArray = [args toArray];
        NSDictionary *optionsDic = [options toDictionary];

        WXLogDebug(@"callNativeComponent...%@,%@,%@,%@", instanceIdString, componentNameString, methodNameString, argsArray);

        callNativeComponentBlock(instanceIdString, componentNameString, methodNameString, argsArray, optionsDic);
    };
}
由于JS的方法的写法,多个参数是依次写在小括号里面的,和OC多个参数中间用:号隔开是不一样的,所有在暴露给JS的时候,需要把Block再包装一层。包装的4个方法如上,最后把这4个方法注入到JSContext中。
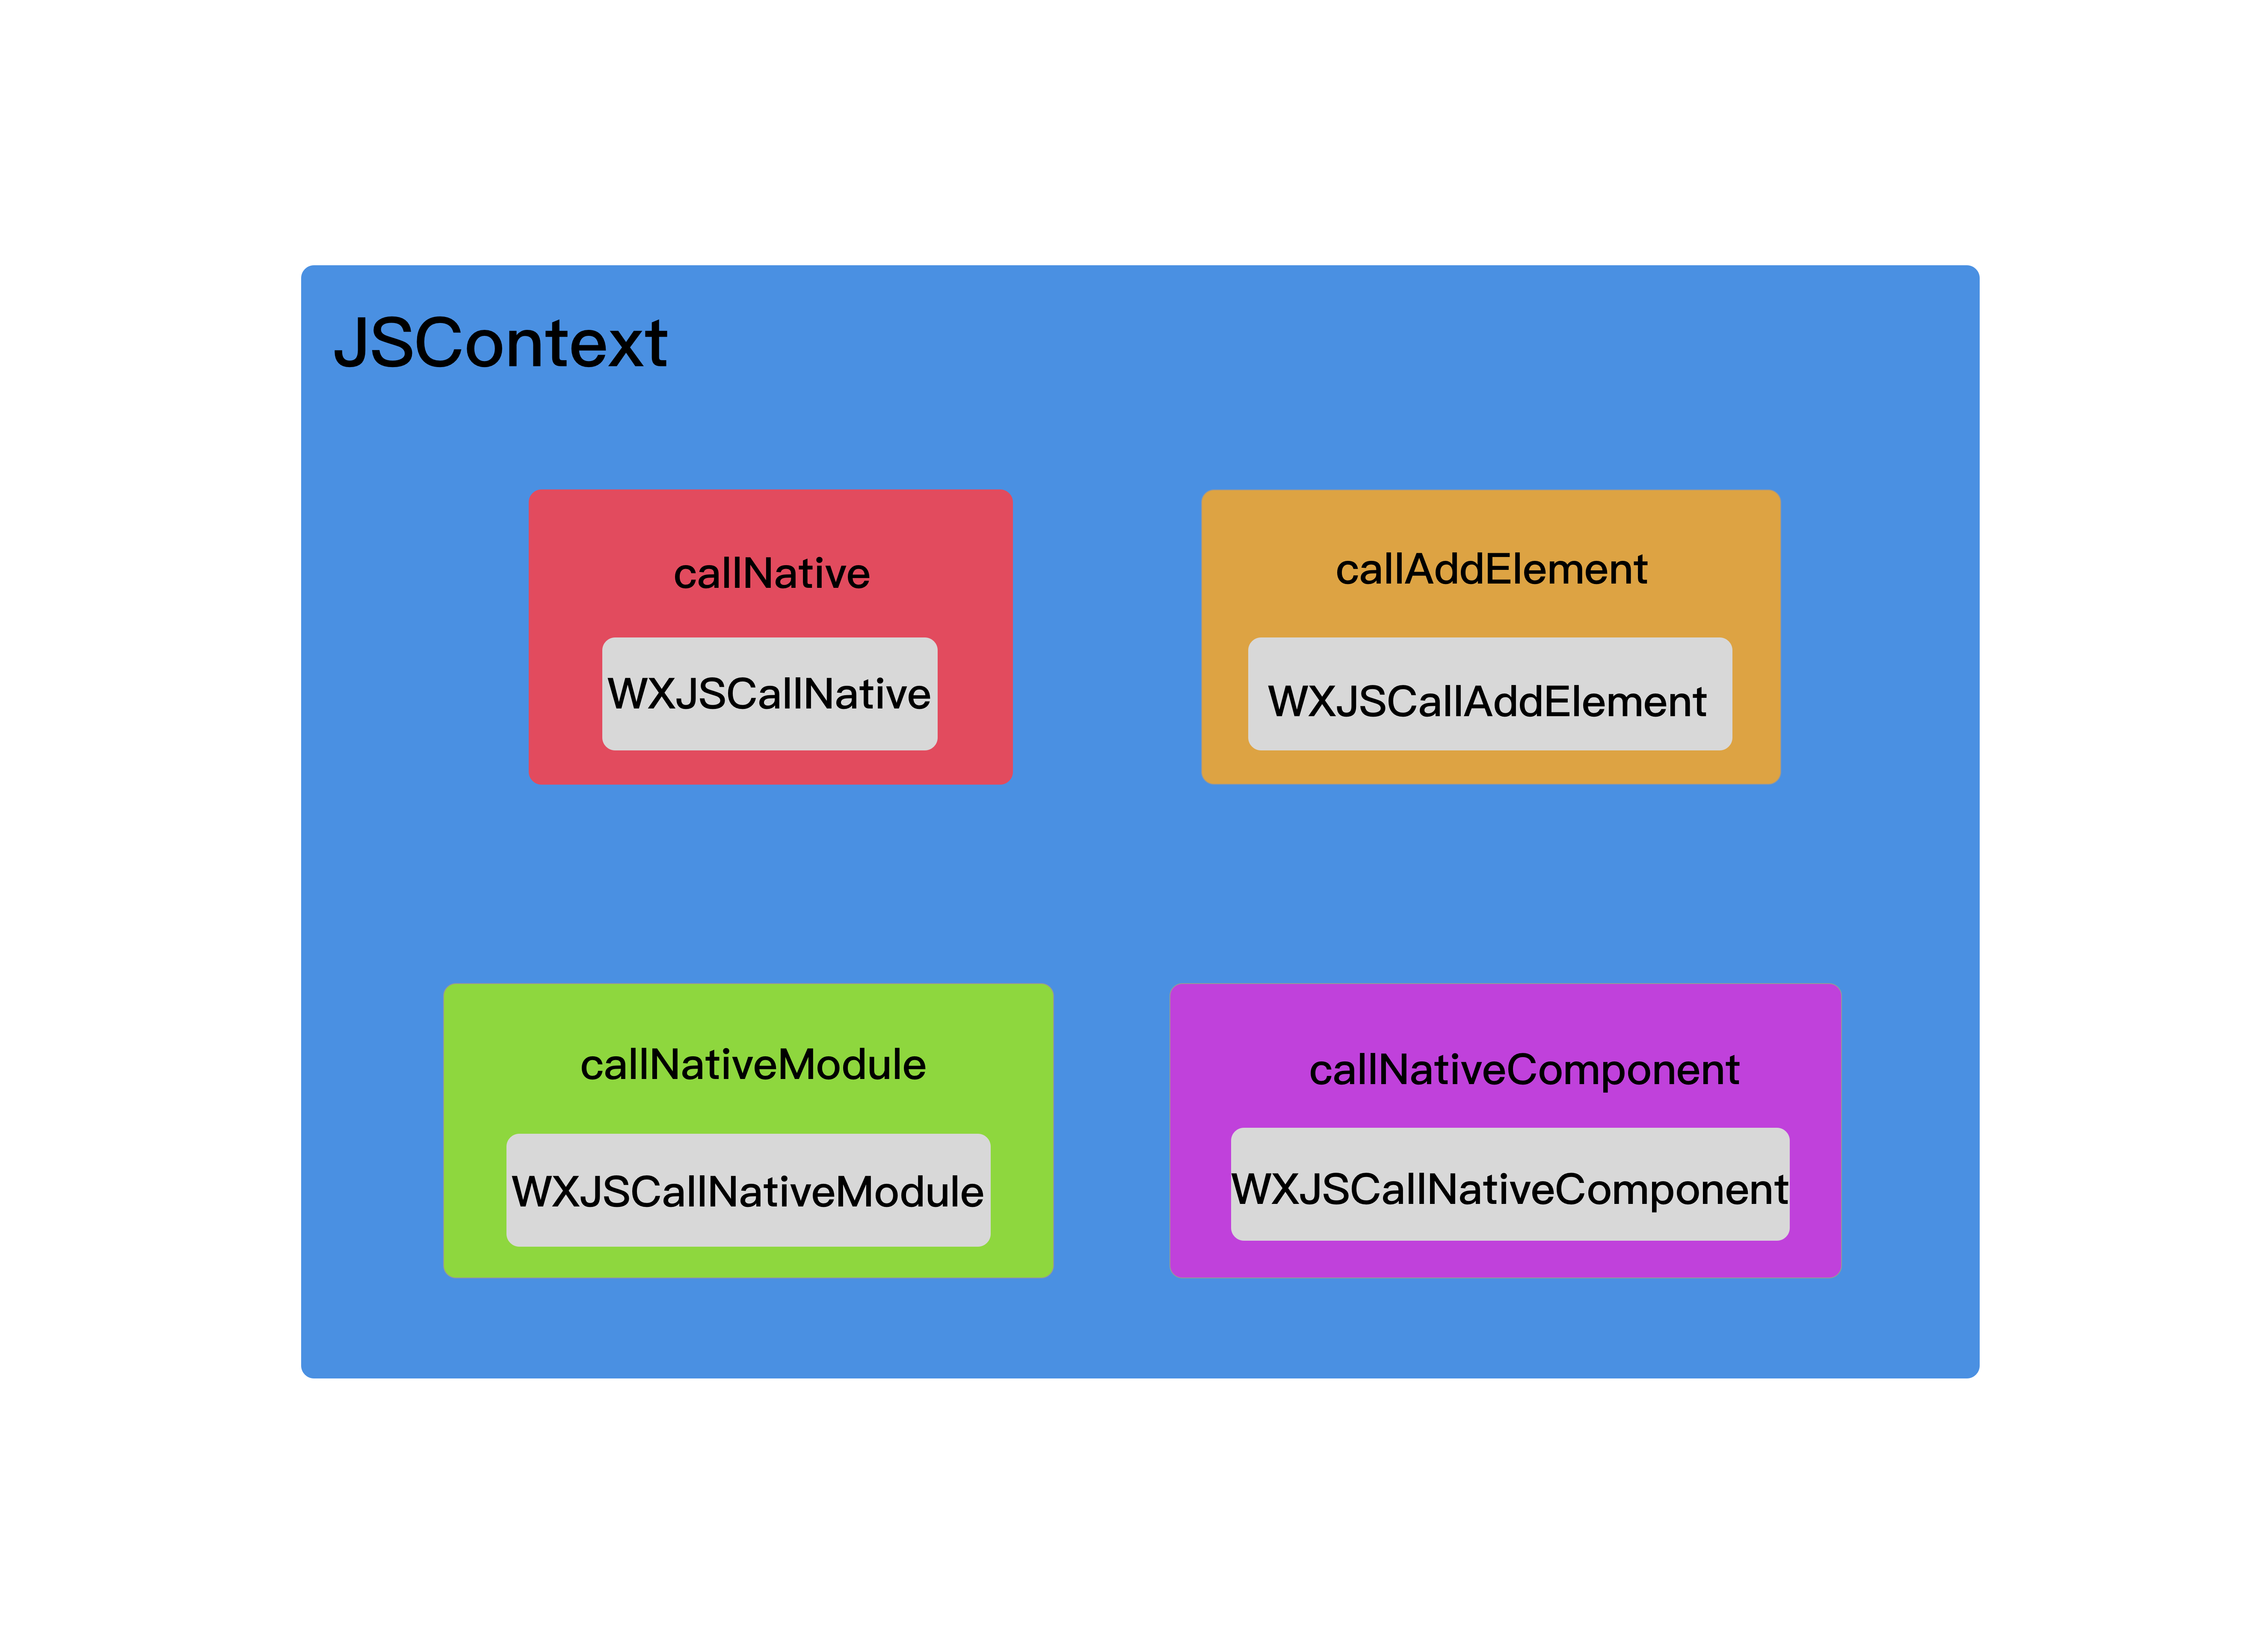
如上图,灰色的就是OC本地传入的Block,外面在包一层,变成JS的方法,注入到JSContext中。
4. 模拟器WXSimulatorShortcutManager连接本地调试工具
#if TARGET_OS_SIMULATOR
    static dispatch_once_t onceToken;
    dispatch_once(&onceToken, ^{
        [WXSimulatorShortcutManager registerSimulatorShortcutWithKey:@"i" modifierFlags:UIKeyModifierCommand | UIKeyModifierAlternate action:^{
            NSURL *URL = [NSURL URLWithString:@"http://localhost:8687/launchDebugger"];
            NSURLRequest *request = [NSURLRequest requestWithURL:URL];

            NSURLSession *session = [NSURLSession sharedSession];
            NSURLSessionDataTask *task = [session dataTaskWithRequest:request
                                                    completionHandler:
                                          ^(NSData *data, NSURLResponse *response, NSError *error) {
                                              // ...
                                          }];

            [task resume];
            WXLogInfo(@"Launching browser...");

            dispatch_after(dispatch_time(DISPATCH_TIME_NOW, (int64_t)(1 * NSEC_PER_SEC)), dispatch_get_main_queue(), ^{

                // 连接websocket调试器
                [self connectDebugServer:@"ws://localhost:8687/debugger/0/renderer"];
            });

        }];
    });
#endif
由于平时开发可能用到模拟器,那么调试的时候就会连接到本地的浏览器(Chrome,Safari)进行调试界面。这里就是在开启模拟的时候,启动浏览器,并且连接websocket调试器。
WXSDKEngine初始化的全部流程可以大概描述如下图:

(二). Weex 是如何让JS调起OC原生UIView的?
上一章节我们分析了WXSDKEngine是如何初始化的,那么初始化完成之后,iOS Native客户端是如何接收到JS的页面并调用OC生成UIView的呢?这一章节我们来分析分析。
在分析这个问题之前,先来看看AppStore上面Weex官方为我们提供的实例程序WeexPlayground的扫码功能是怎么实现扫描二维码就可以进入到一个页面的。
1.扫二维码的原理
首先看一下扫码界面的一些属性:
@interface WXScannerVC : UIViewController <AVCaptureMetadataOutputObjectsDelegate>
@property (nonatomic, strong) AVCaptureSession * session;
@property (nonatomic, strong) AVCaptureVideoPreviewLayer *captureLayer;
@end
这个页面没有额外的配置,就是一些调用摄像头的代理。
- (void)captureOutput:(AVCaptureOutput *)captureOutput didOutputMetadataObjects:(NSArray *)metadataObjects fromConnection:(AVCaptureConnection *)connection
{
    [_captureLayer removeFromSuperlayer];
    [_session stopRunning];
    AudioServicesPlaySystemSound(kSystemSoundID_Vibrate);
    if (metadataObjects.count > 0) {
        AVMetadataMachineReadableCodeObject * metadataObject = [metadataObjects objectAtIndex : 0 ];
        [self openURL:metadataObject.stringValue];
    }
}
当扫描到二维码以后,代理会调用上面这个函数,扫描出来的URL就是metadataObject.stringValue。
- (void)openURL:(NSString*)URL
{
    NSString *transformURL = URL;
    NSArray* elts = [URL componentsSeparatedByString:@"?"];
    if (elts.count >= 2) {
        NSArray *urls = [elts.lastObject componentsSeparatedByString:@"="];
        for (NSString *param in urls) {
            if ([param isEqualToString:@"_wx_tpl"]) {
                transformURL = [[urls lastObject]  stringByReplacingPercentEscapesUsingEncoding:NSUTF8StringEncoding];
                break;
            }
        }
    }
    NSURL *url = [NSURL URLWithString:transformURL];
    if ([self remoteDebug:url]) {
        return;
    }
    [self jsReplace:url];
    WXDemoViewController * controller = [[WXDemoViewController alloc] init];
    controller.url = url;
    controller.source = @"scan";

    NSMutableDictionary *queryDict = [NSMutableDictionary new];
    if (WX_SYS_VERSION_GREATER_THAN_OR_EQUAL_TO(@"8.0")) {
        NSURLComponents *components = [NSURLComponents componentsWithURL:url resolvingAgainstBaseURL:NO];
        NSArray *queryItems = [components queryItems];

        for (NSURLQueryItem *item in queryItems)
            [queryDict setObject:item.value forKey:item.name];
    }else {
        queryDict = [self queryWithURL:url];
    }
    NSString *wsport = queryDict[@"wsport"] ?: @"8082";
    NSURL *socketURL = [NSURL URLWithString:[NSString stringWithFormat:@"ws://%@:%@", url.host, wsport]];
    controller.hotReloadSocket = [[SRWebSocket alloc] initWithURL:socketURL protocols:@[@"echo-protocol"]];
    controller.hotReloadSocket.delegate = controller;
    [controller.hotReloadSocket open];

    [[self navigationController] pushViewController:controller animated:YES];
}
上面这段是完成的打开二维码页面的代码,里面包含判断URL的query参数的一些处理。稍微简化一下,简化成下面的样子:
- (void)openURL:(NSString*)URL
{
    // 1.获取URL
    NSString *transformURL = URL;
    NSURL *url = [NSURL URLWithString:transformURL];
    // 2.配置新页面的url
    WXDemoViewController * controller = [[WXDemoViewController alloc] init];
    controller.url = url;
    controller.source = @"scan";
    // 3.连接websocket
    NSString *wsport = queryDict[@"wsport"] ?: @"8082";
    NSURL *socketURL = [NSURL URLWithString:[NSString stringWithFormat:@"ws://%@:%@", url.host, wsport]];
    controller.hotReloadSocket = [[SRWebSocket alloc] initWithURL:socketURL protocols:@[@"echo-protocol"]];
    controller.hotReloadSocket.delegate = controller;
    [controller.hotReloadSocket open];
    // 4.页面跳转
    [[self navigationController] pushViewController:controller animated:YES];
}
openURL:其实就干了上面注释说的4件事情。最重要的就是给新的界面配置了URL,至于连接websocket是为了更改.we文件或者.vue文件能及时的在手机上看见更改。最后一步就是页面跳转。所以扫描二维码能打开一个新的页面,原因只是给这个新的页面配置了一个URL,仅此而已。
2.JS是如何调起OC原生View的
再次回到我们的主题上来,JS究竟是如何调起OC原生View的?
所有的秘密都在WXSDKInstance这个类里面。
@interface WXSDKInstance : NSObject

// 当前需要渲染的viewController
@property (nonatomic, weak) UIViewController *viewController;
// Native根容器的View是完全受WXSDKInstance控制,开发者无法更改
@property (nonatomic, strong) UIView *rootView;
// 如果组件想固定rootview的frame,可以把这个属性设置为YES,当weex进行layout的时候,就不会改变rootview的frame了。反之设置为NO
@property (nonatomic, assign) BOOL isRootViewFrozen;
// weex bundle的scriptURL
@property (nonatomic, strong) NSURL *scriptURL;
// 父Instance
@property (nonatomic, weak) WXSDKInstance *parentInstance;
// 父Instance节点的引用
@property (nonatomic, weak) NSString *parentNodeRef;
// 用来标识当前weex instance独一无二的ID
@property (nonatomic, strong) NSString *instanceId;
// 当前weex instance的状态
@property (nonatomic, assign) WXState state;
// 当weex instance完成rootView的创建时的回调block
@property (nonatomic, copy) void (^onCreate)(UIView *);
// 根容器的frame改变时候的回调
@property (nonatomic, copy) void (^onLayoutChange)(UIView *);
// 当weex instance完成渲染时的回调block
@property (nonatomic, copy) void (^renderFinish)(UIView *);
// 当weex instance刷新完成时的回调block
@property (nonatomic, copy) void (^refreshFinish)(UIView *);
// 当weex instance渲染失败时的回调block
@property (nonatomic, copy) void (^onFailed)(NSError *error);
// 当weex instance页面滚动时的回调block
@property (nonatomic, copy) void (^onScroll)(CGPoint contentOffset);
// 当weex instance渲染进行中的回调block
@property (nonatomic, copy) void (^onRenderProgress)(CGRect renderRect);
// 当前weex instance的frame
@property (nonatomic, assign) CGRect frame;
// user存储的一些Info信息
@property (nonatomic, strong) NSMutableDictionary *userInfo;
// css单元和设备像素的换算比例因子
@property (nonatomic, assign, readonly) CGFloat pixelScaleFactor;
// 是否监测组件的渲染
@property (nonatomic, assign)BOOL trackComponent;

- (void)renderWithURL:(NSURL *)url;
- (void)renderWithURL:(NSURL *)url options:(NSDictionary *)options data:(id)data;
- (void)renderView:(NSString *)source options:(NSDictionary *)options data:(id)data;
// forcedReload为YES,每次加载都会从URL重新读取,为NO,会从缓存中读取
- (void)reload:(BOOL)forcedReload;
- (void)refreshInstance:(id)data;
- (void)destroyInstance;
- (id)moduleForClass:(Class)moduleClass;
- (WXComponent *)componentForRef:(NSString *)ref;
- (NSUInteger)numberOfComponents;
- (BOOL)checkModuleEventRegistered:(NSString*)event moduleClassName:(NSString*)moduleClassName;
- (void)fireModuleEvent:(Class)module eventName:(NSString *)eventName params:(NSDictionary*)params;
- (void)fireGlobalEvent:(NSString *)eventName params:(NSDictionary *)params;
- (NSURL *)completeURL:(NSString *)url;

@end
一个WXSDKInstance就对应一个UIViewController,所以每个Weex的页面都有一个与之对应的WXSDKInstance。
@property (nonatomic, strong) WXSDKInstance *instance;
WXSDKInstance主要用来渲染页面,一般通过调用renderWithURL方法。
一个Weex界面的主动渲染的过程如下:
- (void)render
{
    CGFloat width = self.view.frame.size.width;
    [_instance destroyInstance];
    _instance = [[WXSDKInstance alloc] init];
    _instance.viewController = self;
    _instance.frame = CGRectMake(self.view.frame.size.width-width, 0, width, _weexHeight);

    __weak typeof(self) weakSelf = self;
    _instance.onCreate = ^(UIView *view) {
        [weakSelf.weexView removeFromSuperview];
        weakSelf.weexView = view;
        [weakSelf.view addSubview:weakSelf.weexView];
        UIAccessibilityPostNotification(UIAccessibilityScreenChangedNotification, weakSelf.weexView);
    };
    _instance.onFailed = ^(NSError *error) {

    };

    _instance.renderFinish = ^(UIView *view) {
        [weakSelf updateInstanceState:WeexInstanceAppear];
    };

    _instance.updateFinish = ^(UIView *view) {

    };

    if (!self.url) {
        WXLogError(@"error: render url is nil");
        return;
    }
    NSURL *URL = [self testURL: [self.url absoluteString]];
    NSString *randomURL = [NSString stringWithFormat:@"%@%@random=%d",URL.absoluteString,URL.query?@"&":@"?",arc4random()];
    [_instance renderWithURL:[NSURL URLWithString:randomURL] options:@{@"bundleUrl":URL.absoluteString} data:nil];
}
由于WXSDKInstance是支持实时刷新,所以在创建的时候需要先销毁掉原来的,再创建一个新的。
WXSDKInstance支持设置各种状态时候的回调callback函数,具体支持哪些状态,可以看上面WXSDKInstance的定义。
Weex支持从本地加载JS,也支持从服务器加载JS。如果从本地加载,那么可以用下面的方法,从本地加载一个JSBundle。
- (void)loadLocalBundle:(NSURL *)url
{
    NSURL * localPath = nil;
    NSMutableArray * pathComponents = nil;
    if (self.url) {
        pathComponents =[NSMutableArray arrayWithArray:[url.absoluteString pathComponents]];
        [pathComponents removeObjectsInRange:NSRangeFromString(@"0 3")];
        [pathComponents replaceObjectAtIndex:0 withObject:@"bundlejs"];

        NSString *filePath = [NSString stringWithFormat:@"%@/%@",[NSBundle mainBundle].bundlePath,[pathComponents componentsJoinedByString:@"/"]];
        localPath = [NSURL fileURLWithPath:filePath];
    }else {
        NSString *filePath = [NSString stringWithFormat:@"%@/bundlejs/index.js",[NSBundle mainBundle].bundlePath];
        localPath = [NSURL fileURLWithPath:filePath];
    }

    NSString *bundleUrl = [NSURL fileURLWithPath:[NSString stringWithFormat:@"%@/bundlejs/",[NSBundle mainBundle].bundlePath]].absoluteString;
     [_instance renderWithURL:localPath options:@{@"bundleUrl":bundleUrl} data:nil];
}
最后渲染页面就是通过调用renderWithURL:options:data:做到的。
- (void)renderWithURL:(NSURL *)url options:(NSDictionary *)options data:(id)data
{
    if (!url) {
        WXLogError(@"Url must be passed if you use renderWithURL");
        return;
    }

    WXResourceRequest *request = [WXResourceRequest requestWithURL:url resourceType:WXResourceTypeMainBundle referrer:@"" cachePolicy:NSURLRequestUseProtocolCachePolicy];
    [self _renderWithRequest:request options:options data:data];
}
在WXSDKInstance调用renderWithURL:options:data:方法的时候,会生成一个WXResourceRequest。NSMutableURLRequest定义如下:
@interface WXResourceRequest : NSMutableURLRequest
@property (nonatomic, strong) id taskIdentifier;
@property (nonatomic, assign) WXResourceType type;
@property (nonatomic, strong) NSString *referrer;
@property (nonatomic, strong) NSString *userAgent;
@end
WXResourceRequest其实也就是对NSMutableURLRequest的一层封装。
下面来分析一下最核心的函数renderWithURL:options:data:(以下的代码实现在源码的基础上略有删减,源码太长,删减以后并不影响阅读)
- (void)_renderWithRequest:(WXResourceRequest *)request options:(NSDictionary *)options data:(id)data;
{
    NSURL *url = request.URL;
    _scriptURL = url;
    _options = options;
    _jsData = data;
    NSMutableDictionary *newOptions = [options mutableCopy] ?: [NSMutableDictionary new];

    WX_MONITOR_INSTANCE_PERF_START(WXPTJSDownload, self);
    __weak typeof(self) weakSelf = self;
    _mainBundleLoader = [[WXResourceLoader alloc] initWithRequest:request];

      // 请求完成的回调
    _mainBundleLoader.onFinished = ^(WXResourceResponse *response, NSData *data) {
        __strong typeof(weakSelf) strongSelf = weakSelf;

        if ([response isKindOfClass:[NSHTTPURLResponse class]] && ((NSHTTPURLResponse *)response).statusCode != 200) {
            NSError *error = [NSError errorWithDomain:WX_ERROR_DOMAIN
                                                 code:((NSHTTPURLResponse *)response).statusCode
                                             userInfo:@{@"message":@"status code error."}];
            if (strongSelf.onFailed) {
                strongSelf.onFailed(error);
            }
            return ;
        }

        if (!data) {

            if (strongSelf.onFailed) {
                strongSelf.onFailed(error);
            }
            return;
        }

        NSString *jsBundleString = [[NSString alloc] initWithData:data encoding:NSUTF8StringEncoding];

        if (!jsBundleString) {
            return;
        }

        [strongSelf _renderWithMainBundleString:jsBundleString];
    };

    // 请求失败的回调
    _mainBundleLoader.onFailed = ^(NSError *loadError) {

        if (weakSelf.onFailed) {
            weakSelf.onFailed(loadError);
        }
    };

    [_mainBundleLoader start];
}
上面代码只要就是干了2件事情,第一步,生成了WXResourceLoader,并设置了它的onFinished和onFailed回调。第二步调用了start方法。
在WXSDKInstance中强持有了一个WXResourceLoader,WXResourceLoader的定义如下:
@interface WXResourceLoader : NSObject

@property (nonatomic, strong) WXResourceRequest *request;
@property (nonatomic, copy) void (^onDataSent)(unsigned long long /* bytesSent */, unsigned long long /* totalBytesToBeSent */);
@property (nonatomic, copy) void (^onResponseReceived)(const WXResourceResponse *);
@property (nonatomic, copy) void (^onDataReceived)(NSData *);
@property (nonatomic, copy) void (^onFinished)(const WXResourceResponse *, NSData *);
@property (nonatomic, copy) void (^onFailed)(NSError *);

- (instancetype)initWithRequest:(WXResourceRequest *)request;
- (void)start;
- (void)cancel:(NSError **)error;
@end
WXResourceLoader里面含有一个WXResourceRequest,所以WXResourceRequest也可以看出对网络请求的封装,并且提供了5种不同状态的callback回调函数。
- (void)start
{
    if ([_request.URL isFileURL]) {
        [self _handleFileURL:_request.URL];
        return;
    }

    id<WXResourceRequestHandler> requestHandler = [WXHandlerFactory handlerForProtocol:@protocol(WXResourceRequestHandler)];
    if (requestHandler) {
        [requestHandler sendRequest:_request withDelegate:self];
    } else if ([WXHandlerFactory handlerForProtocol:NSProtocolFromString(@"WXNetworkProtocol")]){
        // deprecated logic
        [self _handleDEPRECATEDNetworkHandler];
    } else {
        WXLogError(@"No resource request handler found!");
    }
}
在调用了WXResourceLoader的start方法以后,会先判断是不是本地的url,如果是本地的文件,那么就直接开始加载。
- (void)_handleFileURL:(NSURL *)url
{
    dispatch_async(dispatch_get_global_queue(DISPATCH_QUEUE_PRIORITY_DEFAULT, 0), ^{
        NSData *fileData = [[NSFileManager defaultManager] contentsAtPath:[url path]];
        if (self.onFinished) {
            self.onFinished([WXResourceResponse new], fileData);
        }
    });
}
本地文件就直接回调onFinished函数。
如果不是本地的文件,就开始发起网络请求,请求服务器端的js文件。
- (void)sendRequest:(WXResourceRequest *)request withDelegate:(id<WXResourceRequestDelegate>)delegate
{
    if (!_session) {
        NSURLSessionConfiguration *urlSessionConfig = [NSURLSessionConfiguration defaultSessionConfiguration];
        if ([WXAppConfiguration customizeProtocolClasses].count > 0) {
            NSArray *defaultProtocols = urlSessionConfig.protocolClasses;
            urlSessionConfig.protocolClasses = [[WXAppConfiguration customizeProtocolClasses] arrayByAddingObjectsFromArray:defaultProtocols];
        }
        _session = [NSURLSession sessionWithConfiguration:urlSessionConfig
                                                 delegate:self
                                            delegateQueue:[NSOperationQueue mainQueue]];
        _delegates = [WXThreadSafeMutableDictionary new];
    }

    NSURLSessionDataTask *task = [_session dataTaskWithRequest:request];
    request.taskIdentifier = task;
    [_delegates setObject:delegate forKey:task];
    [task resume];
}
这里的网络请求就是普通的正常的NSURLSession网络请求。
如果成功,最终都会执行onFinished的回调函数。
_mainBundleLoader.onFinished = ^(WXResourceResponse *response, NSData *data) {
        __strong typeof(weakSelf) strongSelf = weakSelf;

        if ([response isKindOfClass:[NSHTTPURLResponse class]] && ((NSHTTPURLResponse *)response).statusCode != 200) {
            NSError *error = [NSError errorWithDomain:WX_ERROR_DOMAIN
                                        code:((NSHTTPURLResponse *)response).statusCode
                                    userInfo:@{@"message":@"status code error."}];
            if (strongSelf.onFailed) {
                strongSelf.onFailed(error);
            }
            return ;
        }

        if (!data) {
            NSString *errorMessage = [NSString stringWithFormat:@"Request to %@ With no data return", request.URL];
            WX_MONITOR_FAIL_ON_PAGE(WXMTJSDownload, WX_ERR_JSBUNDLE_DOWNLOAD, errorMessage, strongSelf.pageName);

            if (strongSelf.onFailed) {
                strongSelf.onFailed(error);
            }
            return;
        }

        NSString *jsBundleString = [[NSString alloc] initWithData:data encoding:NSUTF8StringEncoding];


        NSLog(@"下载下来的 jsBundleString = %@",jsBundleString);

        if (!jsBundleString) {
            WX_MONITOR_FAIL_ON_PAGE(WXMTJSDownload, WX_ERR_JSBUNDLE_STRING_CONVERT, @"data converting to string failed.", strongSelf.pageName)
            return;
        }

        WX_MONITOR_SUCCESS_ON_PAGE(WXMTJSDownload, strongSelf.pageName);
        WX_MONITOR_INSTANCE_PERF_END(WXPTJSDownload, strongSelf);

        [strongSelf _renderWithMainBundleString:jsBundleString];
    };
在onFinished的回调中,还会有3种错误判断,status code error,no data return,data converting to string failed。
NSString *jsBundleString = [[NSString alloc] initWithData:data encoding:NSUTF8StringEncoding];
[strongSelf _renderWithMainBundleString:jsBundleString];
如果一切正常,那么在onFinished的回调中其实就是拿到jsBundleString,并执行渲染操作。
- (void)_renderWithMainBundleString:(NSString *)mainBundleString
{
//以下代码有删减,去除了一些错误判断,但是不影响阅读

    NSMutableDictionary *dictionary = [_options mutableCopy];

    //生成WXRootView
    WXPerformBlockOnMainThread(^{
        _rootView = [[WXRootView alloc] initWithFrame:self.frame];
        _rootView.instance = self;
        if(self.onCreate) {
            self.onCreate(_rootView);
        }
    });

    // 再次注册默认的模块modules、组件components、handlers,以确保在创建instance之前它们都被注册了
    [WXSDKEngine registerDefaults];

    // 开始createInstance
    [[WXSDKManager bridgeMgr] createInstance:self.instanceId template:mainBundleString options:dictionary data:_jsData];

}
这里WXSDKEngine还会重新再次注册一遍模块modules、组件components、handlers,以确保在创建instance之前它们都被注册了。
- (void)createInstance:(NSString *)instance
              template:(NSString *)temp
               options:(NSDictionary *)options
                  data:(id)data
{
    if (!instance || !temp) return;
    if (![self.instanceIdStack containsObject:instance]) {
        if ([options[@"RENDER_IN_ORDER"] boolValue]) {
            [self.instanceIdStack addObject:instance];
        } else {
            [self.instanceIdStack insertObject:instance atIndex:0];
        }
    }
    __weak typeof(self) weakSelf = self;
    WXPerformBlockOnBridgeThread(^(){
        [weakSelf.bridgeCtx createInstance:instance
                                  template:temp
                                   options:options
                                      data:data];
    });
}
WXSDKManager中会调用createInstance:template:options:data:方法,这个方法也必须在JSThread中执行。
- (void)createInstance:(NSString *)instance
              template:(NSString *)temp
               options:(NSDictionary *)options
                  data:(id)data
{
    if (![self.insStack containsObject:instance]) {
        if ([options[@"RENDER_IN_ORDER"] boolValue]) {
            [self.insStack addObject:instance];
        } else {
            [self.insStack insertObject:instance atIndex:0];
        }
    }

    //create a sendQueue bind to the current instance
    NSMutableArray *sendQueue = [NSMutableArray array];
    [self.sendQueue setValue:sendQueue forKey:instance];

    NSArray *args = nil;
    if (data){
        args = @[instance, temp, options ?: @{}, data];
    } else {
        args = @[instance, temp, options ?: @{}];
    }

    [self callJSMethod:@"createInstance" args:args];
}
最终还是WXJSCoreBridge里面的JSContext调用
[[_jsContext globalObject] invokeMethod:method withArguments:args];
调用JS的"createInstance"方法。从此处开始,就开始和JSFramework进行相互调用了。
在举例之前,我们先把前面的流程画图总结一下:

接下来用一个例子来说明JS是如何调用起OC原生的View的。
先用JS写一个页面:
<template>
    <div class="container">
        <image src="http://9.pic.paopaoche.net/up/2016-7/201671315341.png" class="pic" onclick="picClick"></image>
        <text class="text">{{title}}</text>
    </div>
</template>

<style>

    .container{
        align-items: center;
    }
    .pic{
        width: 200px;
        height: 200px;
    }
    .text{
        font-size: 40px;
        color: black;
    }

</style>

<script>
    module.exports = {
        data:{
            title:'Hello World',
            toggle:false,
        },
        ready:function(){
            console.log('this.title == '+this.title);
            this.title = 'hello Weex';
            console.log('this.title == '+this.title);
        },
        methods:{
            picClick: function () {
                this.toggle = !this.toggle;
                if(this.toggle){
                    this.title = '图片被点击';
                }else{
                    this.title = 'Hello Weex';
                }

            }
        }
    }
</script>
这个页面跑起来长下面这个样子:

上面是我的.we源文件,经过Weex编译以后,就变成了index.js,里面的代码如下:
// { "framework": "Weex" }
/******/ (function(modules) { // webpackBootstrap
/******/ 	// The module cache
/******/ 	var installedModules = {};

/******/ 	// The require function
/******/ 	function __webpack_require__(moduleId) {

/******/ 		// Check if module is in cache
/******/ 		if(installedModules[moduleId])
/******/ 			return installedModules[moduleId].exports;

/******/ 		// Create a new module (and put it into the cache)
/******/ 		var module = installedModules[moduleId] = {
/******/ 			exports: {},
/******/ 			id: moduleId,
/******/ 			loaded: false
/******/ 		};

/******/ 		// Execute the module function
/******/ 		modules[moduleId].call(module.exports, module, module.exports, __webpack_require__);

/******/ 		// Flag the module as loaded
/******/ 		module.loaded = true;

/******/ 		// Return the exports of the module
/******/ 		return module.exports;
/******/ 	}


/******/ 	// expose the modules object (__webpack_modules__)
/******/ 	__webpack_require__.m = modules;

/******/ 	// expose the module cache
/******/ 	__webpack_require__.c = installedModules;

/******/ 	// __webpack_public_path__
/******/ 	__webpack_require__.p = "";

/******/ 	// Load entry module and return exports
/******/ 	return __webpack_require__(0);
/******/ })
/************************************************************************/
/******/ ([
/* 0 */
/***/ function(module, exports, __webpack_require__) {

	var __weex_template__ = __webpack_require__(1)
	var __weex_style__ = __webpack_require__(2)
	var __weex_script__ = __webpack_require__(3)

	__weex_define__('@weex-component/916f9ecb075bbff1f4ea98389a4bb514', [], function(__weex_require__, __weex_exports__, __weex_module__) {

	    __weex_script__(__weex_module__, __weex_exports__, __weex_require__)
	    if (__weex_exports__.__esModule && __weex_exports__.default) {
	      __weex_module__.exports = __weex_exports__.default
	    }

	    __weex_module__.exports.template = __weex_template__

	    __weex_module__.exports.style = __weex_style__

	})

	__weex_bootstrap__('@weex-component/916f9ecb075bbff1f4ea98389a4bb514',undefined,undefined)

/***/ },
/* 1 */
/***/ function(module, exports) {

	module.exports = {
	  "type": "div",
	  "classList": [
	    "container"
	  ],
	  "children": [
	    {
	      "type": "image",
	      "attr": {
	        "src": "http://9.pic.paopaoche.net/up/2016-7/201671315341.png"
	      },
	      "classList": [
	        "pic"
	      ],
	      "events": {
	        "click": "picClick"
	      }
	    },
	    {
	      "type": "text",
	      "classList": [
	        "text"
	      ],
	      "attr": {
	        "value": function () {return this.title}
	      }
	    }
	  ]
	}

/***/ },
/* 2 */
/***/ function(module, exports) {

	module.exports = {
	  "container": {
	    "alignItems": "center"
	  },
	  "pic": {
	    "width": 200,
	    "height": 200
	  },
	  "text": {
	    "fontSize": 40,
	    "color": "#000000"
	  }
	}

/***/ },
/* 3 */
/***/ function(module, exports) {

	module.exports = function(module, exports, __weex_require__){'use strict';

	module.exports = {
	    data: function () {return {
	        title: 'Hello World',
	        toggle: false
	    }},
	    ready: function ready() {
	        console.log('this.title == ' + this.title);
	        this.title = 'hello Weex';
	        console.log('this.title == ' + this.title);
	    },
	    methods: {
	        picClick: function picClick() {
	            this.toggle = !this.toggle;
	            if (this.toggle) {
	                this.title = '图片被点击';
	            } else {
	                this.title = 'Hello Weex';
	            }
	        }
	    }
	};}
	/* generated by weex-loader */


/***/ }
/******/ ]);
看上去一堆代码,实际上仔细看看,就能看出门道。
(function(modules) { // webpackBootstrap

……  ……
}
这段代码是自动加的,暂时不管。然后下面有4段代码,开头都分别编了序号,0,1,2,3。1,2,3段代码就是分别对应<template>,<style>,<script>。上述这段代码就是从服务器请求下来的代码。
那服务器拿到JS以后,OC会调用JS的方法createInstance(id, code, config, data)方法。
args:(
    0,
    “(这里是网络上下载的JS,由于太长了,省略)”,
        {
        bundleUrl = "http://192.168.31.117:8081/HelloWeex.js";
        debug = 1;
    }
)
接着会在JSFramework里面执行一些转换的操作:
[JS Framework] create an Weex@undefined instance from undefined  [;
[JS Framework] Intialize an instance with: undefined  [;
[JS Framework] define a component @weex-component/916f9ecb075bbff1f4ea98389a4bb514  [;
[JS Framework] bootstrap for @weex-component/916f9ecb075bbff1f4ea98389a4bb514  [;
[JS Framework] "init" lifecycle in Vm(916f9ecb075bbff1f4ea98389a4bb514)  [;
[JS Framework] "created" lifecycle in Vm(916f9ecb075bbff1f4ea98389a4bb514)  [;
[JS Framework] compile native component by {"type":"div","classList":["container"],"children":[{"type":"image","attr":{"src":"http://9.pic.paopaoche.net/up/2016-7/201671315341.png"},"classList":["pic"],"events":{"click":"picClick"}},{"type":"text","classList":["text"],"attr":{}}]}  [;
[JS Framework] compile to create body for div  [;
[JS Framework] compile to append single node for {"ref":"_root","type":"div","attr":{},"style":{"alignItems":"center"}}
接下来JSFramework就会调用OC的callNative方法。调用dom模块的createBody方法,创建rootView。参数如下:
(
        {
        args =         (
                        {
                attr =                 {
                };
                ref = "_root";
                style =                 {
                    alignItems = center;
                };
                type = div;
            }
        );
        method = createBody;
        module = dom;
    }
)
创建好rootView以后,接着要继续添加View了。
[JS Framework] compile native component by {"type":"image","attr":{"src":"http://9.pic.paopaoche.net/up/2016-7/201671315341.png"},"classList":["pic"],"events":{"click":"picClick"}}  [;
[JS Framework] compile to create element for image  [;
[JS Framework] compile to append single node for {"ref":"3","type":"image","attr":{"src":"http://9.pic.paopaoche.net/up/2016-7/201671315341.png"},"style":{"width":200,"height":200},"event":["click"]}
JSFramework继续调用OC的callAddElement方法添加View。参数如下:
{
    attr =     {
        src = "http://9.pic.paopaoche.net/up/2016-7/201671315341.png";
    };
    event =     (
        click
    );
    ref = 3;
    style =     {
        height = 200;
        width = 200;
    };
    type = image;
}
UIImage添加完成以后,再接着添加UILabel。
[JS Framework] compile native component by {"type":"text","classList":["text"],"attr":{}}  [;
[JS Framework] compile to create element for text  [;
[JS Framework] compile to append single node for {"ref":"4","type":"text","attr":{"value":"Hello World"},"style":{"fontSize":40,"color":"#000000"}}
JSFramework继续调用OC的callAddElement方法添加View。参数如下:
{
    attr =     {
        value = "Hello World";
    };
    ref = 4;
    style =     {
        color = "#000000";
        fontSize = 40;
    };
    type = text;
}
当ready以后:
[JS Framework] "ready" lifecycle in Vm(916f9ecb075bbff1f4ea98389a4bb514)
JSFramework继续调用OC的callNative方法,参数如下:
(
        {
        args =         (
            4,
                        {
                value = "hello Weex";
            }
        );
        method = updateAttrs;
        module = dom;
    }
)
至此,所有的布局已经完成。JSFramework会继续调用OC的callNative方法。
(
        {
        args =         (
        );
        method = createFinish;
        module = dom;
    }
)
到此为止,所有的View都已经创建完成了。最终整个布局如下:
{layout: {width: 414, height: 672, top: 0, left: 0}, flexDirection: 'column', alignItems: 'stretch', flex: 0, width: 414, height: 672, left: 0, top: 0, children: [
  {_root:div layout: {width: 414, height: 672, top: 0, left: 0}, flexDirection: 'column', alignItems: 'center', flex: 0, width: 414, height: 672, children: [
    {3:image layout: {width: 110.4, height: 110.4, top: 0, left: 151.8}, flexDirection: 'column', alignItems: 'stretch', flex: 0, width: 110.4, height: 110.4, },
    {4:text layout: {width: 107.333, height: 26.6667, top: 110.4, left: 153.333}, flexDirection: 'column', alignItems: 'stretch', flex: 0, },
  ]},
]}
从最终的layout来看,我们可以看出,每一个module,component都有其对应的独一无二的id。
接着下一步操作是WXImageComponent更新图片。更新结束以后,整个Render就算彻底完成了。
JSFramework在整个过程中扮演的角色是根据输入的JSBundle,不断的输出Json格式的Virtual DOM,然后通过JSCore调用OC原生方法,生成View。
上面这个例子中,JSFramework的工作原理基本就展现出来了。大体流程如下图:
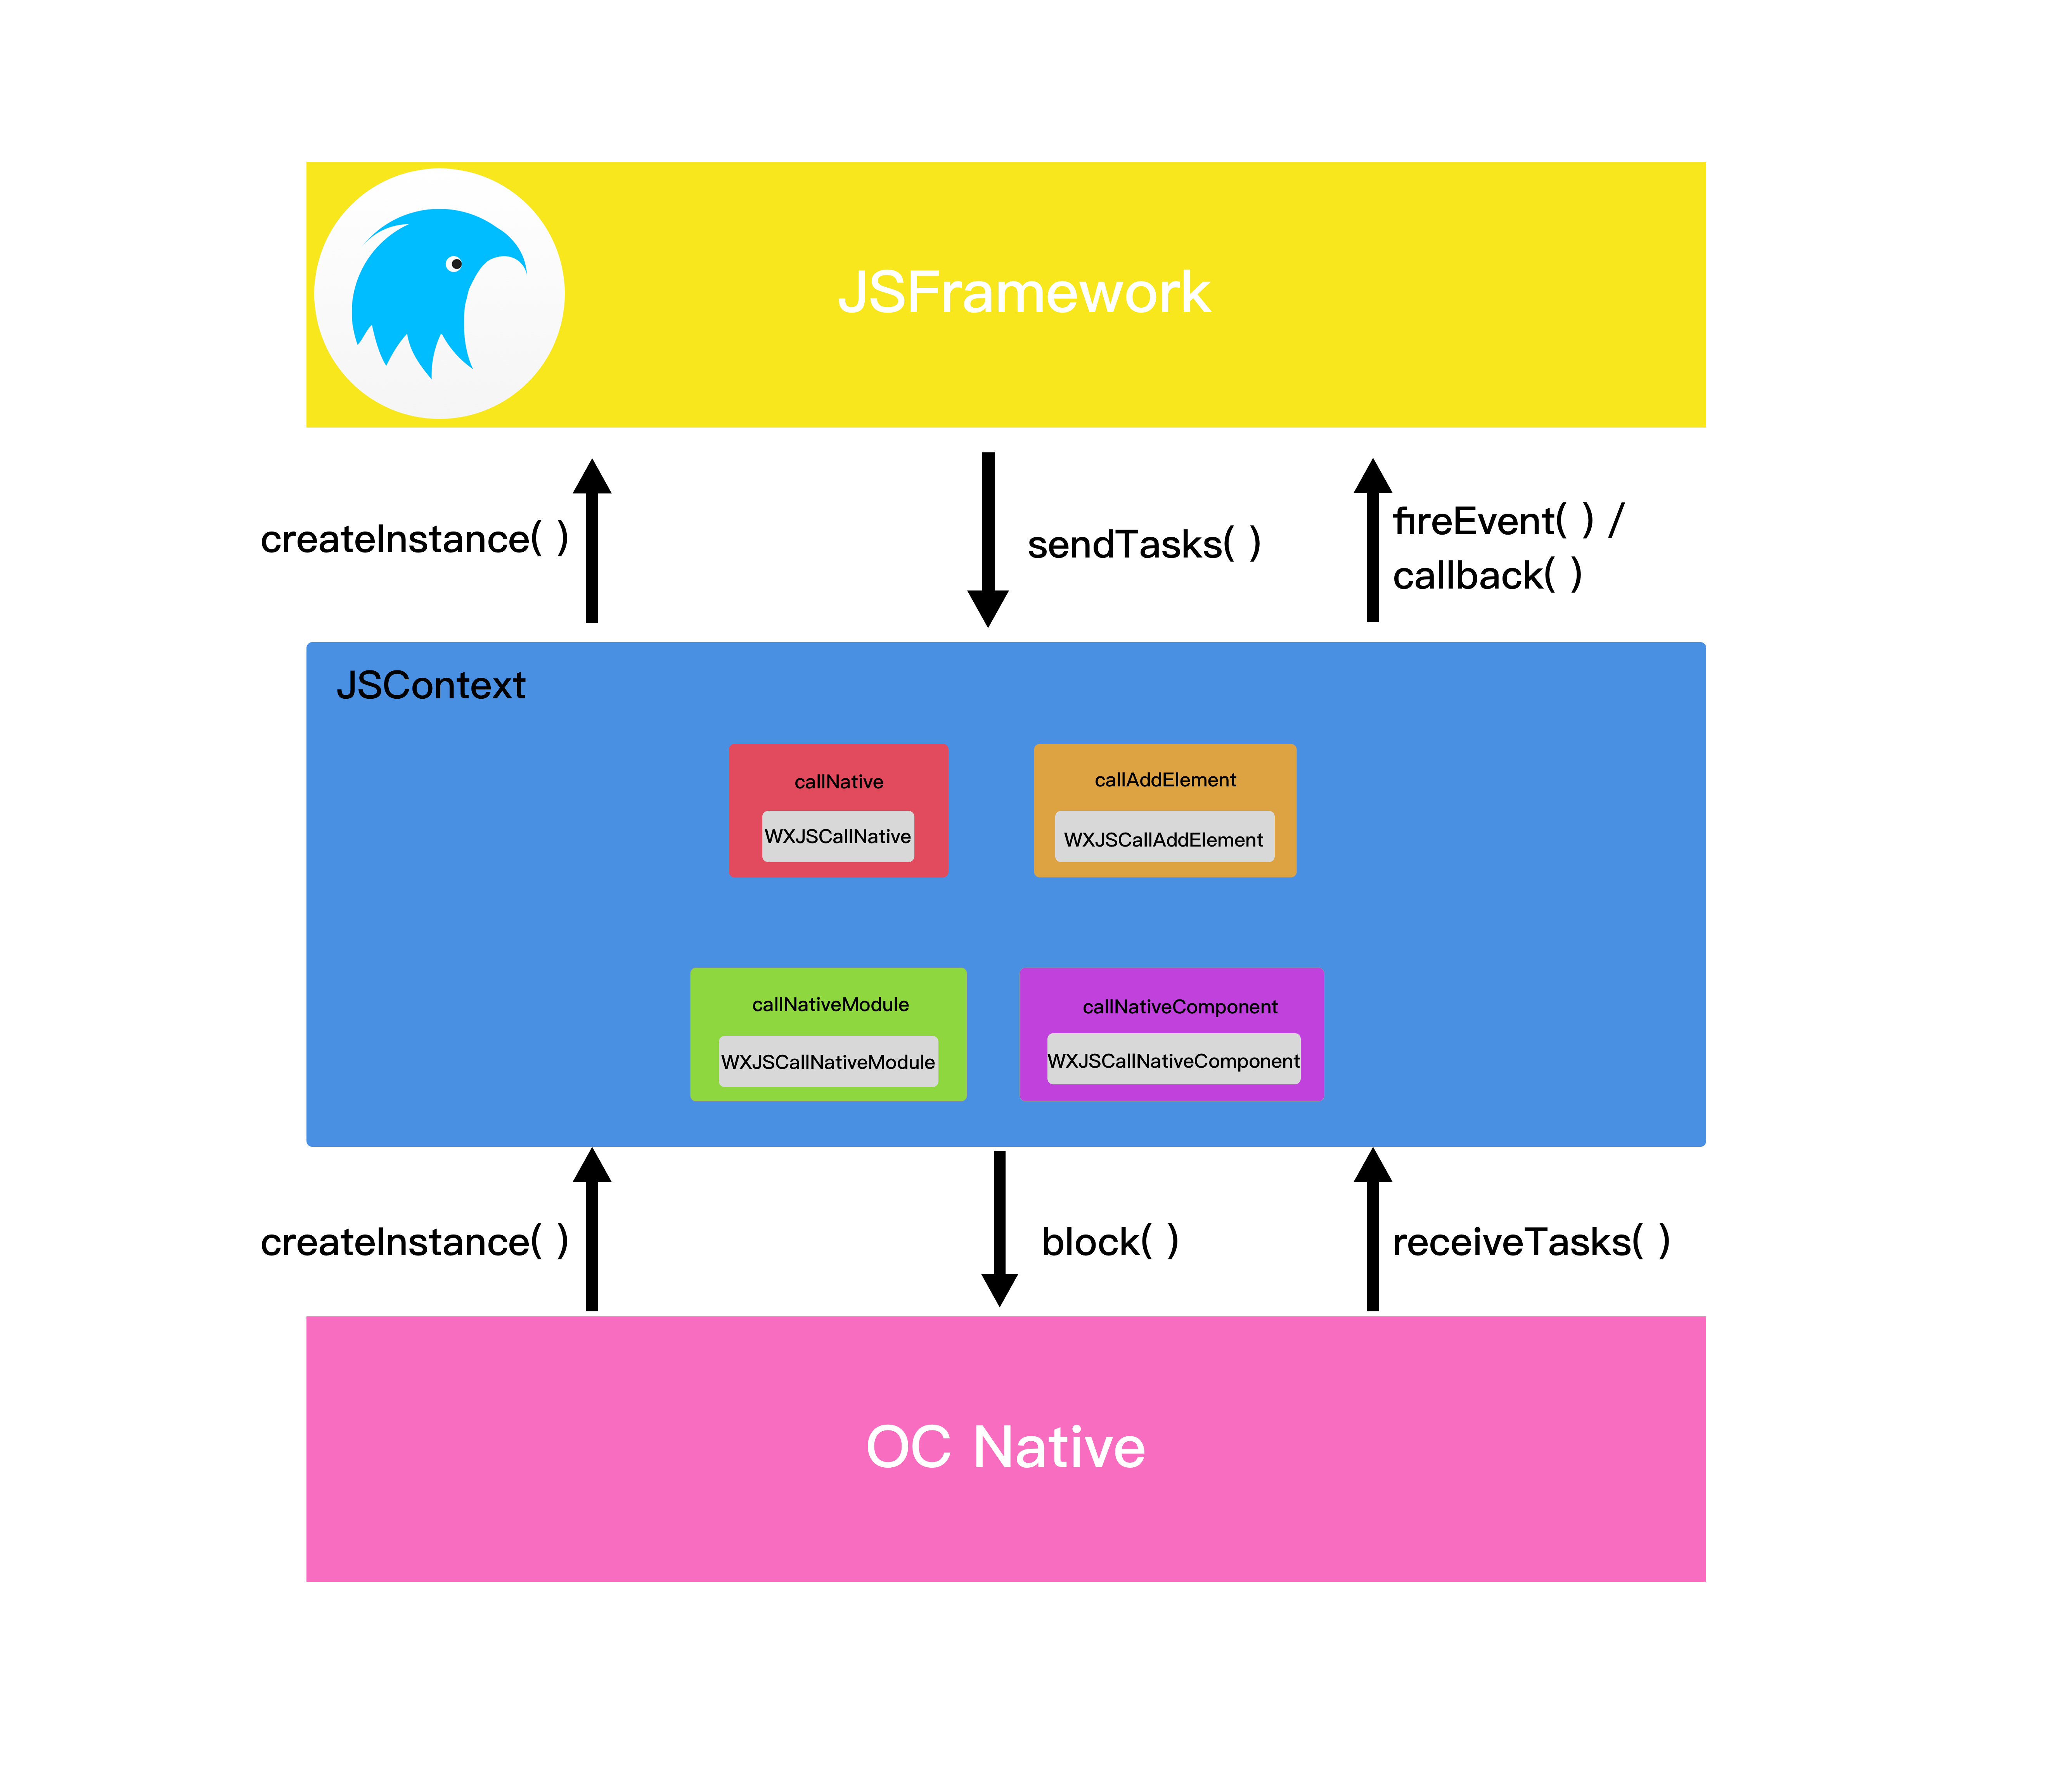
接下来详细总结一下JSFramework在整个Native端是如何工作的。
-
首先JSFramework的初始化只会在App启动时初始化一次,多个页面都共享这一份JSFramework。这个设计也提高了Weex所有页面的打开速度, JS Framework 的启动过程几百毫秒,相当于每个页面打开的时候,这几百毫秒都被节省下来了。
-
虽然JSFramework全局只有一个,那么Weex是如何避免多个Weex在同一个JS Runtime里面相互互不影响?Weex采取了2方面的措施,一是要求每个Weex页面都必须要创建一个全局唯一的 instance ID,通过这个ID直接能对应一个Weex页面。二是JS与Native进行相互调用的时候,每个方法都要求第一个参数是ID。比如createInstance(id, code, config, data),sendTasks(id, tasks),receiveTasks(id, tasks)。这样不同页面的状态就被隔离到了不同的闭包中了,这样就做到了相互不影响。
-
当Native需要渲染页面的时候,会主动调用createInstance(id, code, config, data)方法,其中code参数就是JS Bundle转换成的String。JSFramework接收到了这段入参以后,就会开始解析,并开始sendTasks(id, tasks)。
-
sendTasks(id, tasks)会通过JSBridge调用OC Native方法。tasks里面会指定功能的模块名、方法名以及参数。比如:
sendTasks(id, [{ module: 'dom', method: 'removeElement', args: [elementRef]}])这里就会调用之前注册到JSContext的OC方法。 -
客户端也会调用receiveTasks(id, tasks)方法,调用JS的方法。receiveTasks 中有两种方式,一种是fireEvent,对应的是客户端在某个DOM元素上触发的事件,比如fireEvent(titleElementRef, 'click', eventObject);另一种则是callback,即前面功能模块调用之后产生的回调,比如我们通过fetch接口向Native端发送一个 HTTP 请求,并设置了一个回调函数,这个时候,先在JS端为这个回调函数生成一个callbackID,比如字符串 "123",这个是发送给Native端的是这个callbackID,当请求结束之后,native需要把请求结果返还给JS Runtime,为了能够前后对得上,这个回调最终会成为类似 callback(callbackID, result) 的格式。
四.关于Weex,ReactNative,JSPatch
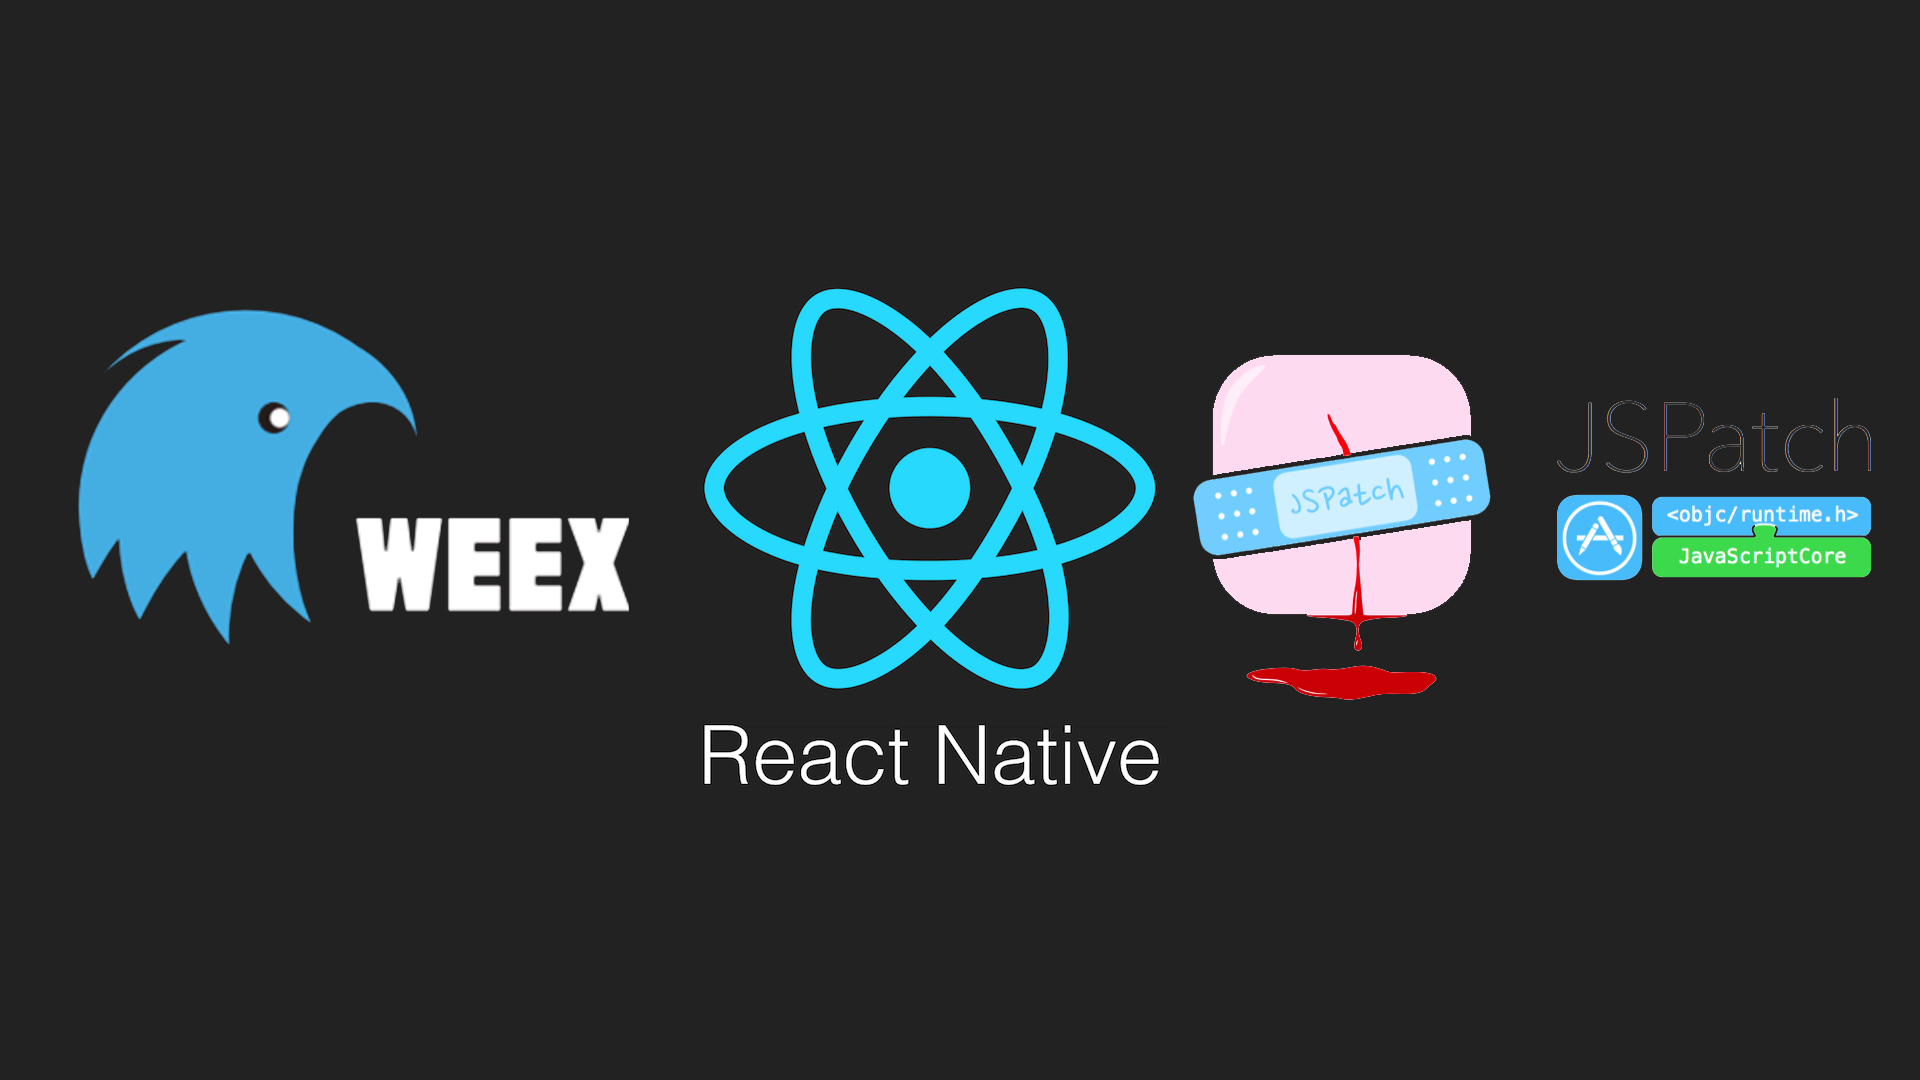
这一章本来是不在这个文章之中的,但是由于近期苹果审核,带来了一些审核风波,于是打算在这里稍微提提。
在各位读者看到这篇文章的时候,纯的ReactNative和纯的Weex的项目已经可以完美通过审核了,JSPatch依旧处于被封杀的状态。
既然本篇文章分析了Weex的工作原理,那么就稍微谈谈RN,Weex和JSpatch的区别。
首先他们三者都是基于JS来进行热修复的,但是RN,Weex和JSPatch有一个最大的不同是,如果Native没有提供可以供JS调用的方法接口的话,那么在RN和Weex界面怎么也无法实现Native的一些方法的。
但是JSPatch不同,虽然它也是一套基于JSCore的bridge,但是它是基于Runtime的,基于OC的Runtime,可以实现各种需求,即使预先Native没有暴露出来的接口,都可以添加方法实现需求,也可以更改已经实现的方法。
从热更新的能力来看,RN和Weex的能力仅仅只是中等能力,而JSPatch是几乎无所不能,Runtime都实现的,它都能实现。
所以从热更新的能力上看,RN和Weex都不能改变Native原生代码,也无法动态调用Native系统私有API。所以苹果审核允许RN和Weex通过。
最后

本篇文章只讲述了Weex是如何在iOS Native端跑起来的原理,但是关于Weex其实还有很多没有解释,比如说在Vue.js页面更改了一个页面元素,是怎么能让Native页面及时的变更?Weex的页面是怎么通过FlexBox算法进行渲染的?前端页面是如何打包成JS bundle的?.we和.vue文件是怎么通过DSL被翻译的?如何利用JS的Runtime写一些强大的JSService?webpackBootstrap和weex-loader是如何生成最终的JS代码的,中间有哪些优化?……
以上的这些问题都会在接下来一系列的Weex文章里面一一详解,希望大家多多指点!
GitHub Repo:Halfrost-Field
Follow: halfrost · GitHub
Source: https://halfrost.com/weex_ios/