前言
BeeHive是阿里巴巴公司开源的一个iOS框架,这个框架是App模块化编程的框架一种实现方案,吸收了Spring框架Service的理念来实现模块间的API解耦。
BeeHive这个名字灵感来源于蜂窝。蜂窝是世界上高度模块化的工程结构,六边形的设计能带来无限扩张的可能。所以就用了这个名字作为开源项目的名字。
在前一篇文章iOS 组件化 —— 路由设计思路分析中,我们分析了App组件之间可以通过路由来解除耦合。那么这篇文章就来看看利用模块化的思想如何解除耦合的。
(看到这里一定会很多人有疑问,那就看看这篇文章组件和模块的区别)
说明:本文是基于BeeHive v1.2.0版本进行解析的。
目录
- 1.BeeHive概述
- 2.BeeHive模块注册
- 3.BeeHive模块事件
- 4.BeeHive模块调用
- 5.其他的一些辅助类
- 6.可能还在完善中的功能
一. BeeHive概述
由于BeeHive是基于Spring的Service理念,虽然可以使模块间的具体实现与接口解耦,但无法避免模块对接口类的依赖关系。
暂时BeeHive没有采用invoke和performSelector:action withObject: params的方法。主要原因还是考虑学习成本难度以及动态调用实现无法在编译检查阶段检测接口参数变更等问题。
目前BeeHive v1.2.0 全部是利用Protocol的方式,实现了模块间解耦的目的:
1.各个模块以插件的形式存在。每个都可独立,相互解耦。
2.各个模块具体实现与接口调用分离
3.各个模块也有生命周期,也可以进行管理。
官方也给出了一个架构图:
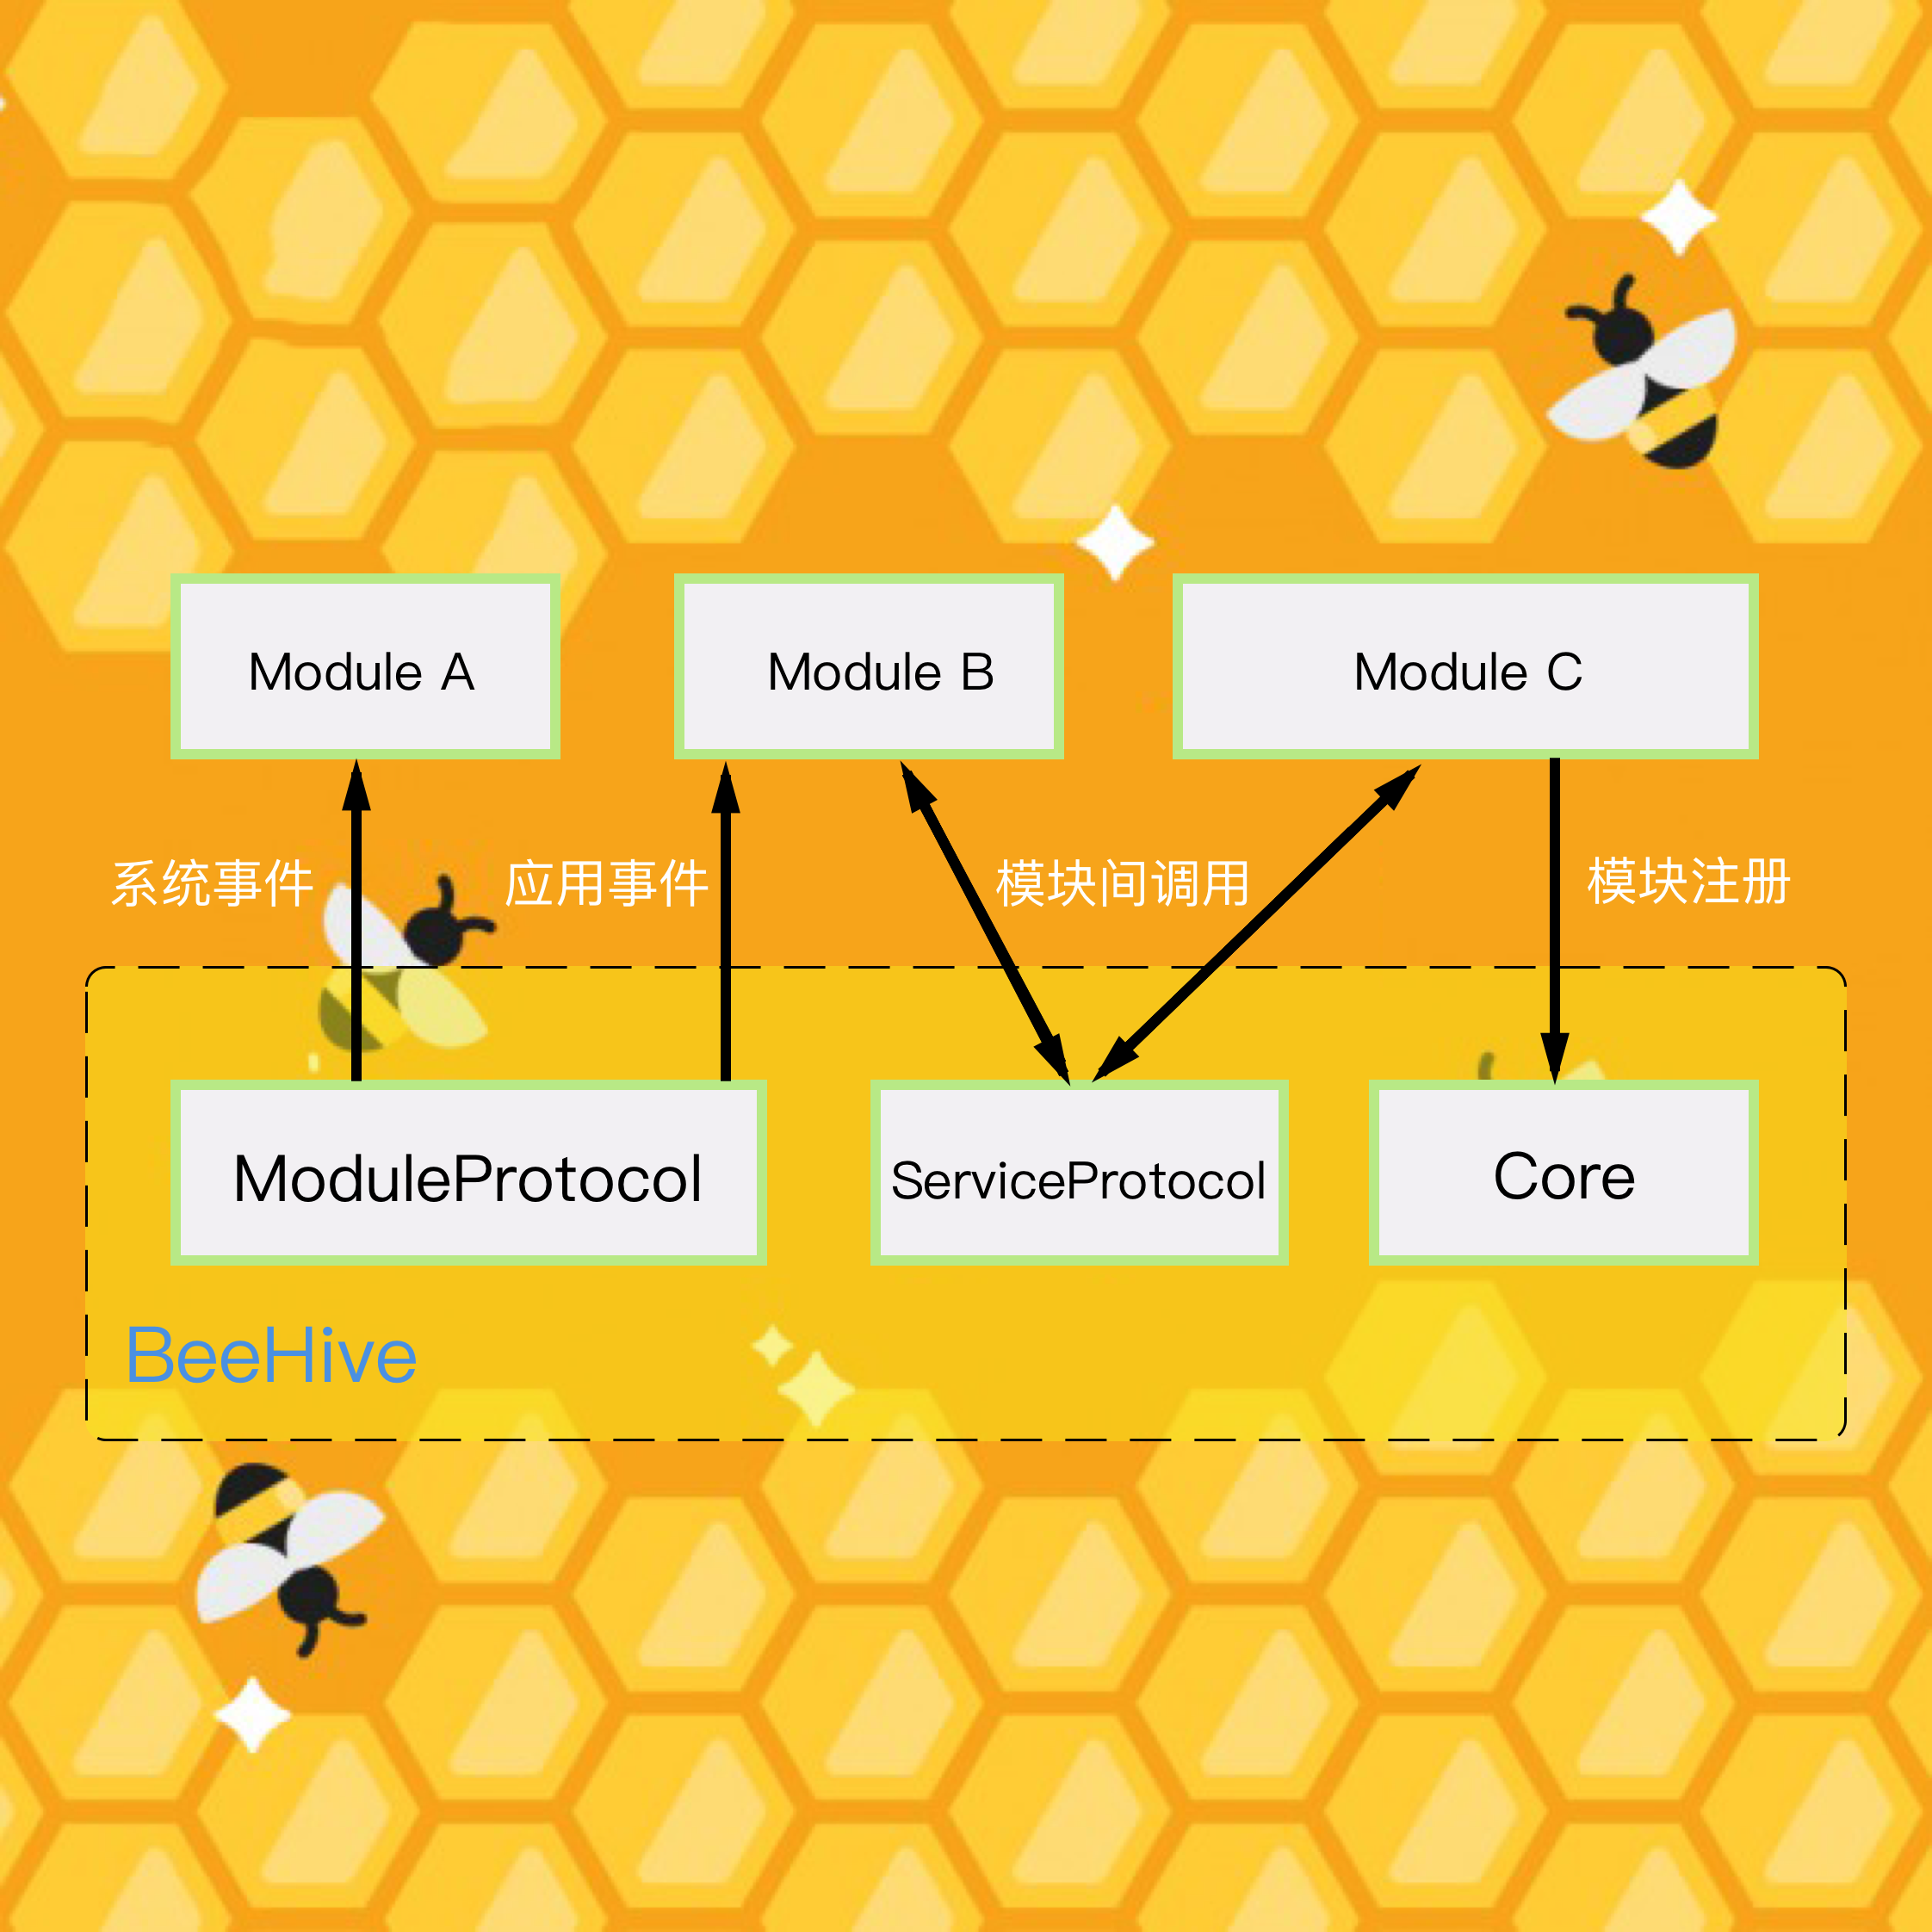
接下来就依次分析模块注册,模块事件,模块调用是如何实现解耦的。
二. BeeHive模块注册
先从模块的注册开始分析,来看看BeeHive是如何给各个模块进行注册的。
在BeeHive中是通过BHModuleManager来管理各个模块的。BHModuleManager中只会管理已经被注册过的模块。
注册Module的方式总共有三种:
1. Annotation方式注册
通过BeeHiveMod宏进行Annotation标记。
BeeHiveMod(ShopModule)
BeeHiveMod宏定义如下:
#define BeeHiveMod(name) \
char * k##name##_mod BeeHiveDATA(BeehiveMods) = ""#name"";
BeeHiveDATA又是一个宏:
#define BeeHiveDATA(sectname) __attribute((used, section("__DATA,"#sectname" ")))
最终BeeHiveMod宏会在预编译结束会完全展开成下面的样子:
char * kShopModule_mod __attribute((used, section("__DATA,""BeehiveMods"" "))) = """ShopModule""";
注意双引号的总对数。
到这里__attribute((used,section("segmentname,sectionname")))就需要先说明2个地方。
__attribute第一个参数used很有用。这个关键字是用来修饰函数的。被used修饰以后,意味着即使函数没有被引用,在Release下也不会被优化。如果不加这个修饰,那么Release环境链接器下会去掉没有被引用的段。具体的描述可以看这个gun的官方文档。
Static静态变量会按照他们申明的顺序,放到一个单独的段中。我们通过使用__attribute__((section("name")))来指明哪个段。数据则用__attribute__((used))来标记,防止链接器会优化删除未被使用的段。
再来具体说说section的作用。
编译器编译源代码后生成的文件叫目标文件,从文件结构上来说,它已经是编译后可执行的文件格式,只是还没有经过链接的过程。可执行文件(Executable)主要是Windows下的PE(Portable Executable)和Linux的ELF(Executable Linkable Format),它们也都是COFF(Common file format)格式的变种。程序源程序代码被编译之后会主要分成两个段:程序指令和程序数据。代码段属于程序指令,数据段和.bss段属于数据段。

具体的例子见上图,可见.data数据段里面保存的都是初始化过的全局静态变量和局部静态变量。.rodata段存放的是只读数据,一般都是const修饰的变量和字符串常量。.bss段存放的是未初始化的全局变量和局部静态变量。代码段就在.text段。
有时候我们需要指定一个特殊的段,来存放我们想要的数据。这里我们就把数据存在data数据段里面的"BeehiveMods"段中。
当然还有其他的Attributes的修饰关键字,详情见官方文档
回到代码上来:
char * kShopModule_mod __attribute((used, section("__DATA,""BeehiveMods"" "))) = """ShopModule""";
也就相当于:
char * kShopModule_mod = """ShopModule""";
只不过是把kShopModule_mod字符串放到了特殊的段里面。
Module被这样存到了特殊的段中,那怎么取出来的呢?
static NSArray<NSString *>* BHReadConfiguration(char *section)
{
    NSMutableArray *configs = [NSMutableArray array];

    Dl_info info;
    dladdr(BHReadConfiguration, &info);

#ifndef __LP64__
    // const struct mach_header *mhp = _dyld_get_image_header(0); // both works as below line
    const struct mach_header *mhp = (struct mach_header*)info.dli_fbase;
    unsigned long size = 0;
    // 找到之前存储的数据段(Module找BeehiveMods段 和 Service找BeehiveServices段)的一片内存
    uint32_t *memory = (uint32_t*)getsectiondata(mhp, "__DATA", section, & size);
#else /* defined(__LP64__) */
    const struct mach_header_64 *mhp = (struct mach_header_64*)info.dli_fbase;
    unsigned long size = 0;
    uint64_t *memory = (uint64_t*)getsectiondata(mhp, "__DATA", section, & size);
#endif /* defined(__LP64__) */

    // 把特殊段里面的数据都转换成字符串存入数组中
    for(int idx = 0; idx < size/sizeof(void*); ++idx){
        char *string = (char*)memory[idx];

        NSString *str = [NSString stringWithUTF8String:string];
        if(!str)continue;

        BHLog(@"config = %@", str);
        if(str) [configs addObject:str];
    }

    return configs;
}
Dl_info是一个Mach-O里面的一个数据结构。
typedef struct dl_info {
        const char      *dli_fname;     /* Pathname of shared object */
        void            *dli_fbase;     /* Base address of shared object */
        const char      *dli_sname;     /* Name of nearest symbol */
        void            *dli_saddr;     /* Address of nearest symbol */
} Dl_info;
这个数据结构的数据默认就是通过
extern int dladdr(const void *, Dl_info *);
dladdr这个函数来获取Dl_info里面的数据。
dli_fname:路径名,例如
/Applications/Xcode.app/Contents/Developer/Platforms/iPhoneSimulator.platform/Developer/SDKs/iPhoneSimulator.sdk/System/Library/Frameworks/CoreFoundation.framework/CoreFoundation
dli_fbase:共享对象的的起始地址(Base address of shared object,比如上面的 CoreFoundation)
dli_saddr :符号的地址
dli_sname:符号的名字,即下面的第四列的函数信息
Thread 0:
0     libsystem_kernel.dylib          0x11135810a __semwait_signal + 94474
1     libsystem_c.dylib               0x1110dab0b sleep + 518923
2     QYPerformanceMonitor            0x10dda4f1b -[ViewController tableView:cellForRowAtIndexPath:] + 7963
3     UIKit                           0x10ed4d4f4 -[UITableView _createPreparedCellForGlobalRow:withIndexPath:willDisplay:] + 1586420
通过调用这个static函数BHReadConfiguration,我们就可以拿到之前注册到BeehiveMods特殊段里面的各个Module的类名,都用字符串装在数据里。
+ (NSArray<NSString *> *)AnnotationModules
{
    static NSArray<NSString *> *mods = nil;
    static dispatch_once_t onceToken;
    dispatch_once(&onceToken, ^{
        mods = BHReadConfiguration(BeehiveModSectName);
    });
    return mods;
}
这是一个单例数组,里面装的都是之前放在特殊段里面的Module名字对应的字符串数组。
拿到这个数组以后,就可以注册所有的Module了。
- (void)registedAnnotationModules
{

    NSArray<NSString *>*mods = [BHAnnotation AnnotationModules];
    for (NSString *modName in mods) {
        Class cls;
        if (modName) {
            cls = NSClassFromString(modName);

            if (cls) {
                [self registerDynamicModule:cls];
            }
        }
    }
}


- (void)registerDynamicModule:(Class)moduleClass
{
    [self addModuleFromObject:moduleClass];

}
最后还需要把所有已经注册的Module添加到BHModuleManager里面。
- (void)addModuleFromObject:(id)object
{
    Class class;
    NSString *moduleName = nil;

    if (object) {
        class = object;
        moduleName = NSStringFromClass(class);
    } else {
        return ;
    }

    if ([class conformsToProtocol:@protocol(BHModuleProtocol)]) {
        NSMutableDictionary *moduleInfo = [NSMutableDictionary dictionary];

        // basicModuleLevel 这个方法如果默认不实现,Level默认是Normal
        BOOL responseBasicLevel = [class instancesRespondToSelector:@selector(basicModuleLevel)];

        // Level是BHModuleNormal,就是1
        int levelInt = 1;

        // 如果实现了basicModuleLevel方法,那么Level就是BHModuleBasic
        if (responseBasicLevel) {
            // Level是Basic,BHModuleBasic就是0
            levelInt = 0;
        }

        // @"moduleLevel" 为Key,Level为Value
        [moduleInfo setObject:@(levelInt) forKey:kModuleInfoLevelKey];
        if (moduleName) {
            // @"moduleClass"为Key,moduleName为Value
            [moduleInfo setObject:moduleName forKey:kModuleInfoNameKey];
        }

        [self.BHModules addObject:moduleInfo];
    }
}
一些需要说明已经在上述代码里面添加了注释。BHModules是一个NSMutableArray,里面存的都是一个个的字典,字典里面有两个Key,一个是@"moduleLevel",另一个是@"moduleClass"。存储已经注册的Module的时候都要判断Level。还有一点需要说明的,所有需要注册的Module必须遵循BHModuleProtocol协议,否则不能被存储。
2. 读取本地Pilst文件
要读取本地的Plist文件之前,需要先设置好路径。
[BHContext shareInstance].moduleConfigName = @"BeeHive.bundle/BeeHive";//可选,默认为BeeHive.bundle/BeeHive.plist
BeeHive所有的配置都可以写在BHContext进行传递。
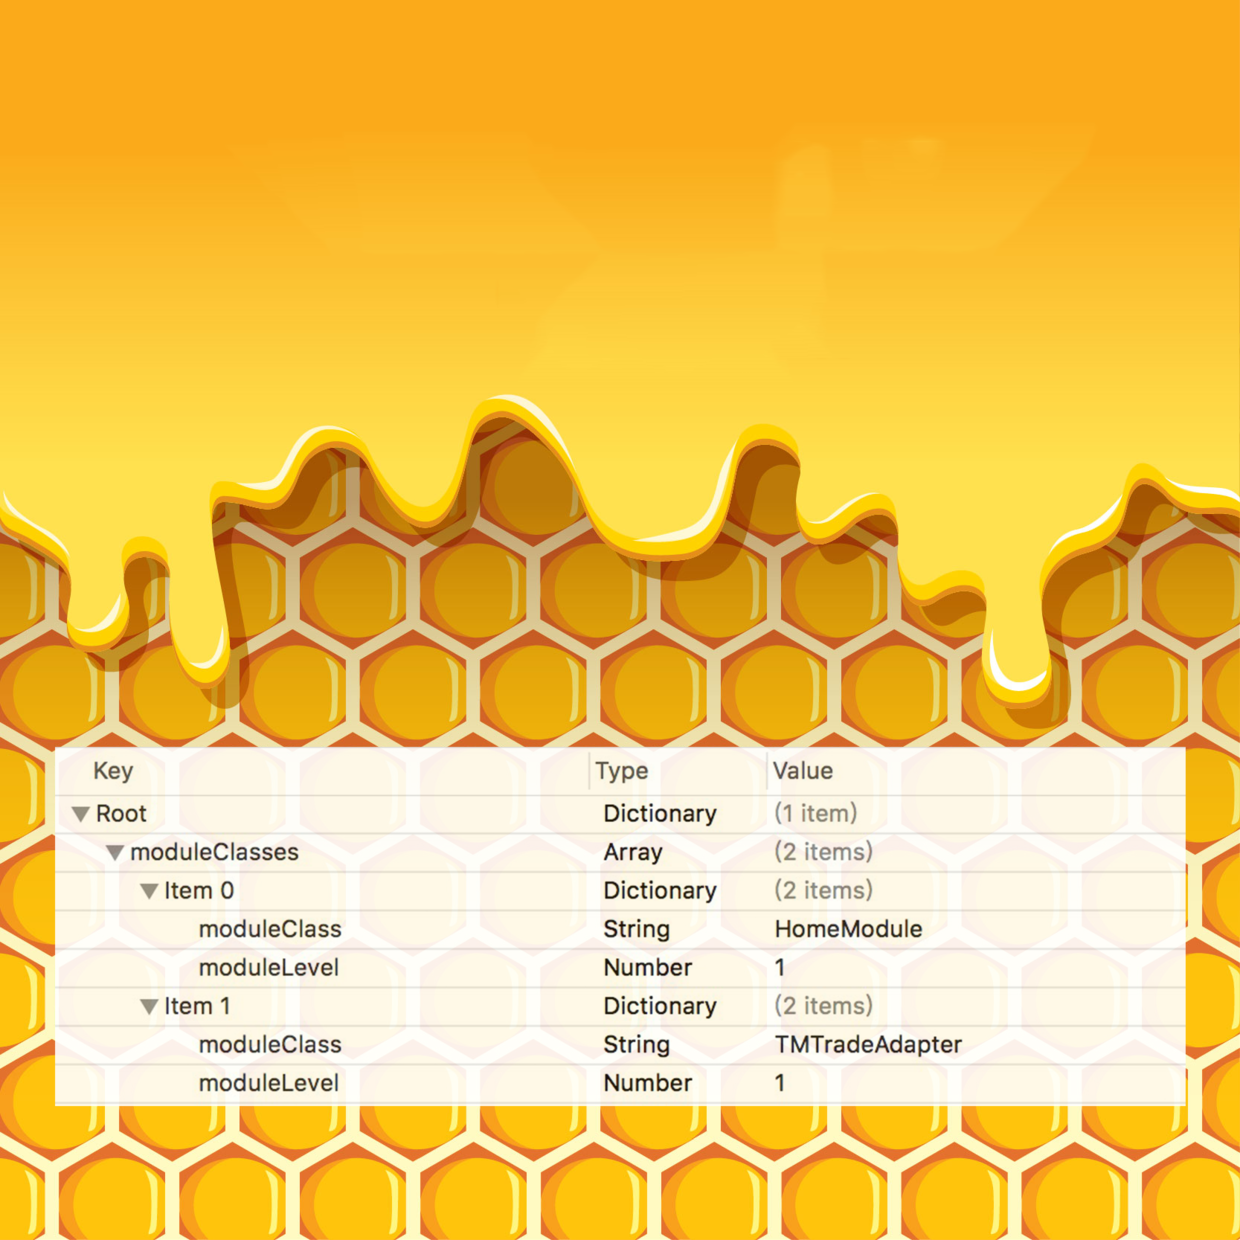
Plist文件的格式也要是数组里面包一个个的字典。字典里面有两个Key,一个是@"moduleLevel",另一个是@"moduleClass"。注意根的数组的名字叫@“moduleClasses”。
- (void)loadLocalModules
{

    NSString *plistPath = [[NSBundle mainBundle] pathForResource:[BHContext shareInstance].moduleConfigName ofType:@"plist"];
    if (![[NSFileManager defaultManager] fileExistsAtPath:plistPath]) {
        return;
    }

    NSDictionary *moduleList = [[NSDictionary alloc] initWithContentsOfFile:plistPath];

    NSArray *modulesArray = [moduleList objectForKey:kModuleArrayKey];

    [self.BHModules addObjectsFromArray:modulesArray];

}
从Plist里面取出数组,然后把数组加入到BHModules数组里面。
3. Load方法注册
最后一种注册Module的方法就是在Load方法里面注册Module的类。
+ (void)load
{
    [BeeHive registerDynamicModule:[self class]];
}
调用BeeHive里面的registerDynamicModule:完成Module的注册。
+ (void)registerDynamicModule:(Class)moduleClass
{
    [[BHModuleManager sharedManager] registerDynamicModule:moduleClass];
}
BeeHive里面的registerDynamicModule:的实现还是调用的BHModuleManager的注册方法registerDynamicModule:
- (void)registerDynamicModule:(Class)moduleClass
{
    [self addModuleFromObject:moduleClass];

}
最后还是调用到了BHModuleManager里面的addModuleFromObject:方法,这个方法上面分析过了,不再赘述。
Load方法还可以用一个宏BH_EXPORT_MODULE来完成。
#define BH_EXPORT_MODULE(isAsync) \
+ (void)load { [BeeHive registerDynamicModule:[self class]]; } \
-(BOOL)async { return [[NSString stringWithUTF8String:#isAsync] boolValue];}
BH_EXPORT_MODULE宏里面可以传入一个参数,代表是否异步加载Module模块,如果是YES就是异步加载,如果是NO就是同步加载。
注册的三种方式就完成了。最后BeeHive还会对这些Module的Class进行一下操作。
首先在BeeHive初始化setContext:的时候,会分别加载Modules和Services。这里先谈Modules。
-(void)setContext:(BHContext *)context
{
    _context = context;

    static dispatch_once_t onceToken;
    dispatch_once(&onceToken, ^{
        [self loadStaticServices];
        [self loadStaticModules];
    });
}
看看loadStaticModules方法里面做了什么事情。
- (void)loadStaticModules
{
    // 读取本地plist文件里面的Module,并注册到BHModuleManager的BHModules数组中
    [[BHModuleManager sharedManager] loadLocalModules];

    // 读取特殊段里面的标记数据,并注册到BHModuleManager的BHModules数组中
    [[BHModuleManager sharedManager] registedAnnotationModules];

    [[BHModuleManager sharedManager] registedAllModules];

}
这里虽然我们只看到了两种方式,但是实际上BHModules数组里面还会包括通过Load方法注册进来的Module。那么BHModules数组实际上是包含了3种注册方式加进来的Module。
最后一步,registedAllModules比较关键。
- (void)registedAllModules
{

    // 根据优先级从大到小进行排序
    [self.BHModules sortUsingComparator:^NSComparisonResult(NSDictionary *module1, NSDictionary *module2) {
      NSNumber *module1Level = (NSNumber *)[module1 objectForKey:kModuleInfoLevelKey];
      NSNumber *module2Level =  (NSNumber *)[module2 objectForKey:kModuleInfoLevelKey];

        return [module1Level intValue] > [module2Level intValue];
    }];

    NSMutableArray *tmpArray = [NSMutableArray array];

    //module init
    [self.BHModules enumerateObjectsUsingBlock:^(NSDictionary *module, NSUInteger idx, BOOL * _Nonnull stop) {

        NSString *classStr = [module objectForKey:kModuleInfoNameKey];

        Class moduleClass = NSClassFromString(classStr);

        if (NSStringFromClass(moduleClass)) {

            // 初始化所有的Module
            id<BHModuleProtocol> moduleInstance = [[moduleClass alloc] init];
            [tmpArray addObject:moduleInstance];
        }

    }];

    [self.BHModules removeAllObjects];

    [self.BHModules addObjectsFromArray:tmpArray];

}
BHModules数组在进行registedAllModules方法之前,装的都是一个个的字典,再执行完registedAllModules方法之后,里面装的就都是一个个的Module的实例了。
registedAllModules方法会先按照Level的优先级从大到小进行排序,然后再按照这个顺序依次初始化所有的Module的实例,存入数组中。最终BHModules数组里面装的是所有的Module实例对象。
注意,这里有两点需要额外说明:
- 限制住了所有的Module的对象都要是遵守BHModuleProtocol协议的。至于为何要遵守BHModuleProtocol协议,下一章节会有详细说明。
- Module不能在任何其他地方alloc创建出来,即使创建一个新的Module实例出来,它也并不在BHModuleManager的管理下,是无法接收BHModuleManager分发的系统事件,创建出来是没有任何意义的。

三. BeeHive模块事件
BeeHive会给每个模块提供生命周期事件,用于与BeeHive宿主环境进行必要信息交互,感知模块生命周期的变化。
BeeHive各个模块会收到一些事件。在BHModuleManager中,所有的事件被定义成了BHModuleEventType枚举。
typedef NS_ENUM(NSInteger, BHModuleEventType)
{
    BHMSetupEvent = 0,
    BHMInitEvent,
    BHMTearDownEvent,
    BHMSplashEvent,
    BHMQuickActionEvent,
    BHMWillResignActiveEvent,
    BHMDidEnterBackgroundEvent,
    BHMWillEnterForegroundEvent,
    BHMDidBecomeActiveEvent,
    BHMWillTerminateEvent,
    BHMUnmountEvent,
    BHMOpenURLEvent,
    BHMDidReceiveMemoryWarningEvent,
    BHMDidFailToRegisterForRemoteNotificationsEvent,
    BHMDidRegisterForRemoteNotificationsEvent,
    BHMDidReceiveRemoteNotificationEvent,
    BHMDidReceiveLocalNotificationEvent,
    BHMWillContinueUserActivityEvent,
    BHMContinueUserActivityEvent,
    BHMDidFailToContinueUserActivityEvent,
    BHMDidUpdateUserActivityEvent,
    BHMDidCustomEvent = 1000

};
上面BHModuleEventType枚举主要分为三种,一种是系统事件,另外一种是应用事件,最后一种是业务自定义事件。
1. 系统事件。
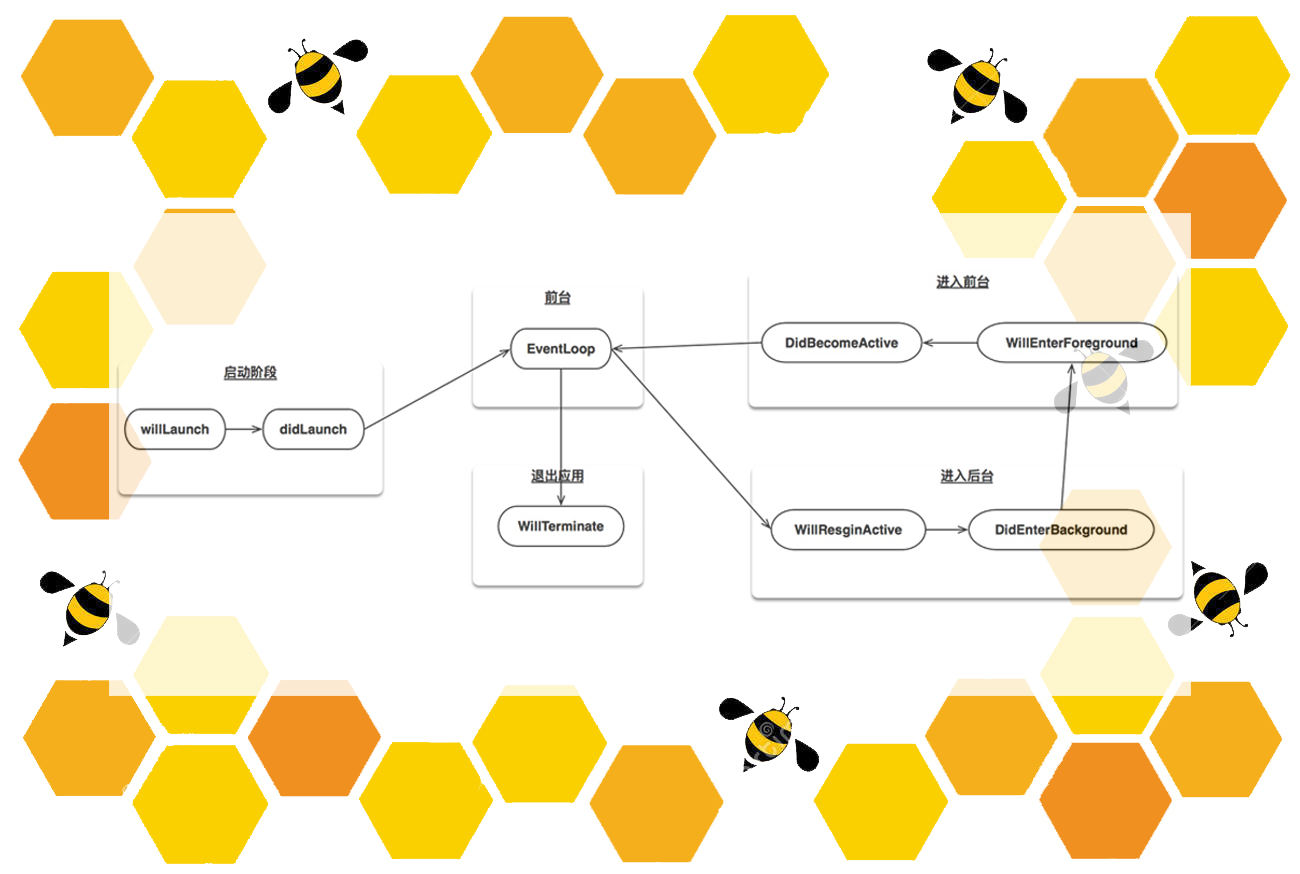
上图是官方给出的一个系统事件基本工作流。
系统事件通常是Application生命周期事件,例如DidBecomeActive、WillEnterBackground等。
一般做法是把BHAppDelegate接管原来的AppDelegate。
- (BOOL)application:(UIApplication *)application didFinishLaunchingWithOptions:(NSDictionary *)launchOptions
{

    [[BHModuleManager sharedManager] triggerEvent:BHMSetupEvent];
    [[BHModuleManager sharedManager] triggerEvent:BHMInitEvent];

    dispatch_async(dispatch_get_main_queue(), ^{
        [[BHModuleManager sharedManager] triggerEvent:BHMSplashEvent];
    });

    return YES;
}


#if __IPHONE_OS_VERSION_MAX_ALLOWED > 80400

-(void)application:(UIApplication *)application performActionForShortcutItem:(UIApplicationShortcutItem *)shortcutItem completionHandler:(void (^)(BOOL))completionHandler
{
    [[BHModuleManager sharedManager] triggerEvent:BHMQuickActionEvent];
}
#endif

- (void)applicationWillResignActive:(UIApplication *)application
{
    [[BHModuleManager sharedManager] triggerEvent:BHMWillResignActiveEvent];
}

- (void)applicationDidEnterBackground:(UIApplication *)application
{
    [[BHModuleManager sharedManager] triggerEvent:BHMDidEnterBackgroundEvent];
}

- (void)applicationWillEnterForeground:(UIApplication *)application
{
    [[BHModuleManager sharedManager] triggerEvent:BHMWillEnterForegroundEvent];
}

- (void)applicationDidBecomeActive:(UIApplication *)application
{
    [[BHModuleManager sharedManager] triggerEvent:BHMDidBecomeActiveEvent];
}

- (void)applicationWillTerminate:(UIApplication *)application
{
    [[BHModuleManager sharedManager] triggerEvent:BHMWillTerminateEvent];
}

- (BOOL)application:(UIApplication *)application openURL:(NSURL *)url sourceApplication:(NSString *)sourceApplication annotation:(id)annotation
{
    [[BHModuleManager sharedManager] triggerEvent:BHMOpenURLEvent];
    return YES;
}

#if __IPHONE_OS_VERSION_MAX_ALLOWED > 80400
- (BOOL)application:(UIApplication *)app openURL:(NSURL *)url options:(NSDictionary<NSString *,id> *)options
{
    [[BHModuleManager sharedManager] triggerEvent:BHMOpenURLEvent];
    return YES;
}
#endif


- (void)applicationDidReceiveMemoryWarning:(UIApplication *)application
{
    [[BHModuleManager sharedManager] triggerEvent:BHMDidReceiveMemoryWarningEvent];
}

- (void)application:(UIApplication *)application didFailToRegisterForRemoteNotificationsWithError:(NSError *)error
{
    [[BHModuleManager sharedManager] triggerEvent:BHMDidFailToRegisterForRemoteNotificationsEvent];
}

- (void)application:(UIApplication *)application didRegisterForRemoteNotificationsWithDeviceToken:(NSData *)deviceToken
{
    [[BHModuleManager sharedManager] triggerEvent:BHMDidRegisterForRemoteNotificationsEvent];
}

- (void)application:(UIApplication *)application didReceiveRemoteNotification:(NSDictionary *)userInfo
{
    [[BHModuleManager sharedManager] triggerEvent:BHMDidReceiveRemoteNotificationEvent];
}

- (void)application:(UIApplication *)application didReceiveRemoteNotification:(NSDictionary *)userInfo fetchCompletionHandler:(void (^)(UIBackgroundFetchResult))completionHandler
{
    [[BHModuleManager sharedManager] triggerEvent:BHMDidReceiveRemoteNotificationEvent];
}

- (void)application:(UIApplication *)application didReceiveLocalNotification:(UILocalNotification *)notification
{
    [[BHModuleManager sharedManager] triggerEvent:BHMDidReceiveLocalNotificationEvent];
}

#if __IPHONE_OS_VERSION_MAX_ALLOWED > 80000
- (void)application:(UIApplication *)application didUpdateUserActivity:(NSUserActivity *)userActivity
{
    if([UIDevice currentDevice].systemVersion.floatValue > 8.0f){
        [[BHModuleManager sharedManager] triggerEvent:BHMDidUpdateUserActivityEvent];
    }
}

- (void)application:(UIApplication *)application didFailToContinueUserActivityWithType:(NSString *)userActivityType error:(NSError *)error
{
    if([UIDevice currentDevice].systemVersion.floatValue > 8.0f){
        [[BHModuleManager sharedManager] triggerEvent:BHMDidFailToContinueUserActivityEvent];
    }
}

- (BOOL)application:(UIApplication *)application continueUserActivity:(NSUserActivity *)userActivity restorationHandler:(void (^)(NSArray * _Nullable))restorationHandler
{
    if([UIDevice currentDevice].systemVersion.floatValue > 8.0f){
        [[BHModuleManager sharedManager] triggerEvent:BHMContinueUserActivityEvent];
    }
    return YES;
}

- (BOOL)application:(UIApplication *)application willContinueUserActivityWithType:(NSString *)userActivityType
{
    if([UIDevice currentDevice].systemVersion.floatValue > 8.0f){
        [[BHModuleManager sharedManager] triggerEvent:BHMWillContinueUserActivityEvent];
    }
    return YES;
}
这样所有的系统事件都可以通过调用BHModuleManager的triggerEvent:来处理。
在BHModuleManager中有2个事件很特殊,一个是BHMInitEvent,一个是BHMTearDownEvent。
先来说说BHMInitEvent事件。
- (void)handleModulesInitEvent
{

    [self.BHModules enumerateObjectsUsingBlock:^(id<BHModuleProtocol> moduleInstance, NSUInteger idx, BOOL * _Nonnull stop) {
        __weak typeof(&*self) wself = self;
        void ( ^ bk )();
        bk = ^(){
            __strong typeof(&*self) sself = wself;
            if (sself) {
                if ([moduleInstance respondsToSelector:@selector(modInit:)]) {
                    [moduleInstance modInit:[BHContext shareInstance]];
                }
            }
        };

        [[BHTimeProfiler sharedTimeProfiler] recordEventTime:[NSString stringWithFormat:@"%@ --- modInit:", [moduleInstance class]]];

        if ([moduleInstance respondsToSelector:@selector(async)]) {
            BOOL async = [moduleInstance async];

            if (async) {
                dispatch_async(dispatch_get_main_queue(), ^{
                    bk();
                });

            } else {
                bk();
            }
        } else {
            bk();
        }
    }];
}
Init事件就是初始化Module模块的事件。遍历BHModules数组,依次对每个Module实例调用modInit:方法。这里会有异步加载的问题。如果moduleInstance重写了async方法,那么就会根据这个方法返回的值来进行是否异步加载的判断。
modInit:方法里面干很多事情。比如说对环境的判断,根据环境的不同初始化不同的方法。
-(void)modInit:(BHContext *)context
{
    switch (context.env) {
        case BHEnvironmentDev:
            //....初始化开发环境
            break;
        case BHEnvironmentProd:
            //....初始化生产环境
        default:
            break;
    }
}
再比如在初始化的时候注册一些协议:
-(void)modInit:(BHContext *)context
{
  [[BeeHive shareInstance] registerService:@protocol(UserTrackServiceProtocol) service:[BHUserTrackViewController class]];
}
总之这里可以干一些初始化需要做的事情。
再来说说BHMTearDownEvent事件。这个事件是拆除Module的。
- (void)handleModulesTearDownEvent
{
    //Reverse Order to unload
    for (int i = (int)self.BHModules.count - 1; i >= 0; i--) {
        id<BHModuleProtocol> moduleInstance = [self.BHModules objectAtIndex:i];
        if (moduleInstance && [moduleInstance respondsToSelector:@selector(modTearDown:)]) {
            [moduleInstance modTearDown:[BHContext shareInstance]];
        }
    }
}
由于Module是有优先级Level,所以拆除的时候需要从低优先级开始拆,即数组逆序循环。对每个Module实例发送modTearDown:事件即可。
2. 应用事件
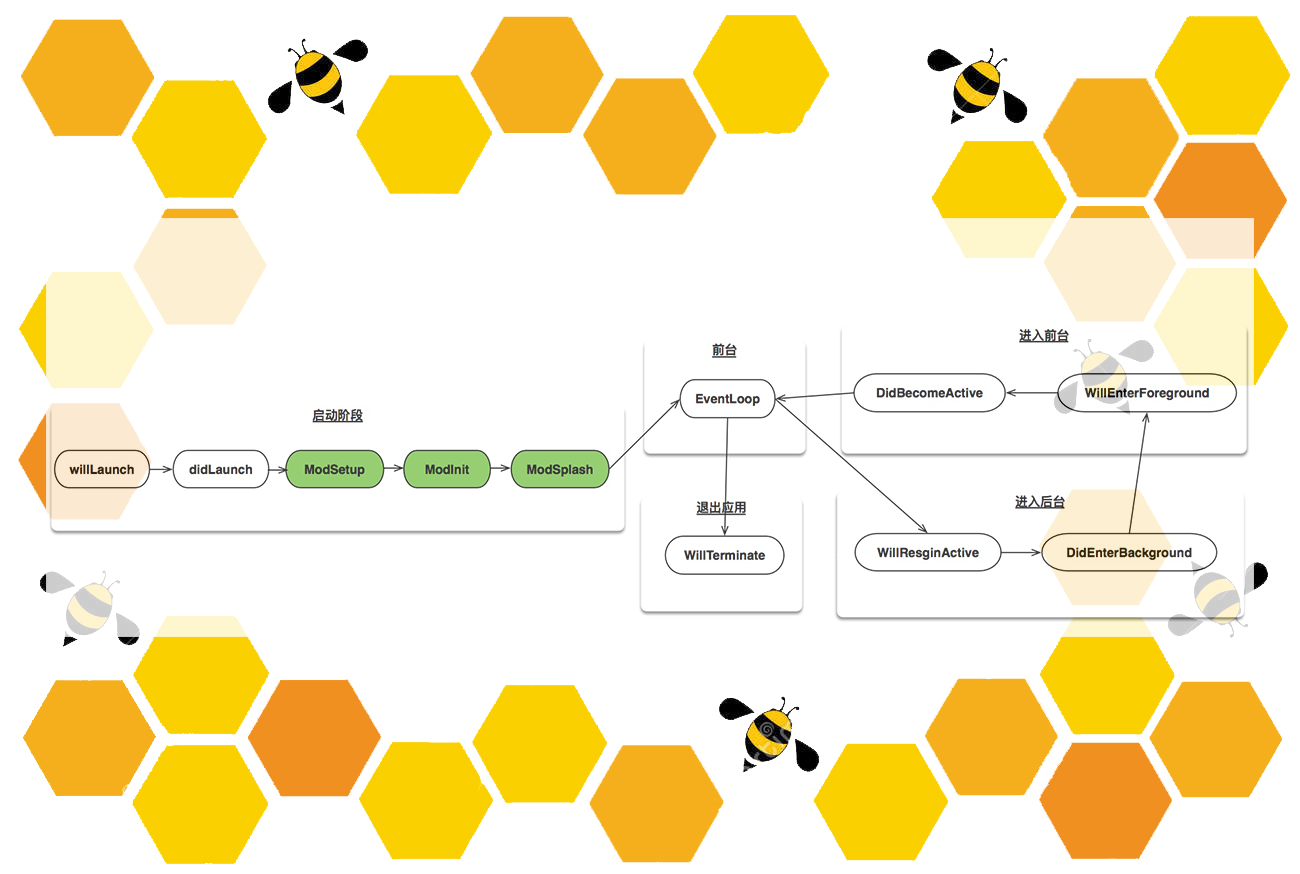
官方给出的应用事件工作流如上:
在系统事件的基础之上,扩展了应用的通用事件,例如modSetup、modInit等,可以用于编码实现各插件模块的设置与初始化。
所有的事件都可以通过调用BHModuleManager的triggerEvent:来处理。
- (void)triggerEvent:(BHModuleEventType)eventType
{
    switch (eventType) {
        case BHMSetupEvent:
            [self handleModuleEvent:kSetupSelector];
            break;
        case BHMInitEvent:
            //special
            [self handleModulesInitEvent];
            break;
        case BHMTearDownEvent:
            //special
            [self handleModulesTearDownEvent];
            break;
        case BHMSplashEvent:
            [self handleModuleEvent:kSplashSeletor];
            break;
        case BHMWillResignActiveEvent:
            [self handleModuleEvent:kWillResignActiveSelector];
            break;
        case BHMDidEnterBackgroundEvent:
            [self handleModuleEvent:kDidEnterBackgroundSelector];
            break;
        case BHMWillEnterForegroundEvent:
            [self handleModuleEvent:kWillEnterForegroundSelector];
            break;
        case BHMDidBecomeActiveEvent:
            [self handleModuleEvent:kDidBecomeActiveSelector];
            break;
        case BHMWillTerminateEvent:
            [self handleModuleEvent:kWillTerminateSelector];
            break;
        case BHMUnmountEvent:
            [self handleModuleEvent:kUnmountEventSelector];
            break;
        case BHMOpenURLEvent:
            [self handleModuleEvent:kOpenURLSelector];
            break;
        case BHMDidReceiveMemoryWarningEvent:
            [self handleModuleEvent:kDidReceiveMemoryWarningSelector];
            break;

        case BHMDidReceiveRemoteNotificationEvent:
            [self handleModuleEvent:kDidReceiveRemoteNotificationsSelector];
            break;

        case BHMDidFailToRegisterForRemoteNotificationsEvent:
            [self handleModuleEvent:kFailToRegisterForRemoteNotificationsSelector];
            break;
        case BHMDidRegisterForRemoteNotificationsEvent:
            [self handleModuleEvent:kDidRegisterForRemoteNotificationsSelector];
            break;

        case BHMDidReceiveLocalNotificationEvent:
            [self handleModuleEvent:kDidReceiveLocalNotificationsSelector];
            break;

        case BHMWillContinueUserActivityEvent:
            [self handleModuleEvent:kWillContinueUserActivitySelector];
            break;

        case BHMContinueUserActivityEvent:
            [self handleModuleEvent:kContinueUserActivitySelector];
            break;

        case BHMDidFailToContinueUserActivityEvent:
            [self handleModuleEvent:kFailToContinueUserActivitySelector];
            break;

        case BHMDidUpdateUserActivityEvent:
            [self handleModuleEvent:kDidUpdateContinueUserActivitySelector];
            break;

        case BHMQuickActionEvent:
            [self handleModuleEvent:kQuickActionSelector];
            break;

        default:
            [BHContext shareInstance].customEvent = eventType;
            [self handleModuleEvent:kAppCustomSelector];
            break;
    }
}
从上述代码可以看出,除去BHMInitEvent初始化事件和BHMTearDownEvent拆除Module事件这两个特殊事件以外,所有的事件都是调用的handleModuleEvent:方法。上述的switch-case里面,除去系统事件以外的,和default里面的customEvent以外,剩下的事件都是应用事件。
- (void)handleModuleEvent:(NSString *)selectorStr
{
    SEL seletor = NSSelectorFromString(selectorStr);
    [self.BHModules enumerateObjectsUsingBlock:^(id<BHModuleProtocol> moduleInstance, NSUInteger idx, BOOL * _Nonnull stop) {
        if ([moduleInstance respondsToSelector:seletor]) {
#pragma clang diagnostic push
#pragma clang diagnostic ignored "-Warc-performSelector-leaks"
            [moduleInstance performSelector:seletor withObject:[BHContext shareInstance]];
#pragma clang diagnostic pop

        [[BHTimeProfiler sharedTimeProfiler] recordEventTime:[NSString stringWithFormat:@"%@ --- %@", [moduleInstance class], NSStringFromSelector(seletor)]];

        }
    }];
}
handleModuleEvent:方法的实现就是遍历BHModules数组,调用performSelector:withObject:方法实现对应方法调用。
注意这里所有的Module必须是遵循BHModuleProtocol的,否则无法接收到这些事件的消息。
3. 业务自定义事件
如果觉得系统事件、通用事件不足以满足需要,我们还将事件封装简化成BHAppdelgate,你可以通过继承 BHAppdelegate来扩展自己的事件。
自定义的事件的type就是BHMDidCustomEvent = 1000 。
在BeeHive里面有一个tiggerCustomEvent:方法就是用来处理这些事件的,尤其是处理自定义事件的。
- (void)tiggerCustomEvent:(NSInteger)eventType
{
    if(eventType < 1000) {
        return;
    }

    [[BHModuleManager sharedManager] triggerEvent:eventType];
}
这个方法只会把自定义事件透传给BHModuleManager进行处理,其他一切的事件都不会做任何相应。

四. BeeHive模块调用
在BeeHive中是通过BHServiceManager来管理各个Protocol的。BHServiceManager中只会管理已经被注册过的Protocol。
注册Protocol的方式总共有三种,和注册Module是一样一一对应的:
1. Annotation方式注册
通过BeeHiveService宏进行Annotation标记。
BeeHiveService(HomeServiceProtocol,BHViewController)
BeeHiveService宏定义如下:
#define BeeHiveService(servicename,impl) \
char * k##servicename##_service BeeHiveDATA(BeehiveServices) = "{ \""#servicename"\" : \""#impl"\"}";
BeeHiveDATA又是一个宏:
#define BeeHiveDATA(sectname) __attribute((used, section("__DATA,"#sectname" ")))
最终BeeHiveService宏会在预编译结束会完全展开成下面的样子:
char * kHomeServiceProtocol_service __attribute((used, section("__DATA,""BeehiveServices"" "))) = "{ \"""HomeServiceProtocol""\" : \"""BHViewController""\"}";
这里类比注册Module,也是把数据存在特殊的段内,具体原理上面已经分析过了,这里不再赘述。
同理,通过调用static函数BHReadConfiguration,我们就可以拿到之前注册到BeehiveServices特殊段里面的各个Protocol协议对应Class字典的字符串。
"{ \"HomeServiceProtocol\" : \"BHViewController\"}"
数组里面存的都是这样的一些Json字符串。
+ (NSArray<NSString *> *)AnnotationServices
{
    static NSArray<NSString *> *services = nil;
    static dispatch_once_t onceToken;
    dispatch_once(&onceToken, ^{
        services = BHReadConfiguration(BeehiveServiceSectName);
    });
    return services;
}
这是一个单例数组,里面装的都是之前放在特殊段里面的Protocol协议对应Class字典的字符串数组,即为Json字符串数组。
拿到这个数组以后,就可以注册所有的Protocol协议了。
- (void)registerAnnotationServices
{
    NSArray<NSString *>*services = [BHAnnotation AnnotationServices];

    for (NSString *map in services) {
        NSData *jsonData =  [map dataUsingEncoding:NSUTF8StringEncoding];
        NSError *error = nil;
        id json = [NSJSONSerialization JSONObjectWithData:jsonData options:0 error:&error];
        if (!error) {
            if ([json isKindOfClass:[NSDictionary class]] && [json allKeys].count) {

                NSString *protocol = [json allKeys][0];
                NSString *clsName  = [json allValues][0];

                if (protocol && clsName) {
                    [self registerService:NSProtocolFromString(protocol) implClass:NSClassFromString(clsName)];
                }

            }
        }
    }

}
由于services数组里面存的都是Json字符串,所以先转换成字典,然后再依次取出protocol和className。最后调用registerService:implClass:方法。
- (void)registerService:(Protocol *)service implClass:(Class)implClass
{
    NSParameterAssert(service != nil);
    NSParameterAssert(implClass != nil);

    // impClass 是否遵循了 Protocol 协议
    if (![implClass conformsToProtocol:service] && self.enableException) {
        @throw [NSException exceptionWithName:NSInternalInconsistencyException reason:[NSString stringWithFormat:@"%@ module does not comply with %@ protocol", NSStringFromClass(implClass), NSStringFromProtocol(service)] userInfo:nil];
    }

    // Protocol 协议是否已经注册过了
    if ([self checkValidService:service] && self.enableException) {
        @throw [NSException exceptionWithName:NSInternalInconsistencyException reason:[NSString stringWithFormat:@"%@ protocol has been registed", NSStringFromProtocol(service)] userInfo:nil];
    }

    NSMutableDictionary *serviceInfo = [NSMutableDictionary dictionary];
    [serviceInfo setObject:NSStringFromProtocol(service) forKey:kService];
    [serviceInfo setObject:NSStringFromClass(implClass) forKey:kImpl];

    [self.lock lock];
    [self.allServices addObject:serviceInfo];
    [self.lock unlock];
}
在注册registerService:implClass:之前会有2个检查,一是检查impClass 是否遵循了 Protocol 协议,二是检查Protocol 协议是否已经注册过了。如果有一个检查出现问题,都会抛出异常。
如果检查都过了,那么就加入Key为@"service"的,Value为Protocol的名字,和Key为@“impl”的,Value为Class名字的两个键值对。最后把这个字典存入allServices数组中。
在存储allServices数组的时候,是要加锁的。这里的lock是NSRecursiveLock。防止出现递归引起的线程安全问题。
2. 读取本地Pilst文件
要读取本地的Plist文件之前,需要先设置好路径。
[BHContext shareInstance].serviceConfigName = @"BeeHive.bundle/BHService";
BeeHive所有的配置都可以写在BHContext进行传递。
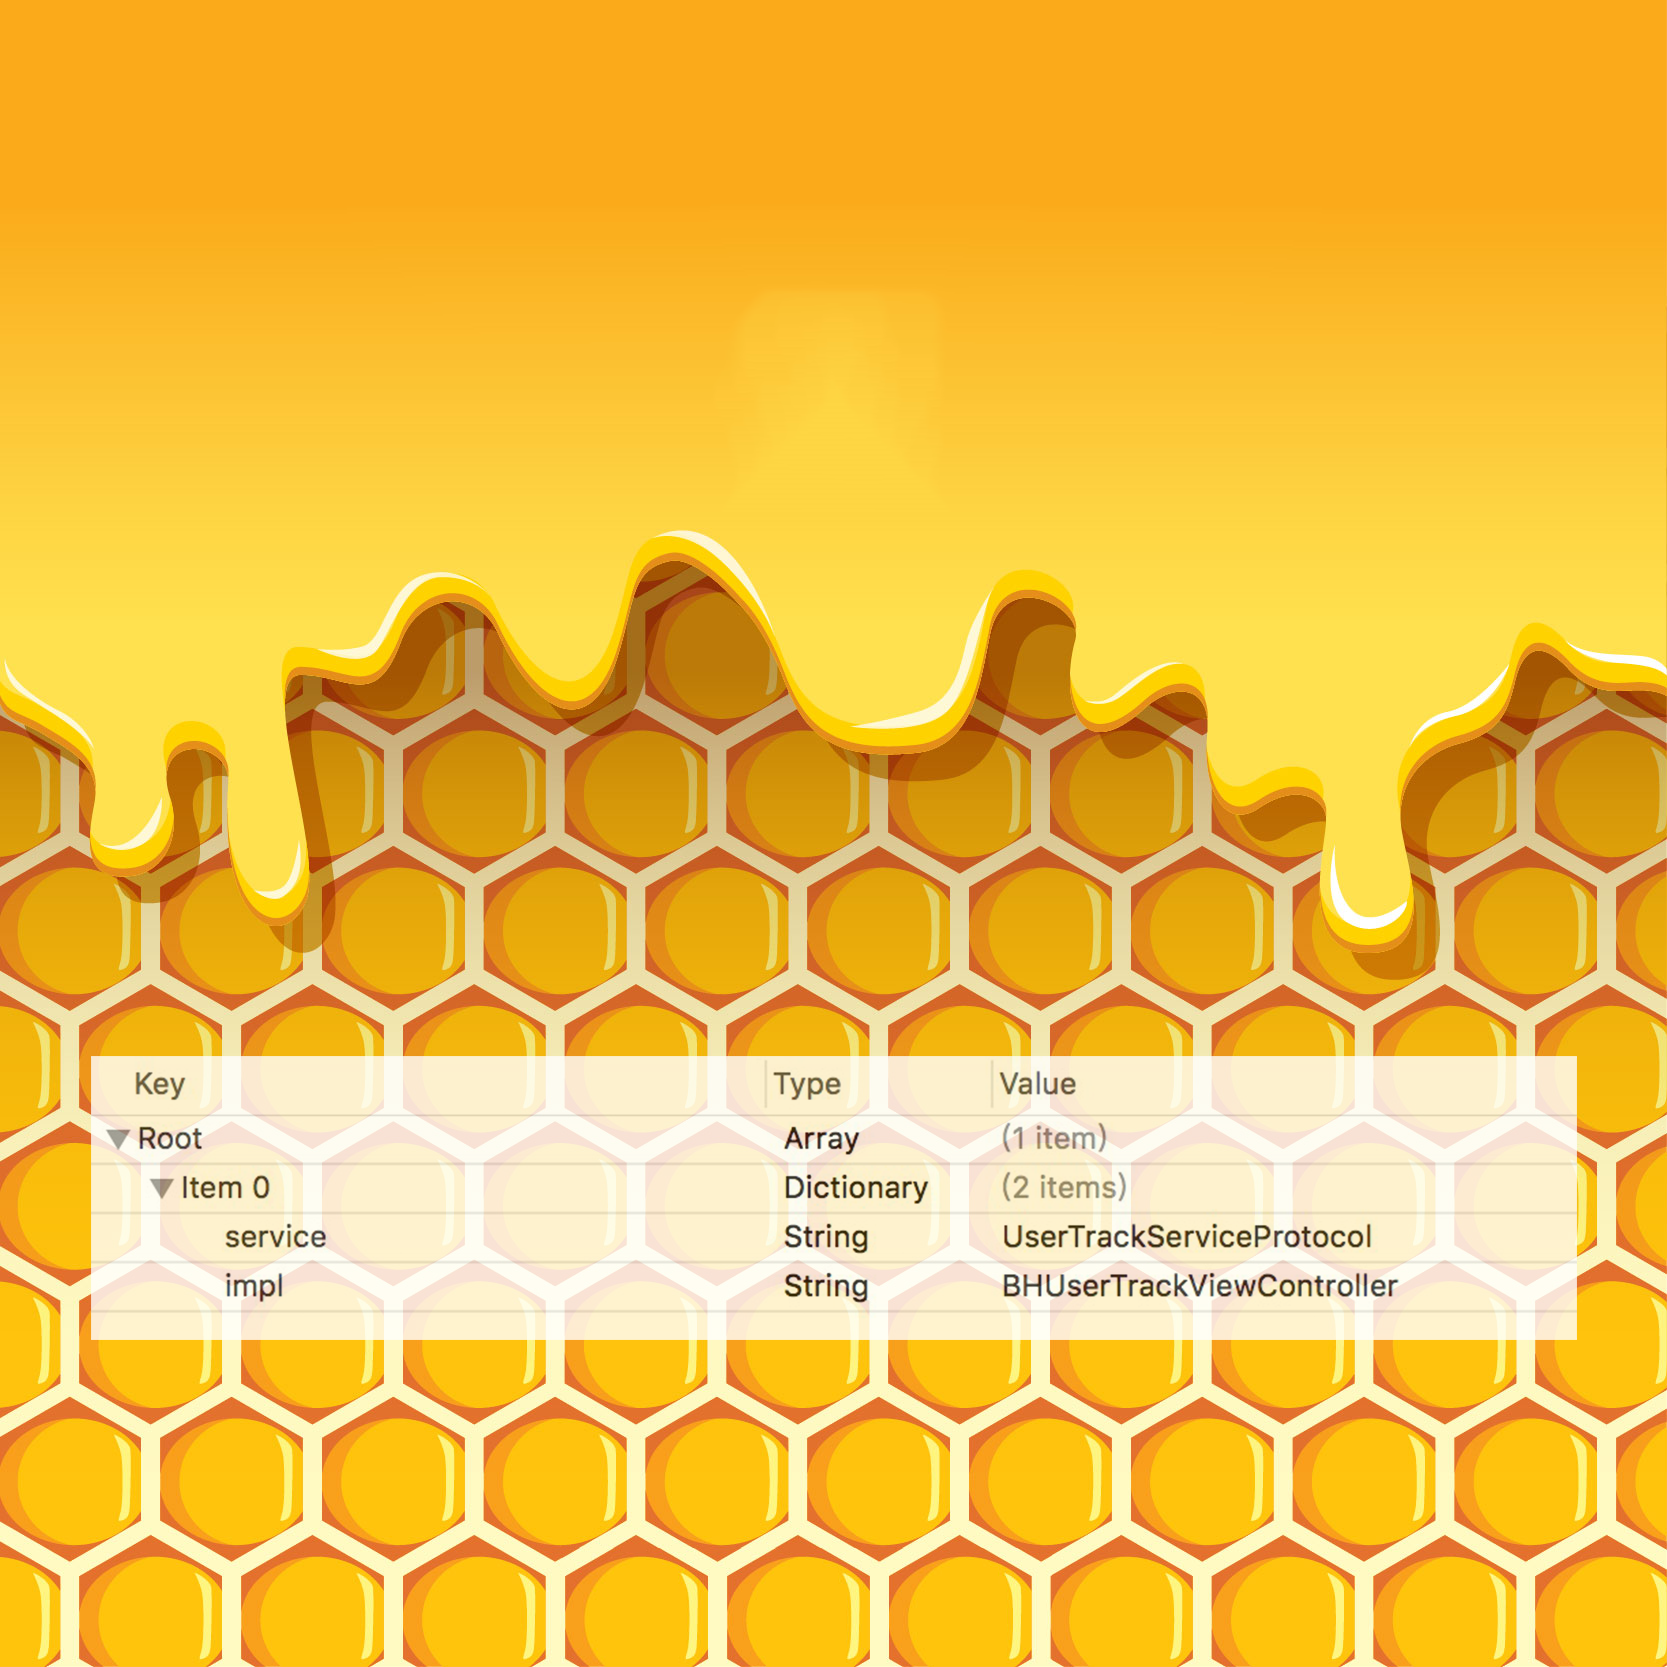
Plist文件的格式也要是数组里面包一个个的字典。字典里面有两个Key,一个是@"service",另一个是@"impl"。
- (void)registerLocalServices
{
    NSString *serviceConfigName = [BHContext shareInstance].serviceConfigName;

    NSString *plistPath = [[NSBundle mainBundle] pathForResource:serviceConfigName ofType:@"plist"];
    if (!plistPath) {
        return;
    }

    NSArray *serviceList = [[NSArray alloc] initWithContentsOfFile:plistPath];

    [self.lock lock];
    [self.allServices addObjectsFromArray:serviceList];
    [self.lock unlock];
}
从Plist里面取出数组,然后把数组加入到allServices数组里面。
3. Load方法注册
最后一种注册Protocol的方法就是在Load方法里面注册Protocol协议。
+ (void)load
{
   [[BeeHive shareInstance] registerService:@protocol(UserTrackServiceProtocol) service:[BHUserTrackViewController class]];
}
调用BeeHive里面的registerService:service:完成Module的注册。
- (void)registerService:(Protocol *)proto service:(Class) serviceClass
{
    [[BHServiceManager sharedManager] registerService:proto implClass:serviceClass];
}
BeeHive里面的registerService:service:的实现还是调用的BHServiceManager的注册方法registerService:implClass:。这个方法上面分析过了,不再赘述。
至此,3种注册Protocol的方式就完成了。
在之前分析注册Module的时候,我们知道在BeeHive在setContext:的时候会调用loadStaticServices方法。
-(void)loadStaticServices
{
    // 是否开启异常检测
    [BHServiceManager sharedManager].enableException = self.enableException;

    // 读取本地plist文件里面的Protocol,并注册到BHServiceManager的allServices数组中
    [[BHServiceManager sharedManager] registerLocalServices];

    // 读取特殊段里面的标记数据,并注册到BHServiceManager的allServices数组中
    [[BHServiceManager sharedManager] registerAnnotationServices];

}
这里虽然我们只看到了两种方式,但是实际上allServices数组里面还会包括通过Load方法注册进来的Protocol。那么allServices数组实际上是包含了3种注册方式加进来的Protocol。
这里就没有注册Module的最后一步初始化实例的过程。
但是Protocol比Module多一个方法,返回能相应Protocol实例对象的方法。
在BeeHive中有这样一个方法,调用这个方法就可以返回一个能相应Protocol的实例对象。
- (id)createService:(Protocol *)proto;

- (id)createService:(Protocol *)proto;
{
    return [[BHServiceManager sharedManager] createService:proto];
}
实质是调用了BHServiceManager的createService:方法。createService:方法具体实现如下:
- (id)createService:(Protocol *)service
{
    id implInstance = nil;

    // Protocol 协议是否已经注册过了
    if (![self checkValidService:service] && self.enableException) {
        @throw [NSException exceptionWithName:NSInternalInconsistencyException reason:[NSString stringWithFormat:@"%@ protocol does not been registed", NSStringFromProtocol(service)] userInfo:nil];
    }

    Class implClass = [self serviceImplClass:service];

    if ([[implClass class] respondsToSelector:@selector(shareInstance)])
        implInstance = [[implClass class] shareInstance];
    else
        implInstance = [[implClass alloc] init];

    if (![implInstance respondsToSelector:@selector(singleton)]) {
        return implInstance;
    }

    NSString *serviceStr = NSStringFromProtocol(service);

    // 是否需要缓存
    if ([implInstance singleton]) {
        id protocol = [[BHContext shareInstance] getServiceInstanceFromServiceName:serviceStr];

        if (protocol) {
            return protocol;
        } else {
            [[BHContext shareInstance] addServiceWithImplInstance:implInstance serviceName:serviceStr];
        }

    } else {
        [[BHContext shareInstance] addServiceWithImplInstance:implInstance serviceName:serviceStr];
    }

    return implInstance;
}
这个方法也会先检查Protocol协议是否是注册过的。然后接着取出字典里面对应的Class,如果实现了shareInstance方法,那么就生成一个单例出来,如果没有,那么就随便生成一个对象出来。如果还实现了singleton,就能进一步的把implInstance和serviceStr对应的加到BHContext的servicesByName字典里面缓存起来。这样就可以随着上下文传递了。
id<UserTrackServiceProtocol> v4 = [[BeeHive shareInstance] createService:@protocol(UserTrackServiceProtocol)];
if ([v4 isKindOfClass:[UIViewController class]]) {
    [self registerViewController:(UIViewController *)v4 title:@"埋点3" iconName:nil];
}
上面是官方给的例子,Module之间的调用就用这种方式,就可以得到很好的解耦了。
五. 其他的一些辅助类
还有一些辅助类,在上面没有提到的,这里就来一个汇总,一起分析了。
BHConfig这也是一个单例,里面保存了一个config的NSMutableDictionary字典。字典维护了一些动态的环境变量,作为BHContext的补充存在。
BHContext也是一个单例,里面有2个NSMutableDictionary字典,一个是modulesByName,另一个是servicesByName。BHContext主要就是用来保存各种上下文环境的。
@interface BHContext : NSObject

//global env
@property(nonatomic, assign) BHEnvironmentType env;

//global config
@property(nonatomic, strong) BHConfig *config;

//application appkey
@property(nonatomic, strong) NSString *appkey;
//customEvent>=1000
@property(nonatomic, assign) NSInteger customEvent;

@property(nonatomic, strong) UIApplication *application;

@property(nonatomic, strong) NSDictionary *launchOptions;

@property(nonatomic, strong) NSString *moduleConfigName;

@property(nonatomic, strong) NSString *serviceConfigName;

//3D-Touch model
#if __IPHONE_OS_VERSION_MAX_ALLOWED > 80400
@property (nonatomic, strong) BHShortcutItem *touchShortcutItem;
#endif

//OpenURL model
@property (nonatomic, strong) BHOpenURLItem *openURLItem;

//Notifications Remote or Local
@property (nonatomic, strong) BHNotificationsItem *notificationsItem;

//user Activity Model
@property (nonatomic, strong) BHUserActivityItem *userActivityItem;

@end
在application:didFinishLaunchingWithOptions:的时候,就可以初始化大量的上下文信息。
    [BHContext shareInstance].application = application;
    [BHContext shareInstance].launchOptions = launchOptions;
    [BHContext shareInstance].moduleConfigName = @"BeeHive.bundle/BeeHive";//可选,默认为BeeHive.bundle/BeeHive.plist
    [BHContext shareInstance].serviceConfigName = @"BeeHive.bundle/BHService";
BHTimeProfiler就是用来进行计算时间性能方面的Profiler。
BHWatchDog是可以开一个线程,设置好handler,每隔一段时间就执行一个handler。

六. 可能还在完善中的功能
BeeHive通过处理Event编写各个业务模块可以实现插件化编程,各业务模块之间没有任何依赖,core与module之间通过event交互,实现了插件隔离。但有时候需要模块间的相互调用某些功能来协同完成功能。
1. 功能还有待完善
通常会有三种形式的接口访问形式:
- 基于接口的实现Service访问方式(Java spring框架实现)
- 基于函数调用约定实现的Export Method(PHP的extension,ReactNative的扩展机制)
- 基于跨应用实现的URL Route模式(iPhone App之间的互访)
BeeHive目前只实现了第一种方式,后两种方式还需要继续完善。
2. 解耦还不够彻底
基于接口Service访问的优点是可以编译时检查发现接口的变更,从而及时修正接口问题。缺点是需要依赖接口定义的头文件,通过模块增加得越多,维护接口定义的也有一定工作量。
3. 设计思路还可以继续改进和优化
BHServiceManager内部维护了一个数组,数组中的一个个字典,Key为@"service"的,Value为Protocol的名字,和Key为@“impl”的,Value为Class名字的两个键值对。与其这样设计,还不如直接使用NSMutableDictionary,Key使用Protocol,Value为Class呢?搜索的时候减少了手动循环过程。
结尾
BeeHive作为阿里开源的一套模块间的解耦方案,思路还是很值得我们学习的。目前版本是v1.2.0,相信在后面的版本迭代更新中,功能会更加的完善,做法会更加的优雅,值得期待!
更新:
有些同学问,宏展开怎么有那么多双引号的问题:
#define BeeHiveMod(name) \
class BeeHive; char * k##name##_mod BeeHiveDATA(BeehiveMods) = ""#name"";

#define BeeHiveService(servicename,impl) \
class BeeHive; char * k##servicename##_service BeeHiveDATA(BeehiveServices) = "{ \""#servicename"\" : \""#impl"\"}";
首先 #在宏里面代表的是把后面连接的转换为字符串。例如,#servicename 就是把 servicename 代替的转换成字符串。再外面一层双引号,是起到了类似占位符的作用,是为了分离开前面双引号。如果直接写 "#servicename" ,你会发现宏进行预编译的时候,并不会把 #servicename 整个当初替换量进行替换,而是把整个双引号括起来的当做一个整的字符串。那这样就达不到我们要替换的目的了。所以需要再加一层双引号,即 "#servicename" 。最后标准的 Json ,每个 key 和 value 都是带双引号的,所以我们外层再加上一层经过转义字符转义后的双引号。于是就得到了最终的样子—— ""#servicename"" 。
于是乎,经过预编译的替换,就会产生下列的结果,很多个双引号。
char * kShopModule_mod __attribute((used, section("__DATA,""BeehiveMods"" "))) = """ShopModule""";
char * kHomeServiceProtocol_service __attribute((used, section("__DATA,""BeehiveServices"" "))) = "{ \"""HomeServiceProtocol""\" : \"""BHViewController""\"}";