前言
Core Data是iOS上一个效率比较高的数据库框架,(但是Core Data并不是一种数据库,它底层还是利用Sqlite3来存储数据的),它可以把数据当成对象来操作,而且开发者并不需要在乎数据在磁盘上面的存储方式。它会把位于NSManagedObject Context里面的托管对象NSManagedObject类的实例或者某个NSManagedObject子类的实例,通过NSManagedObjectModel托管对象模型,把托管对象保存到持久化存储协调器NSPersistentStoreCoordinator持有的一个或者多个持久化存储区中NSPersistentStore中。使用Core Data进行查询的语句都是经过Apple特别优化过的,所以都是效率很高的查询。
当你进行简单的设定,比如说设定某个实体的默认值,设定级联删除的操作,设定数据的验证规则,使用数据的请求模板,这些修改Core Data都会自己完成,不用自己进行数据迁移。那那些操作需要我们进行数据迁移呢?凡是会引起NSManagedObjectModel托管对象模型变化的,都最好进行数据迁移,防止用户升级应用之后就闪退。会引起NSManagedObjectModel托管对象模型变化的有以下几个操作,新增了一张表,新增了一张表里面的一个实体,新增一个实体的一个属性,把一个实体的某个属性迁移到另外一个实体的某个属性里面…………大家应该现在都知道哪些操作需要进行数据迁移了吧。
小技巧:
进入正题之前,我先说3个调试Core Data里面调试可能你会需要的操作。
1.一般打开app沙盒里面的会有三种类型的文件,sqlite,sqlite-shm,sqlite-wal,后面2者是iOS7之后系统会默认开启一个新的“数据库日志记录模式”(database journaling mode)生成的,sqlite-shm是共享内存(Shared Memory)文件,该文件里面会包含一份sqlite-wal文件的索引,系统会自动生成shm文件,所以删除它,下次运行还会生成。sqlite-wal是预写式日志(Write-Ahead Log)文件,这个文件里面会包含尚未提交的数据库事务,所以看见有这个文件了,就代表数据库里面还有还没有处理完的事务需要提交,所以说如果有sqlite-wal文件,再去打开sqlite文件,很可能最近一次数据库操作还没有执行。
所以在调试的时候,我们需要即时的观察数据库的变化,我们就可以先禁用这个日志记录模式,只需要在建立持久化存储区的时候存入一个参数即可。具体代码如下
    NSDictionary *options =
    @{
          NSSQLitePragmasOption: @{@"journal_mode": @"DELETE"}
     };

    NSError *error = nil;
    _store = [_coordinator addPersistentStoreWithType:NSSQLiteStoreType
                                        configuration:nil
                                                  URL:[self storeURL]
                                              options:options error:&error];
2.Mac上打开数据库的方式很多,我推荐3个,一个是Firefox里面直接有sqlite的插件,免费的,可以直接安装,也很方便。当然也有不用Firefox的朋友,就像我是Chrome重度使用者,那就推荐2个免费的小的app,一个是sqlitebrowser,一个是sqlite manager,这2个都比较轻量级,都比较好用。
3.如果你想看看Core Data到底底层是如何优化你的查询语句的,这里有一个方法可以看到。
先点击Product ->Scheme ->Edit Scheme
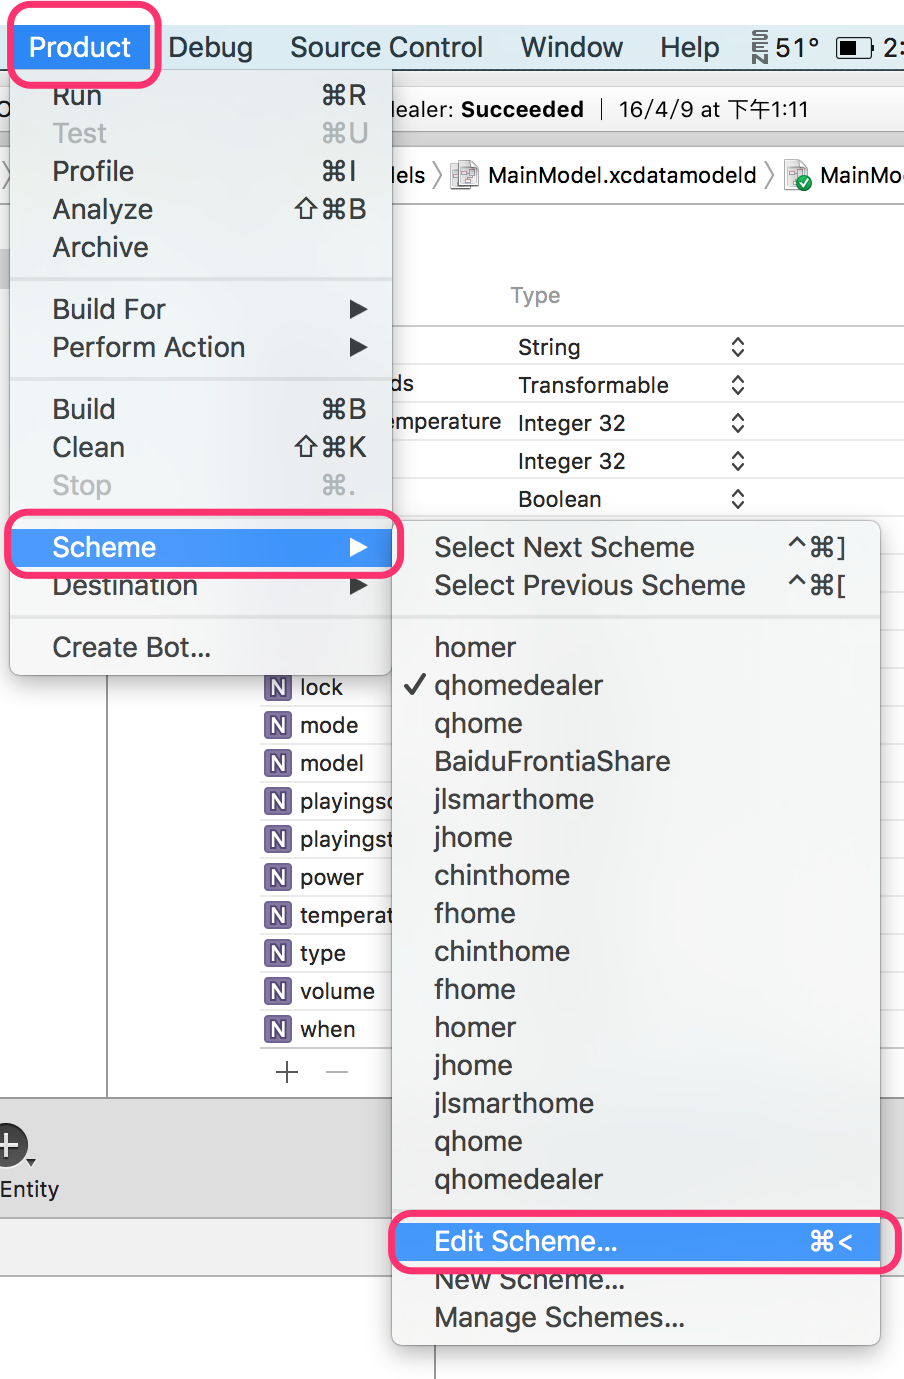
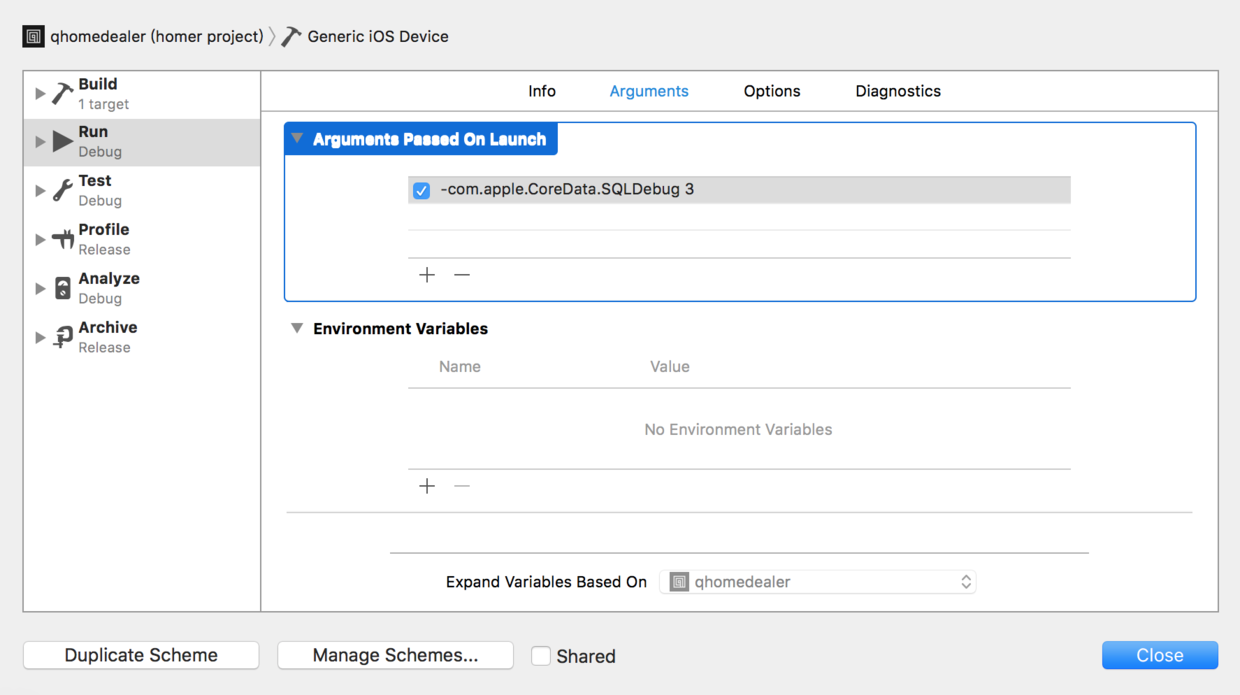
然后再切换到Arguments分页中,在Arguments Passed On Launch里面加入 “- com.apple.CoreData.SQLDebug 3”,重新运行app,下面就会显示Core Data优化过的Sql语句了。
好了,调试信息应该都可以完美显示了,可以开始愉快的进入正文了!
一.Core Data自带的轻量级的数据迁移
这种迁移可别小看它,在你新建一张表的时候还必须加上它才行,否则会出现如下的错误:
**Failed to add store. Error: Error Domain=NSCocoaErrorDomain Code=134100 "(null)" UserInfo={metadata={**
**    NSPersistenceFrameworkVersion = 641;**
**    NSStoreModelVersionHashes =     {**
**        Item = <64288772 72e62096 a8a4914f 83db23c9 13718f81 4417e297 293d0267 79b04acb>;**
**        Measurement = <35717f0e 32cae0d4 57325758 58ed0d11 c16563f2 567dac35 de63d5d8 47849cf7>;**
**    };**
**    NSStoreModelVersionHashesVersion = 3;**
**    NSStoreModelVersionIdentifiers =     (**
**        ""**
**    );**
**    NSStoreType = SQLite;**
**    NSStoreUUID = "9A16746E-0C61-421B-B936-412F0C904FDF";**
**    "_NSAutoVacuumLevel" = 2;**
**}, reason=The model used to open the store is incompatible with the one used to create the store}**
错误原因写的比较清楚了,reason=The model used to open the store is incompatible with the one used to create the store,这个是因为我新建了一张表,但是我没有打开轻量级的迁移Option。这里会有人会问了,我新建表从来没有出现这个错误啊?那是因为你们用的第三方框架就已经写好了改Option了。(场外人:这年头谁还自己从0开始写Core Data啊,肯定都用第三方框架啊)那这里我就当讲解原理了哈。如果是自己从0开始写的Core Data的话,这里是应该会报错了,解决办法当然是加上代码,利用Core Data的轻量级迁移,来防止这种找不到存储区的闪退问题
NSDictionary *options =
    @{
      NSSQLitePragmasOption: @{@"journal_mode": @"DELETE"},
      NSMigratePersistentStoresAutomaticallyOption :@YES,
      NSInferMappingModelAutomaticallyOption:@YES
    };

    NSError *error = nil;
    _store = [_coordinator addPersistentStoreWithType:NSSQLiteStoreType
                                        configuration:nil
                                                  URL:[self storeURL]
                                              options:options error:&error];
这里说一下新增加的2个参数的意义:
NSMigratePersistentStoresAutomaticallyOption = YES,那么Core Data会试着把之前低版本的出现不兼容的持久化存储区迁移到新的模型中,这里的例子里,Core Data就能识别出是新表,就会新建出新表的存储区来,上面就不会报上面的error了。
NSInferMappingModelAutomaticallyOption = YES,这个参数的意义是Core Data会根据自己认为最合理的方式去尝试MappingModel,从源模型实体的某个属性,映射到目标模型实体的某个属性。
接着我们来看看MagicRecord源码是怎么写的,所以大家才能执行一些操作不会出现我上面说的闪退的问题
+ (NSDictionary *) MR_autoMigrationOptions;
{
    // Adding the journalling mode recommended by apple
    NSMutableDictionary *sqliteOptions = [NSMutableDictionary dictionary];
    [sqliteOptions setObject:@"WAL" forKey:@"journal_mode"];

    NSDictionary *options = [NSDictionary dictionaryWithObjectsAndKeys:
                             [NSNumber numberWithBool:YES], NSMigratePersistentStoresAutomaticallyOption,
                             [NSNumber numberWithBool:YES], NSInferMappingModelAutomaticallyOption,
                             sqliteOptions, NSSQLitePragmasOption,
                             nil];
    return options;
}
上面这一段就是MagicRecord源码里面替大家加的Core Data轻量级的数据迁移的保护了,所以大家不写那2个参数,一样不会报错。(题外话:MagicRecord默认这里是开启了WAL日志记录模式了) 此处如果大家注销掉那两个参数,或者把参数的值设置为NO,再运行一次,新建一张表,就会出现我上面提到的错误了。大家可以实践实践,毕竟实践出真知嘛。
只要打开上面2个参数,Core Data就会执行自己的轻量级迁移了,当然,在实体属性迁移时候,用该方式不靠谱,之前我觉得它肯定能推断出来,结果后来还是更新后直接闪退报错了,可能是因为表结构太复杂,超过了它简单推断的能力范围了,所以我建议,在进行复杂的实体属性迁移到另一个属性迁移的时候,不要太相信这种方式,还是最好自己Mapping一次。当然,你要是新建一张表的时候,这2个参数是必须要加上的!!!
二.Core Data手动创建Mapping文件进行迁移
这种方式比前一种方式要更加精细一些,Mapping文件会指定哪个实体的某个属性迁移到哪个实体的某个属性,这比第一种交给Core Data自己去推断要靠谱一些,这种方法直接指定映射!
先说一下,如果复杂的迁移,不加入这个Mapping文件会出现什么样的错误
**Failed to add store. Error: Error Domain=NSCocoaErrorDomain Code=134140 "(null)" UserInfo={destinationModel=(<NSManagedObjectModel: 0x7f82d4935280>) isEditable 0, entities {**
**    Amount = "(<NSEntityDescription: 0x7f82d4931960>) name Amount, managedObjectClassName NSManagedObject, renamingIdentifier Amount, isAbstract 0, superentity name (null), properties {\n    qwe = \"(<NSAttributeDescription: 0x7f82d4930f40>), name qwe, isOptional 1, isTransient 0, entity Amount, renamingIdentifier qwe, validation predicates (\\n), warnings (\\n), versionHashModifier (null)\\n userInfo {\\n}, attributeType 700 , attributeValueClassName NSString, defaultValue (null)\";\n}, subentities {\n}, userInfo {\n}, versionHashModifier (null), uniquenessConstraints (\n)";**
**    Item = "(<NSEntityDescription: 0x7f82d4931a10>) name Item, managedObjectClassName Item, renamingIdentifier Item, isAbstract 0, superentity name (null), properties {\n    collected = \"(<NSAttributeDescription: 0x7f82d4930fd0>), name collected, isOptional 1, isTransient 0, entity Item, renamingIdentifier collected, validation predicates (\\n), warnings (\\n), versionHashModifier (null)\\n userInfo {\\n}, attributeType 800 , attributeValueClassName NSNumber, defaultValue 0\";\n    listed = \"(<NSAttributeDescription: 0x7f82d4931060>), name listed, isOptional 1, isTransient 0, entity Item, renamingIdentifier listed, validation predicates (\\n), warnings (\\n), versionHashModifier (null)\\n userInfo {\\n}, attributeType 800 , attributeValueClassName NSNumber, defaultValue 1\";\n    name = \"(<NSAttributeDescription: 0x7f82d49310f0>), name name, isOptional 1, isTransient 0, entity Item, renamingIdentifier name, validation predicates (\\n), warnings (\\n), versionHashModifier (null)\\n userInfo {\\n}, attributeType 700 , attributeValueClassName NSString, defaultValue New Item\";\n    photoData = \"(<NSAttributeDescription: 0x7f82d4931180>), name photoData, isOptional 1, isTransient 0, entity Item, renamingIdentifier photoData, validation predicates (\\n), warnings (\\n), versionHashModifier (null)\\n userInfo {\\n}, attributeType 1000 , attributeValueClassName NSData, defaultValue (null)\";\n    quantity = \"(<NSAttributeDescription: 0x7f82d4931210>), name quantity, isOptional 1, isTransient 0, entity Item, renamingIdentifier quantity, validation predicates (\\n), warnings (\\n), versionHashModifier (null)\\n userInfo {\\n}, attributeType 600 , attributeValueClassName NSNumber, defaultValue 1\";\n}, subentities {\n}, userInfo {\n}, versionHashModifier (null), uniquenessConstraints (\n)";**
**}, fetch request templates {**
**    Test = "<NSFetchRequest: 0x7f82d49316c0> (entity: Item; predicate: (name CONTAINS \"e\"); sortDescriptors: ((null)); type: NSManagedObjectResultType; )";**
**}, sourceModel=(<NSManagedObjectModel: 0x7f82d488e930>) isEditable 1, entities {**
**    Amount = "(<NSEntityDescription: 0x7f82d488f880>) name Amount, managedObjectClassName NSManagedObject, renamingIdentifier Amount, isAbstract 0, superentity name (null), properties {\n    abc = \"(<NSAttributeDescription: 0x7f82d488f9d0>), name abc, isOptional 1, isTransient 0, entity Amount, renamingIdentifier abc, validation predicates (\\n), warnings (\\n), versionHashModifier (null)\\n userInfo {\\n}, attributeType 700 , attributeValueClassName NSString, defaultValue (null)\";\n}, subentities {\n}, userInfo {\n}, versionHashModifier (null), uniquenessConstraints (\n)";**
**    Item = "(<NSEntityDescription: 0x7f82d488fbe0>) name Item, managedObjectClassName NSManagedObject, renamingIdentifier Item, isAbstract 0, superentity name (null), properties {\n    collected = \"(<NSAttributeDescription: 0x7f82d48901c0>), name collected, isOptional 1, isTransient 0, entity Item, renamingIdentifier collected, validation predicates (\\n), warnings (\\n), versionHashModifier (null)\\n userInfo {\\n}, attributeType 800 , attributeValueClassName NSNumber, defaultValue 0\";\n    listed = \"(<NSAttributeDescription: 0x7f82d488fd20>), name listed, isOptional 1, isTransient 0, entity Item, renamingIdentifier listed, validation predicates (\\n), warnings (\\n), versionHashModifier (null)\\n userInfo {\\n}, attributeType 800 , attributeValueClassName NSNumber, defaultValue 1\";\n    name = \"(<NSAttributeDescription: 0x7f82d488fdb0>), name name, isOptional 1, isTransient 0, entity Item, renamingIdentifier name, validation predicates (\\n), warnings (\\n), versionHashModifier (null)\\n userInfo {\\n}, attributeType 700 , attributeValueClassName NSString, defaultValue New Item\";\n    photoData = \"(<NSAttributeDescription: 0x7f82d488fad0>), name photoData, isOptional 1, isTransient 0, entity Item, renamingIdentifier photoData, validation predicates (\\n), warnings (\\n), versionHashModifier (null)\\n userInfo {\\n}, attributeType 1000 , attributeValueClassName NSData, defaultValue (null)\";\n    quantity = \"(<NSAttributeDescription: 0x7f82d488fc90>), name quantity, isOptional 1, isTransient 0, entity Item, renamingIdentifier quantity, validation predicates (\\n), warnings (\\n), versionHashModifier (null)\\n userInfo {\\n}, attributeType 600 , attributeValueClassName NSNumber, defaultValue 1\";\n}, subentities {\n}, userInfo {\n}, versionHashModifier (null), uniquenessConstraints (\n)";**
**}, fetch request templates {**
**    Test = "<NSFetchRequest: 0x7f82d488fa60> (entity: Item; predicate: (name CONTAINS \"e\"); sortDescriptors: ((null)); type: NSManagedObjectResultType; )";**
**}, reason=Can't find mapping model for migration}**
直接看最后一行错误的原因Can't find mapping model for migration,这直接说出了错误的原因,那么接下来我们就创建一个Mapping Model文件。
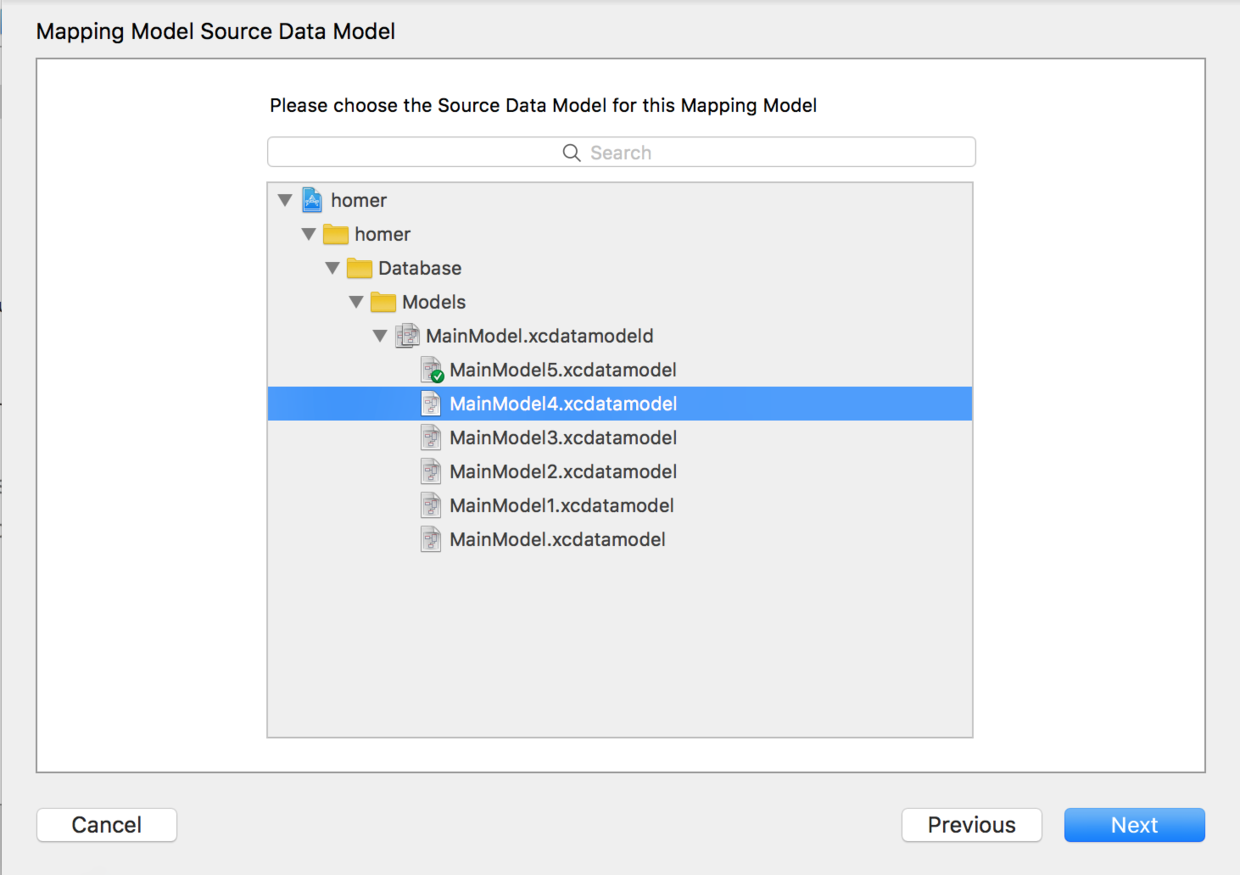
在你xcdatamodeld相同的文件夹目录下,“New File” ->"Core Data"->"Mapping Model"

选择需要Mapping的源数据库
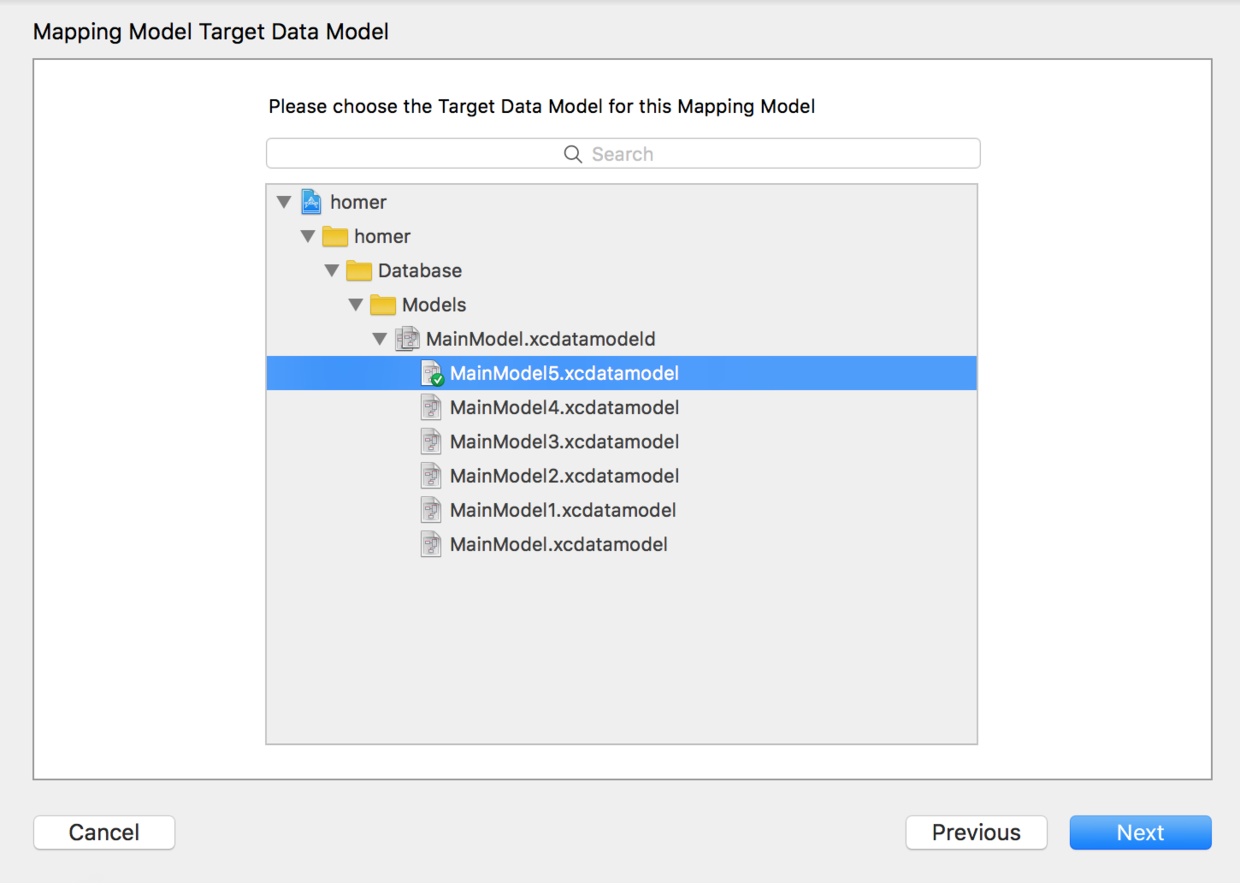
再选择目标数据库
接着命名一下Mapping Model文件的名字
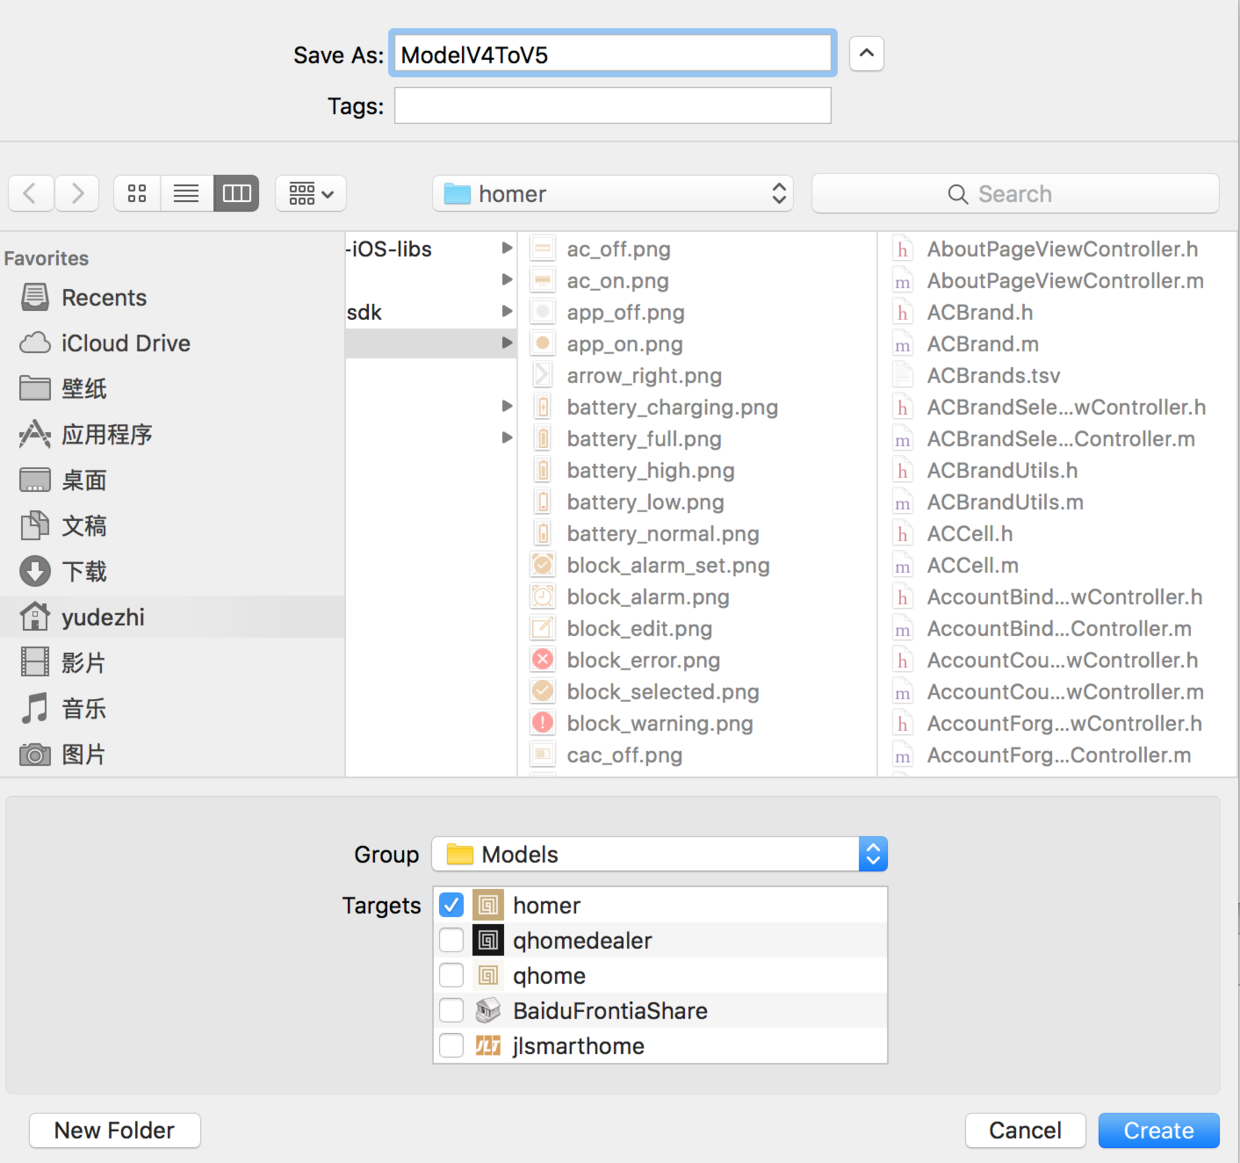
这里说明一下,名字最好能一眼看上去就能区分出是哪个数据库的版本升级上来的,这里我写的就是ModelV4ToV5,这样一看就知道是V4到V5的升级。
这里说明一下Mapping文件的重要性,首先,每个版本的数据库之间都最好能加上一个Mapping文件,这样从低版本的数据库升级上来,可以保证每个版本都不会出错,都不会导致用户升级之后就出现闪退的问题。
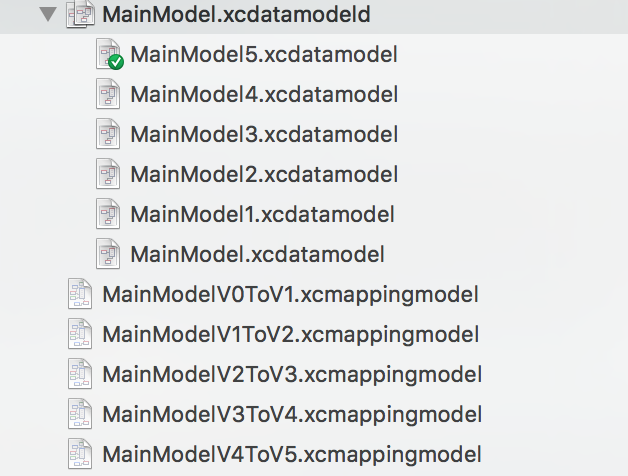
比如上图,每个数据库之间都会对应一个Mapping文件,V0ToV1,V1ToV2,V2ToV3,V3ToV4,V4ToV5,每个Mapping都必须要。
试想,如果用户实在V3的老版本上,由于appstore的更新规则,每次更新都直接更新到最新,那么用户更新之后就会直接到V5,如果缺少了中间的V3ToV4,V4ToV5,中的任意一个,那么V3的用户都无法升级到V5上来,都会闪退。所以这里就看出了每个版本之间都要加上Mapping文件的重要性了。这样任意低版本的用户,任何时刻都可以通过Mapping文件,随意升级到最新版,而且不会闪退了!
接下来再说说Mapping文件打开是些什么东西。

Mapping文件打开对应的就是Source源实体属性,迁移到Target目标实体属性的映射,上面是属性,下面是关系的映射。$source就是代表的源实体
写到这里,就可以很清楚的区分一下到目前为止,Core Data轻量级迁移和手动创建Mapping进行迁移,这2种方法的异同点了。我简单总结一下:
1.Core Data轻量级迁移是适用于添加新表,添加新的实体,添加新的实体属性,等简单的,系统能自己推断出来的迁移方式。
2.手动创建Mapping适用于更加复杂的数据迁移
举个例子吧,假设我最初有一张很抽象的表,叫Object表,用来存储东西的一些属性,里面假设有name,width,height。突然我有一天有新需求了,需要在Object表里面新增几个字段,比如说colour,weight等,由于这个都是简单的新增,不涉及到数据的转移,这时候用轻量级迁移就可以了。
不过突然有一个程序又有新需求了,需要增加2张表,一个是Human表,一个是Animal表,需要把当初抽象定义的Object表更加具体化。这时就需要把Object里面的人都抽出来,放到新建的Human表里,动物也都抽出来放到新建的Animal表里。由于新建的2张表都会有name属性,如果这个时候进行轻量级的迁移,系统可能推断不出到底哪些name要到Human表里,哪里要Animal表了。再者,还有一些属性在Human表里面有,在Animal表里面没有。这是时候就必须手动添加一个Mapping Model文件了,手动指定哪些属性是源实体的属性,应该映射到目标实体的哪个属性上面去。这种更加精细的迁移方式,就只能用手动添加Mapping Model来完成了,毕竟iOS系统不知道你的需求和想法。
三.通过代码实现数据迁移
这个通过代码进行迁移主要是在数据迁移过程中,如果你还想做一些什么其他事情,比如说你想清理一下垃圾数据,实时展示数据迁移的进度,等等,那就需要在这里来实现了。
首先,我们需要检查一下该存储区存不存在,再把存储区里面的model metadata进行比较,检查一下是否兼容,如果不能兼容,那么就需要我们进行数据迁移了。
- (BOOL)isMigrationNecessaryForStore:(NSURL*)storeUrl
{
    NSLog(@"Running %@ '%@'", self.class, NSStringFromSelector(_cmd));

    if (![[NSFileManager defaultManager] fileExistsAtPath:[self storeURL].path])
    {
        NSLog(@"SKIPPED MIGRATION: Source database missing.");
        return NO;
    }

    NSError *error = nil;
    NSDictionary *sourceMetadata =
    [NSPersistentStoreCoordinator metadataForPersistentStoreOfType:NSSQLiteStoreType
                                                               URL:storeUrl error:&error];
    NSManagedObjectModel *destinationModel = _coordinator.managedObjectModel;

    if ([destinationModel isConfiguration:nil compatibleWithStoreMetadata:sourceMetadata])
    {
        NSLog(@"SKIPPED MIGRATION: Source is already compatible");
        return NO;
    }

    return YES;
}
当上面函数返回YES,我们就需要合并了,那接下来就是下面的函数了
- (BOOL)migrateStore:(NSURL*)sourceStore {

    NSLog(@"Running %@ '%@'", self.class, NSStringFromSelector(_cmd));
    BOOL success = NO;
    NSError *error = nil;

    // STEP 1 - 收集 Source源实体, Destination目标实体 和 Mapping Model文件
    NSDictionary *sourceMetadata = [NSPersistentStoreCoordinator
                                    metadataForPersistentStoreOfType:NSSQLiteStoreType
                                    URL:sourceStore
                                    error:&error];

    NSManagedObjectModel *sourceModel =
    [NSManagedObjectModel mergedModelFromBundles:nil
                                forStoreMetadata:sourceMetadata];

    NSManagedObjectModel *destinModel = _model;

    NSMappingModel *mappingModel =
    [NSMappingModel mappingModelFromBundles:nil
                             forSourceModel:sourceModel
                           destinationModel:destinModel];

    // STEP 2 - 开始执行 migration合并, 前提是 mapping model 不是空,或者存在
    if (mappingModel) {
        NSError *error = nil;
        NSMigrationManager *migrationManager =
        [[NSMigrationManager alloc] initWithSourceModel:sourceModel
                                       destinationModel:destinModel];
        [migrationManager addObserver:self
                           forKeyPath:@"migrationProgress"
                              options:NSKeyValueObservingOptionNew
                              context:NULL];

        NSURL *destinStore =
        [[self applicationStoresDirectory]
         URLByAppendingPathComponent:@"Temp.sqlite"];

        success =
        [migrationManager migrateStoreFromURL:sourceStore
                                         type:NSSQLiteStoreType options:nil
                             withMappingModel:mappingModel
                             toDestinationURL:destinStore
                              destinationType:NSSQLiteStoreType
                           destinationOptions:nil
                                        error:&error];
        if (success)
        {
            // STEP 3 - 用新的migrated store替换老的store
            if ([self replaceStore:sourceStore withStore:destinStore])
            {
                NSLog(@"SUCCESSFULLY MIGRATED %@ to the Current Model",
                          sourceStore.path);
                [migrationManager removeObserver:self
                                      forKeyPath:@"migrationProgress"];
            }
        }
        else
        {
            NSLog(@"FAILED MIGRATION: %@",error);
        }
    }
    else
    {
        NSLog(@"FAILED MIGRATION: Mapping Model is null");
    }

    return YES; // migration已经完成
}
上面的函数中,如果迁移进度有变化,会通过观察者,observeValueForKeyPath来告诉用户进度,这里可以监听该进度,如果没有完成,可以来禁止用户执行某些操作
- (void)observeValueForKeyPath:(NSString *)keyPath
                      ofObject:(id)object
                        change:(NSDictionary *)change
                       context:(void *)context {

    if ([keyPath isEqualToString:@"migrationProgress"]) {

        dispatch_async(dispatch_get_main_queue(), ^{

            float progress =
            [[change objectForKey:NSKeyValueChangeNewKey] floatValue];

            int percentage = progress * 100;
            NSString *string =
            [NSString stringWithFormat:@"Migration Progress: %i%%",
             percentage];
            NSLog(@"%@",string);

        });
    }
}
当然,这个合并数据迁移的操作肯定是用一个多线程异步的执行,免得造成用户界面卡顿,再加入下面的方法,我们来异步执行
- (void)performBackgroundManagedMigrationForStore:(NSURL*)storeURL
{
    NSLog(@"Running %@ '%@'", self.class, NSStringFromSelector(_cmd));

    dispatch_async(
                   dispatch_get_global_queue( DISPATCH_QUEUE_PRIORITY_BACKGROUND, 0), ^{
                       BOOL done = [self migrateStore:storeURL];
                       if(done) {
                           dispatch_async(dispatch_get_main_queue(), ^{
                               NSError *error = nil;
                               _store =
                               [_coordinator addPersistentStoreWithType:NSSQLiteStoreType
                                                          configuration:nil
                                                                    URL:[self storeURL]
                                                                options:nil
                                                                  error:&error];
                               if (!_store) {
                                   NSLog(@"Failed to add a migrated store. Error: %@",
                                         error);abort();}
                               else {
                                   NSLog(@"Successfully added a migrated store: %@",
                                         _store);}
                           });
                       }
                   });
}
到这里,数据迁移都完成了,不过目前还有一个问题就是,我们应该何时去执行该迁移的操作,更新完毕之后?appDelegate一进来?都不好,最好的方法还是在把当前存储区添加到coordinator之前,我们就执行好数据迁移!
- (void)loadStore
{
    NSLog(@"Running %@ '%@'", self.class, NSStringFromSelector(_cmd));

    if (_store) {return;} // 不要再次加载了,因为已经加载过了

    BOOL useMigrationManager = NO;
    if (useMigrationManager &&
        [self isMigrationNecessaryForStore:[self storeURL]])
    {
        [self performBackgroundManagedMigrationForStore:[self storeURL]];
    }
    else
    {
        NSDictionary *options =
        @{
          NSMigratePersistentStoresAutomaticallyOption:@YES
          ,NSInferMappingModelAutomaticallyOption:@YES
          ,NSSQLitePragmasOption: @{@"journal_mode": @"DELETE"}
          };
        NSError *error = nil;
        _store = [_coordinator addPersistentStoreWithType:NSSQLiteStoreType
                                            configuration:nil
                                                      URL:[self storeURL]
                                                  options:options
                                                    error:&error];
        if (!_store)
        {
            NSLog(@"Failed to add store. Error: %@", error);abort();
        }
        else
        {
            NSLog(@"Successfully added store: %@", _store);
        }
    }

}
这样就完成了数据迁移了,并且还能显示出迁移进度,在迁移中还可以自定义一些操作,比如说清理垃圾数据,删除一些不用的表,等等。
结束
好了,到此,Core Data数据迁移的几种方式我就和大家分享完了,如果文中有不对的地方,欢迎大家提出来,我们一起交流进步!


